Quantcast
Channel: Fly Nerf: The Blog'O Nerf
Viewing all 96 articles
Browse latest View live

RECON INTEMAGRATION

$
0
0
This is a mod I did with a hornet shell that was broken and a recon I had laying around. This is Aukman by the way and I actually did all the work this time. this is an updated mod on an old post I found on the interwebz. Old Post on Nerf Mods & Reviews. I chose to single it.


First Rainbow Catch

$
0
0
Hi guys, there isn't very much to say about this rainbow catch other than it is the first one that I have made. You could probably have known that it is my first one anyway because of the cuts.


I tested this with a small plunger rod and piece of PVC so it definitely works even though it looks bad. I'm going to break the page because there are three more pictures.

I expect that my next rainbow catches will get nicer as I get better with my scroll saw, but with a catch it is function over form. As you may notice, there is an extra hole that I drilled in it. That was just because I wasn't really paying attention.


What an ugly piece! (Hey, it works)


There you have it, my rainbow catch.

Hmmmm...

$
0
0
I have one more post for today. I was looking at acnerfshop's sale and I saw this picture:


That Stampede looks pretty familiar... the pump placement, shell, tank, and hopper idea are all very familiar *cough* here's the link *cough*

Commissions

The One Day Pumpsnap

$
0
0
Behold, the one day pumpsnap. That's right. I built it in one day, well less than a day but that doesn't matter. I think you could have figured that out yourself though considering what it looks like. Before I go into a long and boring story like I usually do, I will just talk about the basics. It is a pumpsnap 3.0 with a K26 spring in it. I wasn't originally going to post this because of the looks but I really wanted to prove that I actually made one.

There is no doubt that this is the ugliest pumpsnap ever built. Just look at those slots that I didn't even try to make clean, look at those sharpie marks all over the body. Look at that horrible 2" PVC pump slide. That pump slide is made with 2" PVC because I didn't feel like buying expensive 1.5" thinwall for a one day project. I word of advice: don't cut 2" PVC with a scroll saw. The arm on the saw bumps the PVC and because the pipe is too big, one of my scroll saw blades melted into it. I just couldn't cut the pipe steadily. There's my excuse for the slide. The sharpie marks are there because I don't want to clean the body of a one day pumpsnap. The slots, well to be honest, I didn't really try on them. I could make them look nicer but I don't see the point in that. The handle looks weird but it is surprisingly confortable.
Even though it is incredibly bad looking, it performs very well. I don't have official ranges but with a hopper and slugs it gets the same ranges as my snapbow. The seal isn't 100% but it is still very good and it catches very well.


I really made this pumpsnap just to prove that I can. If you ever commission me for one, I would actually take my time on it and make it look amazing. The slide would be thinwall PVC and the slots would be a lot nicer. There's my pumpsnap!

iModify's Rainbow Catch

$
0
0
Here's the rainbow catch that I made for iMod. There isn't really much to say other than the fact that it's a a rainbow catch.


It's a lot cleaner than my first rainbow catch which means i'm getting better.


I use this setup to test rainbow catches It is just a small piece of 1.25" PVC and delrin rod and it's pretty nice because I don't have to screw in the rainbow catch to test it. I hope you're happy with the catch, iMod.

Rainbow

$
0
0
My brother has always wanted a primary to use, but he just can't prime a K26 to full compression. Even if I were to make a snap with a shorter K26, he would still have trouble with it. That is why I decided to make a rainbow. With a rainbow, I can put the catch notch anywhere that I want so I can use a K26 without making it have full (or near) compression.                        


Rainbows are kind of like Snapbows except they are a little longer and use a rainbow catch. I used a rubber washer as a plunger head instead of a skirt seal because skirt seals are so expensive. The washer is working pretty well but I still need to work on the seal because it isn't very good. The main challenge of this blaster was using opaque PVC instead of clear. Clear PVC is very expensive and I didn't want to buy more of it for a basic rainbow. In the writeup for the rainbow, it tells you to use clear PVC because drilling into polycarbonate through opaque PVC is a bad idea. I kind of agree with the write up but I eventually got a method to drilling into the catch. You can look at the picture below and see the holes I made by missing the catch.


The holes aren't really a big deal because the rest of the blaster is pretty clean. It only features about 5-5.5" of draw on it because I wanted my brother to be able to prime it. I don't have measured ranges but it doesn't get far off my Snapbow's ranges with a hopper. It is really easy and comfortable to pull back with the polycarbonate pull. It is even easier to pull back than my Rainbow pistol. The blaster also includes a very nicely sanded handle for extra comfort. Overall, this is a very nice blaster.

Five Polycarbonate Nitefinder Catches

$
0
0
Sorry I haven't posted lately; I haven't had anything to post. Anyways, I made five polycarbonate Nitefinder catches for charlie.156 on Nerf Revolution. They don't look super clean, but a catch doesn't need to look good. They are made of 1/4" polycarbonate and I had to dremel the sides of each one in order to make them fit in the blaster itself.


Polycarbonate Nitefinder catches are great when you are using a very strong spring in your blaster. They are especially useful when making a Nitefinder Rifle because your catch wont break. I charger $2 each for these and you can find more information on the commissions page.


PVC Check Valve

$
0
0
Here's a video that I found on youtube that shows you how to make a check valve out of PVC parts. Even though it is kind of bulky, it could be very useful for pumps without check valves or if your check valve breaks. I highly recommend taking a look at this video.

No more blaster commissions :(

$
0
0
Here's a quick boring post to tell you that I will no longer be accepting blaster commissions. That means no homemades or modifying stock blasters. This was not my personal choice to not accept blaster commissions anymore, I just can't. However, I can still do other things. I can do custom handles, rainbow handles with a trigger and other things. Commissions are still open, there just isn't as much stuff. I would still love for people to commission me!

+Bow!

$
0
0
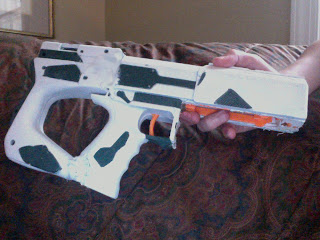
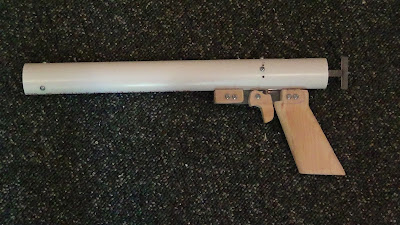
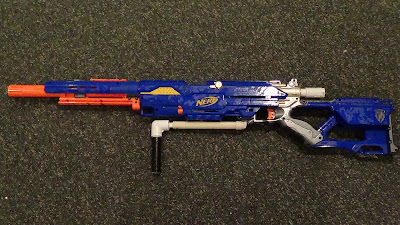
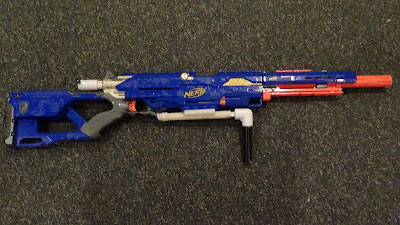
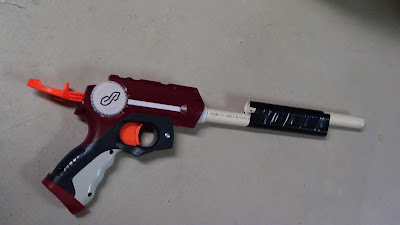
I finished this about three days ago and I kept forgetting to post it. This is obviously my +bow.


There are going to be a lot of pictures and words, so I am breaking the page.

I have to admit it, the reason that I bought a scroll saw was to make a +bow. It wasn't to make a RBpistol or even cut parts, it was to make a +bow. Ever since I started modding, I have thought that +bows are the coolest home mades ever. +bows look so advanced and professional even when they are made poorly making them super awesome. When I started modding, I never thought that I would build a +bow (especially one year after I started). It turns out that I did build a +bow and let me tell you, it is my favorite thing that I have ever made.


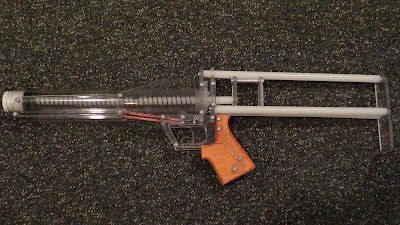
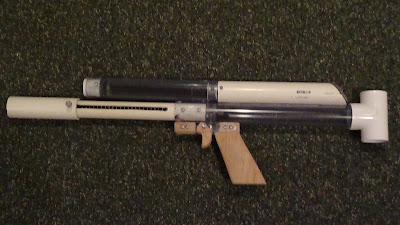
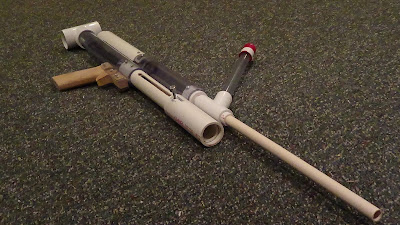
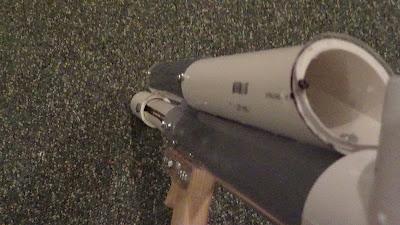
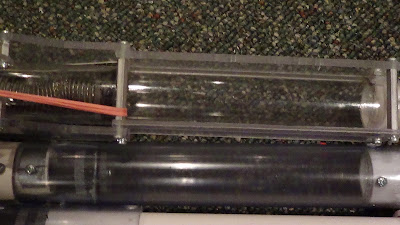
The pictures didn't turn out very well, but I think I have enough of them to show all of the parts. Before I show more pictures, here is a list of the features and parts or the blaster:
- 3/16" side plates (better and thicker than 1/8")
- Wooden handle
-White nylon rods
- Circular plunger rod with three notches
- Skirt seal
- Rubber band attached to trigger


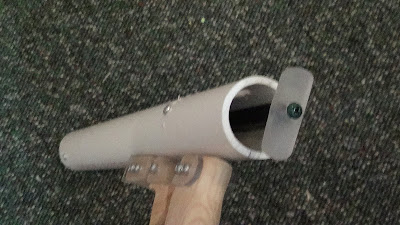
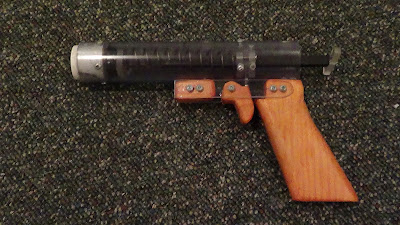
Using a wooden handle on a +bow is a very good idea. It doesn't cut into your hand like polycarbonate and it looks nicer. My handle is still not rounded because that takes a long time to do and dremeling the edges will suffice for a while. All of the plastic that touches my hands was dremeled with a sanding drum so it doesn't hurt. The rubber band on the trigger is also a very nice edition because it makes the trigger have a better feel.


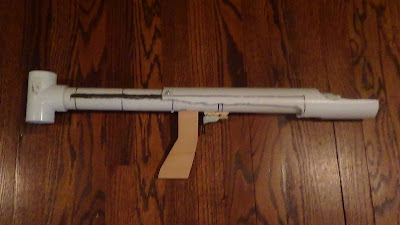
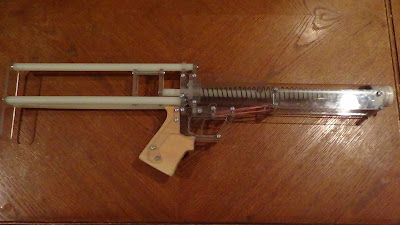
The pull back is pretty self explanatory but I dremeled the edges of the piece that I pull because it was hurting.


The stock piece is cut very well and is made of 3/16" polycarbonate to make it stronger.


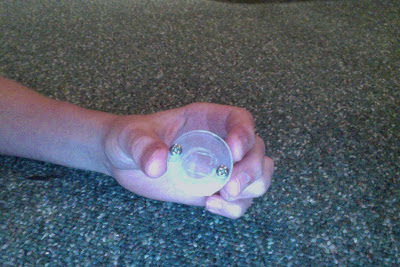
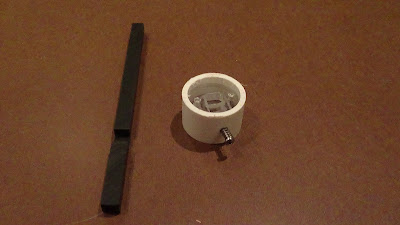
The bushing is really the only bad part about the blaster. I originally had it taped in very tightly with packing tape, but the packing tape started tearing so I had to goop it in. Even if you goop in the bushing, you can still take the blaster apart. I also had to drill a larger hole than normal for the long screw to make the screw go to the other side. This caused a massive air leak and I fixed it a little bit with goop. The blaster still has a very mediocre seal, but I can't do anything about it. It is my first +bow and I did pretty well with everything other than that.


I didn't go with single side plates because my piece of polycarbonate wasn't big enough to fit them. I even tried positioning the templates diagonally and they didn't fit. I also chose to go with a non-sanded look because the clear plastic goes very well with the color of the handle and the nylon rods. Everyone I have showed the blaster to agrees with me on that. I used a circular plunger rod because there are no problems with it rotating due to the pull-back design. Cutting three notches in the rod was also kind of cool but it really has no point because people use hoppers now.


Overall, this +bow is the best thing I have ever made and I have enough parts to make another. I might end up making a pumpbow or papbow someday too. I'm going to end up owning a lot of +bows because I can't sell them, but who cares? +BOWS ARE DA BOMB!!!!!!!!!!

Sales Page Updated!

PVC Pump

$
0
0
Sorry for no original content recently, I ran out of materials and I just ordered more to make stuff. Though I have already posted one video made by this guy, I think it is necessary to post this one.

I have found that there hasn't been much success in the NIC when it comes to making homemade pumps. Most modders have PVC around so I figured this design is perfect to apply to air blasters. There are other pump tutorials out there on Youtube, but this is by far the best and most reliable looking one. I really want to see someone try this on a blaster to see if it works.

Rainbow PAC

$
0
0
Here is my Rainbow PAC. Just incase you don't know, PAC stands for Pump Action Crossbow. I originally didn't plan to make this blaster, but I have been waiting for my 2-11 parts to ship and iMod made a snap version. I figured that this would be a quick and fun project considering I had most of the parts.


You probably saw that one of the slots isn't very good. It is the same on the other side, and they are so horrible (better than my pumpsnap's) because I messed up while cutting them with my scroll saw. Luckily, with this design the cleanliness of slots doesn't matter.


As I said before, I had most of the parts t build it. The bow arms and front tee are from my broken AAbow and I just had a rainbow catch laying around. Because of this, it was a pretty quick build. Putting a rainbow catch in PVC also isn't that much harder than putting it in clear PVC, which saved me money. For the priming piece, I used 2" PVC because it works very well on this. It also has an extremely smooth, quiet, and easy prime making it have a super high ROF.


The ranges were about 80' flat with and 8 dart hopper and slugs. That is pretty good considering I only have it at about 5" of draw and the arms aren't tensioned very much. The arms do look tensioned though because they wiggle in the PVC. Increasing the draw will be as easy as adding another catch notch.


There's the size of it compared to my +bow, showing the huge size of the bow arms. The size of this is really the only down side. Other than that, it has a super high ROF and great ranges for 5" of draw.

Update: My tapping bit broke so I have to find or order one to continue making my 2-11.

Longstrike-3K

$
0
0
The Longstrike is a blaster that doesn't deserve it's own shell. The shell makes it look like a sniper rifle even though it is the opposite of that. How can you "snipe" someone with ranges of 20' flat? You can't. I wanted my Longstrike to live up to it's full potential.


At first, I considered making rainbow internals for this. At that point in time, I didn't have any experience with rainbows so that would have been a big challenge. I then wanted to let is still accept clips and use a 3K tank. I decided to go along with BBV's design to use an air tank. Let me tell you, it is a great design until you come to the trigger system. I didn't really want to mess around with the trigger so I went with a different design.

I saw this Longstrike 3K design on Nerf Revolution and it is really awesome. It uses an RSCB system inside of it giving it a large ammo capacity.  Instead of using a tee in the RSCB, it uses a wye because it fits in the shell very well. I decided to replicate it because I had the materials and it seemed fun.


It was a very fun mod and it turned out very well. Here is the list of mods and features:
- Pump from broken 2K
- Air tank positioned below the "N" in the Nerf logo
- Minimal tubing
- 11 dart RSCB
- End cap coupler thing with a screw in it for easy removal
- 9" barrel
I went with a 9" barrel because it seemed like the ideal length. It gives off ranges of about 95' flat for the first half of the darts and about 85' for the rest. This is using 1.25" slugs at 8-10 pumps.


As you can see, you can remove the fake barrel and it exposes the real one. I was never one to think that scopes on a Nerf gun actually work but a Longshot scope on this was incredibly accurate. Of course, you can just aim with the scope. You have to line it up with the barrel for it to be accurate, but it let me hit a cup from 30' away! This mod made the Longstrike live up to it's shell and it works very well.

2-11

$
0
0
Today I have a 2-11. The 2-11 is known as the successor to the +bow, but it is not nearly as popular. You may wonder why it isn't as popular as the +bow especially because it is less expensive to make. Throughout this post, I will tell you some reasons why it isn't as popular.


The 2-11 features 4.25" of draw (Captain Slug says it's 4.5 even though it isn't), an optional pump action grip, an omni-directional catch, and less polycarb to cut that the +bow. Even though the draw is shorter than a +bow's, it has more air volume due to its 2" plunger tube. These features make the 2-11 seem like a perfect blaster, but there are flaws. The first flaw is that it doesn't look as nice as a +bow. This is probably because there are no side plates. The next flaw is actually how hard it is to prime. Because of the 4.5" draw length, you would think it is easier to prime than a +bow. It is actually harder to prime. I think this is because you get no momentum before compressing the spring to nearly full compression. This also means that the pump action is pretty hard to use, even though I found a way to use the pump action. 


The 2-11 doesn't look very stable. I thought this before I built it, but I was surprised when it turned out to be very stable. It doesn't feel like it will ever fall apart. However, it the write up captain slug uses 3/8" screws for most parts. These screws are too short for anything though. After going through 1/4" polycarb, there is only 1/8" of thread left to attach parts together. If you used 3/8" screws for attaching all of the parts, the blaster would not be stable. If you want to build one of these I highly recommend using 1/2" screws because they work very well.


The 2-11 looks very nice even though it doesn't look as nice as the +bow. I have been bashing it the whole time even though it is a very nice blaster. I think the main problem with the blaster is the write up. I had to change a lot of things from the write up because the write up has problems. 
Here is a list of the problems and their solutions:
- 3/8" screws are too short, use 1/2"
- 1 1/4" screw is too short, use  1 1/2"
- Don't use the rubber washer seal! I still have that seal and it creates a vacuum when you use a hopper. It also has a lot of friction when pulling back the plunger. Instead, use a skirt seal. I will put up the part # when I find it.
- There are many useless holes that the templates have you drill. I might edit the templates to get ris of the holes.
I actually really like the 2-11. I have tested the ranges singled and it gets +bow ranges. The pump action priming is hard but you can use two hands or get used to it. I can't currently use a hopper because of the vacuum problem, but once I switch to a skirt seal it will be great. The 2-11 is also pretty cheap compared to the +bow. If you want, you can opt to use 2" PVC instead of 2" polycarb which cuts the price a lot. You can also buy screws in the amount you need instead of buying 100 of each from McMaster. Overall, the 2-11 is a cheaper solution to the +bow and the only reason it isn't as popular is because the write up has flaws.


Stained Handles

$
0
0
100th post! This post isn't very special for the 100th post, but I stained the handles of my +bow and Rainbow Pistol. I think the stain makes them look completed.


I also rounded the handle on my +bow a little bit more so it is supa-comfy.


These are probably the two main blasters that I would use at a war and they look very nice. Hopefully I can get one more project in before the summer ends.

Double Rainbow

$
0
0
As you can see, it goes all the way.


Let me just start off by saying that the double rainbow is an amazing design. You don't need any obscure materials like 1.5" thinwall PVC, you can have as much draw as you want, and it wont murder your face! The double rainbow can be built in any design you want. The only requirement is that the plunger tube and spring/catch are separate. 


This double rainbow is also very special because it is the first rainbow catch that I cut entirely with my scroll saw. I didn't use a hole saw to cut out any parts. Surprisingly, the circles turned out almost perfectly and the catch lines up in PVC better than the hole-saw-cut ones.


The design that I went with on this is based off of Modman712's (based off of NoM's). This design uses two sections of clear PVC and two sections of opaque. I did change the design a bit though. I went with a PVC tee for the stock and cut the top opaque PVC diagonally then put polycarb over it. I will be changing the stock into an elbow with and endcap because it will give the blaster a better look. 


I was a little bit hesitant to build one of these at first because they don't look very stable. I can assure you that this is one of the most stable blasters that I have ever built. Everything is also mechanically fastened, making it easy to take apart for maintenance. This thing is also extremely comfy. I think it is because I'm not worried about my face getting cut up from the plunger rod and that priming is very smooth. Not only is it super comfy, but it is shorter than a +bow or pumpsnap/rainbowpump when you put a hopper in it.


I took a picture of the spring with the 1" PVC off of the blaster to show that the spring gets full compression. Because of the K26 getting full compression, this blaster gets amazing ranges. It is getting the same (if not higher) ranges of my +bow. I think it might be getting better ranges than my +bow because it has a nearly perfect seal and full compression.


You can see that the double rainbow is getting a little bit more draw than my +bow which might also explain the amazing performance. I only have a few more things to do with my double rainbow to make it completely finished. I am going to paint the opaque PVC, get a shorter bolt for priming, and stain the handle. After that, it will compete for being my primary against my +bow. I can't emphasize enough how awesome double rainbows are and if you are between building one of these or a rainbow pump, build the double rainbow.

This is my last project of the summer, but that doesn't mean I will stop making new things. I definitely won't be able to post as frequently even though I will still be working on stuff. I have a blaster planned for the NerfHaven homemade write up contest but other than that, I have nothing else. What do you think I should build next?

Nitefinder

$
0
0
I want to start off by saying that i'm sorry I haven't posted for a while. I just started school and I don't have as much time to work on blasters (and I ran out of money over the summer). The amount of posts will slow down, but I will try to find a way to make up for that. Anyways, here is my Super Nitefinder!


The only reason I call it a super Nitefinder is because I drew a super s on the white circle parts. They were looking plain so I just drew them. 
Mods:
- Minimal draw extension (the plunger head just sits farther forward in the plunger tube)
- Minimization
- CPVC coupler
- Standoff to reinforce shell
- Super cool paint job
- Polycarbonate catch
- Seal improved
- Part of a K26
- Upgraded catch spring
Look at that horrible accidental sharpie dot!


I mainly did this Nitefinder because I wanted to try to paint something. Other than my crappy Maverick paint job and my Snapbow, I haven't painted anything. I think for my first-ish paint job this turned out pretty well. I didn't think that the orange would fit, but it actually did.


This Nitefinder is hitting the same ranges as my RBpistol which is really awesome. The only problem is that it has more difficult prime and less air volume. I'm not worried about this breaking either because the coupler is secured with a screw and the polycarbonate catch is super strong. Not only that but I added a standoff in front of the trigger for supa-stability. The only thing I have left to do on this is fill in the front gap somehow and then I am done.

What should I do?

$
0
0
Since school has started, I obviously can't make as many projects. I don't want to make shameless filler posts like this, so what should I do? I could do speculations, reviews, news, or anything else that you can think of. I could also post my ideas, concepts, and even make tutorials for how I do things. I can do anything involving Nerf or foam dart blasters that you can think of. I really want to make you readers happy and that is why I am asking you. Like I have said a million times, I do have projects coming up, they will just take a while. Please leave your thoughts in the comments about what I should do.

Viewing all 96 articles
Browse latest View live