Quantcast
Channel: Fly Nerf: The Blog'O Nerf
Viewing all 96 articles
Browse latest View live

Extreme Air Max 1 Review

$
0
0
The Buzz Bee Panther was an extremely popular blaster in the NIC and it still is. The problem is that most stores never carried them. There is an even bigger problem now because the Panther seems to be discontinued. I couldn't find the Panther at Walmart, Target, or even ToysRUs. All of them are the Air Max one. I'm not saying that you still can't find a Panther at one of those stores, but Buzz Bee is moving towards the Air Max one.


What is wrong with the Air Max 1? Here is the list of the changes:
- Tank reduced to half the size (about the size of a hornet tank)
- Pump shaft is smaller
- Relocated Over Pressure Release valve
You may think that these features don't matter if you don't plan on modding this blaster, let me tell you, they do. Because of these changes, the stock range of this blaster is about 20' less than a Panther. Most Panthers got around 45' flat and I measured this to get about 25' flat. 25' flat might might not seem bad because most nerf pistols before the Elite line got that range. The problem is that the rate of fire is slowed dramatically. It takes 3 pumps to fill the tank and shoot, when in that time you could have probably fired all 6 darts out of a Maverick. Are there any reasons to buy this blaster?


As you can see above, there is an extreme Buzz Bee dart. These darts are the best foam darts that you can buy. The foam is super dense and rigid making the darts super durable. Not only that, but they are way more accurate than Elite Darts. With the Air Max 1, you get 6 of these darts. The blaster costs $5 at most stores so you are basically getting 6 amazing darts and a mediocre pistol for that price.


Should you buy the Air Max 1? I say you shouldn't. The range and rate of fire on it are pretty bad and the only good part is the darts. Now when I say you shouldn't buy it, I was talking specifically to people who don't plan on modding. If you are planning on modding it, I would definitely try it out. The air tank may be half the size, but it still has potential. Expect to see a mod guide soon.


Air Max 1 Mod Guide

$
0
0
It's seems that some people are having trouble modifying their new Air Max 1's. Here is a mod guide that will make your AM1 (as I will now call it) super awesome.


I just want to be clear and say that all of the directions will be above the pictures. In some write ups, they change that throughout and I don't want that to happen.

Tools:
- Dremel with cutting wheel
- Glue gun
- Hobby knife

Materials:
- Hot glue
- Solvent weld that works for ABS and PVC
- Super glue
- Baking soda (not needed, but will definitely help)
- Vinyl tubing 3/16" ID (I like the aquarium tubing kind)
- 3/4" to 1/2" PVC bushing


Take your AM1 and unscrew it (I bet you couldn't have guessed that!).


Next, take your dremel cutting wheel and cut across like this. Do the same cut on the bottom of the shell too.


Here's a picture of what your internals should look like. Some blasters might look a little bit different on the inside, but that's ok.


Here's the tank compared to a Hornet tank. They are almost exactly the same size.


Now take your air tank off of the other parts. It should be very easy considering it is held on by an o-ring.


Cut the barrel off with your cutting wheel like this. Leave some room for the bushing to glue on to. It is very important that you don't get any plastic in the little hole or your tank will be ruined!


There's a measurement of the tank when it is cut.


Next, fill in the dead space with hot glue. Don't get hot glue in the hole either!


Now mark where you want to cut the shell. You don't have to mark it exactly where I did, you just need to make sure the bushing fits.


Now cut the shell with your dremel! I recommend taking out the other internals before doing this though.


You are going to want to cut the black plastic tubing and make it look like the second picture. You will want to save the o-ring that connects into the tank.


Take your section of vinyl tubing (3" will do) and super glue one end into the hole. If it doesn't fit, take your hobby knife and carve the hole until it is big enough. You should put the super glue around the tubing before gluing it in so you don't get any air leaks. You can also dip this in baking soda and it hardens instantly. 
Now put all of your internals in the shell and measure where you should cut the tubing. Make sure the tubing goes into the tank though.
Once you cut the tubing, take the o-ring from your old plastic tubing and super glue it on to the tubing. Make sure air wont be able to leak through it.
Set that aside and get out your air tank and bushing. You are going to prepare these for solvent welding. There is sand paper there because I was originally planning on using epoxy.
There is a picture of your solvent welding supplies. You don't need cleaner/primer, but it makes the plastic bond perfectly.


Solvent weld the bushing to the tank. If you don't know how to do this, google how to solvent weld PVC.
Super glue your vinyl tubing into the tank. Baking soda is your friend here again because it will make sure there will be no air leaks.
That's what your whole internal setup should look like. Some of you might need to plug the pump in your blaster. To do this, put hot glue on the front of the pump and press down on the glue. If your pump head is flat plastic, you don't need to do that.
Put hot glue on the shell where the picture shows and quickly put you internals inside.
Next you want to glue the bushing into the shell. Fill in all of the space between the shell and the bushing with hot glue. The picture isn't great, but if you look to the side of the bushing you should be able to see. You really want the bushing to be super secure.
Screw your shell back together and your AM1 is ready to use. With 8-12 pumps, a ~5" CPVC barrel, and slugs this gets the same ranges as my rainbow pistol. It isn't as far as the old panthers, but it shoots very well and would make a very good and cheap secondary. I found that it shoots just as far with 8 pumps as it does with 12 pumps. I'm not sure why this is, but it might not be the same for you. I wouldn't go over 12 pumps because it could blow the tank though.
Have fun with your AM1!

HDPE Rainbow Catch

$
0
0
I've had a ton of school work recently, but I had some spare time and I made this rainbow catch.

It is made of a HDPE cutting board that my family was done using. This catch was made as an experiment more than for anything useful. I honestly didn't think that HDPE would be able to make a stable catch, but it has proved me wrong. I tested the catch with my RB catch tester and it was very strong. I haven't used it in a blaster yet even though I expect it to work very well with a K26. 


The whole catch was cut with a scroll saw other that the circular hole which was cut with a drill. I was very surprised that this material was harder to cut than polycarbonate because it is a much softer plastic. When I say it is harder to cut, I just mean it takes longer to cut. Don't let that discourage you from trying to use this material as a catch because it is much cheaper and more accessible than polycarbonate. However, if you make a catch out of this and it breaks in a blaster, don't blame me. I plan on using this catch as soon as I can and I will make a post about how it holds up. Leave your opinions on this catch in the comments!

Name a Price!

$
0
0
I am in the need of some money, so you can ignore the prices on the sales page. Just name a price for anything on the sales page and I will tell you if it is ok. I might be putting some more stuff on the page too in order to get more money. I also have a bunch of random springs, so if you need a specific spring, ask me and I might have it. Remember that you are helping to fund new projects by buying things on the sales page!

Reverse-inverse Bullpup

$
0
0
IT IS THE FLY NERF 1 YEAR ANNIVERSARY!!!!!!!!!!!!!!! A year ago I started this blog and I had no idea that I would be making homemades of my own design. Heck, a year ago I was modifying Mavericks!

Onto the blaster, bullpups have always interested me, but I don't like the way that some of them work. They usually require a weird plunger rod setup and stuff like that. However, I was very interested when Makeitgo made his Reverse-Inverse (I'm keeping my blog clean and not saying the name) bullpup blaster. The problem was that I didn't have enough skill to build something like that when I first saw it. Over the past couple months, I read the writeup multiple times and looked over andtheherois's PVC version. I developed a strong grasp on the mechanism it used and I realized that their blasters were overly complicated.

I used the Paint program on my computer to plan out a blaster and I eventually made  a design. This is how it turned out:


It was the most difficult blaster that I have made because I made the measurements and design all by myself. Of course I had MIG and andtheherois's blasters for reference, but they can only help so much.
Parts and Features
- Pump action with close to 7" of draw!
- Bullpup
- HAMP-able
- Heavily modified 1" rainbow catch
- K26
- U-Cup seal
- Omni-directional catch with PETG plunger sheath
- 27.5" long
- Custom trigger


When the blaster is de-primed, it is 27.5" long. My original goal was to make it shorter, but I messed up with some measurements and it became longer. That is ok because I plan on making another version. 27.5" long with the barrel is still very good though because a double rainbow with a barrel is 40.5" long.


Here is the trigger that I made for it. It is nothing special and it does its job very well. This activates the 1" diameter rainbow catch that was a pain to make. It was very hard to make the catch actually function while still making it fit in the 1" PVC and making it be able to slide. My only complaint about this blaster is that you can't de-prime it. You have to plug the barrel and slide the slide all the way forward for it to "de-prime"
As you can see, the compression on the spring is almost perfect because it isn't full but it almost is. I want to say that you can only use a U-Cup or a skirt seal for this blaster design. This is because The plunger head gets pushed against the front bushing in order to prime. The polycarbonate disc in from of the u-cup is what keeps the plunger head in tact. A normal washer seal will not work! I tried two different variations and both broke.
The pump grip flops around but it is very stable.
Overall, this is a great blaster. It is surprisingly outranging every other homemade that I have including my double rainbow and +bow. I don't really know why this is because it has more dead space but you don't see me complaining. Oh yeah, I forgot to mention that it has a near perfect seal! I'm probably forgetting to say something about this and I will add something if I realize I forgot it.

Tell me what you think of this! Do you want a writeup? What should I name it?

New Video

$
0
0
This is just a video that I made for my new homemade. It is my first overview video so I'm not that good at it yet. Also, I say actually a lot. It also sounds like I say "This hat is using a full K26 spring". I don't know what I was trying to say, but I am just warning you about that error.

Pump-action rainbow

$
0
0
Here is my pump-action rainbow blaster. It was based off of Zorn's FAL-2 and Erfnay's ART. 
I really like looking at people's new homemade designs and I was very interested when Erfnay made his ART. The ART also reminded me of Zorn's FAL-2 on NerfHaven. They both used a plunger tube prime mechanism so I decided to try it out for myself.

Features:
- Unique plunger prime mechanism
- 6" of draw
- Nearly full compressed segment of K26
- Compact design
- U-Cup seal
- HDPE rainbow catch

Another reason that I made this blaster is because I wanted a use for my HDPE rainbow catch. Some people said it would work and some people said it would. I can tell you that both opinions on the catch are right. After firing it a couple times, the front plate of the catch cracked all over. Because the front plate has a total of 6 screws in it though, it is completely stable. This would be very bad in any other blaster, but not this one. The rainbow catch doesn't have to be taken out of this when disassembled so the catch should last.
 there are two different ways to prime this blaster. The first is to pull the plunger tube back and then push it forward. The second way is to push the handle forward and pull it back. If you kind of use both of these methods at the same time, the prime is very easy. I haven't gotten around to making a barrel the proper length for it but with a 16" barrel (that is too long) it is getting very good ranges. The seal on it sucks right now and I need to tweak it and once I do that and get a good barrel for it, I expect it to be on par with all of my other homemades. The rate of fire of it is a bit slower than other pump action blasters because of a moving barrel.

 Overall, I really like this blaster for what it is. I didn't think that I would like it, but I do. I wouldn't choose this over a double rainbow or my bullpup for a war, but that doesn't mean that I don't like it. What do you think of this blaster? What should I name it?


Boring Update (Sorry, I had to make it)

$
0
0
Well, this is a normal boring update. I just want to tell everyone that you probably won't be seeing any new mods or homemades until sometime in January. Hopefully I will be getting some new tools by then and some new blasters. I'm taking this break because I have midterms coming up next week and then the holidays. I am going to be super busy so I won't even be working on anything for a while.

You can still expect to see some posts coming up though. I have a different kind of post planned for later this week and I will hopefully be making a pre-war post about my load out and stuff. Sorry about this boring post, but I felt like it needed to be done. I like to keep my (few) readers updated.

Crossbow (this one is actually real)

$
0
0
I know I have a past of posting about the "crossbow". I made a lame April fools day post about how I smashed one with a hammer and I made my own "crossbow". However, this time I actually have a crossbow.


I saw it go up for a good price so I decided to get it. I have wanted a crossbow ever since I started modding a little over a year ago. I didn't want one because of its rarity, but I have always liked the way it looks. I like how the stock is built into the shell, the nice foregrip, and the hole that lets you see the plunger tube. I could go on all day about how awesome it looks.


Even though the crossbow is super awesome, it has its flaws. When I say flaws, I mean one flaw. That flaw would be the handle. The handle is too square and sometimes it starts making your hand hurt if you use it for a while. This is by no means the worst handle but it isn't the best. I don't intent on keeping this crossbow stock either. I bought it with the plans to mod it and give it a cool paintjob. When I am done with modding it, it will probably be my new favorite blaster. Hopefully I will get to modding it soon!

Update: Now that life isn't so busy and stressful I will be able to work on stuff again. This includes my crossbow and other mods and homemades. I will also be putting some homemades up for sale! I plan on making a rainbowpump (I can't decide which design) and another bullpup. If I really like the rainbowpump, I will sell my double rainbow instead. I am also officially opening up commissions. I will be making another post about commissions soon, but if you want anything just email me.

Blaster Commissions

$
0
0
As some of you may know, I had blaster commissions opened up for a day or two. That didn't work out, but now I am opening commissions and I don't plan on closing them for a long time. Here is a list of the things that you can commission me to make:
- Snapbow
- Snap pistol
- Rainbow
- Rainbow pistol
- Rainbowpump
- Double Rainbow
- Bullpup Rainbow
- Other kind of pump action Rainbow
- Rainbow PAC
- +bow
- L+L
- Any Airtech Blaster
- Any Supermaxx blaster
- Airtank in other shell
- Longshot
- BBB
- Crossbow
- Tornado/Tonado X/2
- Nitefinder
- Panther
- BBBB

Contact
Drev453@gmail.com

For more information on commissions, please visit the commissions page here.


New Posts Coming Soon!

$
0
0
I just want everyone to know that I'm not quitting or anything. I've just been really busy recently and I haven't had time to do much. Here is a list for the posts that you can expect to see:
- Rainbowpump (very soon)
- Rainbow Pistol
- +bow
- Overhauled Crossbow
- UMB Mod
- SM1.5K Mod
- Some kind of integration
- Longstrike with homemade internals?
Thanks for reading.

Rainbow Pistol

$
0
0
Hi everyone! Here is a commission that I finished a few days ago and I just haven't gotten around to posting. It is my second rainbow pistol and it is pretty different from my first one.


The first difference from my first rainbow pistol that you might notice is just the general looks of it. It uses opaque PVC instead of clear, has non-stained handles, and has sanded polycarbonate trigger thingies. My commissioner wanted to keep this on the cheaper side so I made it with opaque PVC and mostly existing materials.


I changed the design of the handle a bit to make the part that attaches to the PVC thicker. This allowed me to make the handle more secure. I also tried a new method of aligning the catch where I drill and tap two holes on the PVC and put screws in. I then put the rainbow catch in and made the screws go in the front part of the catch to hold it steady. I know it sounds confusing, but it worked pretty well. I'm going to keep experimenting with different methods of installing the catch in opaque PVC until I get a perfect method though. Another design change that I made was that I screwed in the block in front of the trigger from the bottom. This gets rid of having another hole in the top of the blaster and makes everything look clean.


Features:
- U-cup seal
- Different handle design
- Polycarbonate pull
- Square plunger rod
- 3" of draw
- 11 coils of a K25 spring


I also made a small RSCB clip for it that works very well. It holds 4 slugs and gets almost singles ranges. I included a 7 dart RSCB tube with it too, but the ranges really suffer when using it. Due to snow, I cannot range test this, though I expect the ranges to be very good. The seal on this pistol is nearly perfect with the u-cup seal and everything functions perfectly. I am very happy with this blaster and I would like to know what you think about it.

Stay tuned for a rainbowpump!

iMod's +bow

$
0
0
Here is my second (and favorite) +bow that I have ever made.


The title says it all, this is iModify's +bow that I made for him. It is very nice and I like it a lot better than my +bow.
Features:
- Tinted polycarb!
- Black nylon rod
- 3/16" sideplates, handle plates, and stock plate
- 1/4" everything else
- 6.5" of draw
- K25 spring with 1/2" spacer
- Comfy handle
- Super smooth use
- Single sideplates


I enjoyed making this +bow because I got to tweak some things that I didn't like about my +bow. For instance, I secured the bushing differently to give it a better seal and I made single sideplates. Single sideplates are much nicer because it makes the blaster feel more stable, looks better, and adds the option to make it into a pumpbow.


The changes I made were very nice, but they did present some challenges. Using 3/16" polycarb for the handle plate things made it hard to fit the handle on the blaster. I actually had to remake two pieces to be wider in order to make the handle fit. The single sideplates also didn't help with fitting on the handle because they have to bend slightly at the bushing. Even though there were some difficulties, they made the +bow much better in the end.


The look of this blaster is just awesome. The tinted polycarb and the black nylon rods look so much cooler than the clear and white color scheme on mine. It also has the single sideplates and much straighter cuts going for it. Like I said in my first +bow post, +bows are amazing and they look amazing too. The seal is not perfect because I can't figure out how to do it on a +bow, but it is still very good. You might be wondering why I only have it at 6.5" of draw. This is because I find 7" of draw on pullbacks sometimes gets annoying and because 7" of draw is uncomfortable on a +bow. You are basically bringing the pull to the stock and it just isn't a good experience. The prime is so smooth and it just feels good to use this blaster. It gets great ranges (better than my +bow) and that would be due to the more draw and a better seal. I wish I could keep this +bow, but I can't. Enjoy the +bow iMod!

I know I keep saying I am going to post the rainbowpump and I will hopefully get around to it soon. I just keep forgetting about posting it.

Rainbowpump

$
0
0
Here is it, the thing that I have neglected to post for a very long time *drumroll please* my rainbowpump!


Let me start off by saying the rainbowpumps are awesome. They are so smooth and just work really well. Granted, I haven't made a quality pumpsnap that would be just as smooth, but I like rainbows better anyways.
Features
- 7" of draw
- K25 spring
- Skirt seal
- Wooden foregrip
- Square plunger rod


I decided that I wanted a rainbowpump before Quertyman made his writeup on NerfHaven. I had already bought the supplies and I was planning on using pumpsnap measurements for it. Luckily, Quertyman released his writeup for one and I used his measurements. If you are thinking about making a rainbowpump, I definitely recommend looking at his writeup here. I did not need to do everything the writeup said because I have already made homemades before, but he did have some really good tips in it (hopefully that didn't come off as being arrogant).

This was one of the best experiences that I have had with making homemades. I finally got all of the right tools for it including a countersink bit and a good dremel cutting disc. This made it so much easier to mount the bushing and catch and to cut out the slots. The slots turned out very nicely and they are probably the best ones that I have made yet. You might have noticed that there are two holes in the trigger/handle sideplates. This is so I can move the trigger depending on how I want it. I can have it be farther away and not move very far forward or I can have it be close and have a short trigger pull. I like having it in the farther hole, but my brother said he likes it better in the close hole. I decided that I wanted a foregrip on this after I discovered that priming the blaster without one is hard to do. I completely forgot that NoM's foregrip design was the same measurements as a Maverick slide so I just made mine by guessing the measurements. It was a stupid move, but it still turned out well. I made it by glueing two pieces of 3/4" wood together and then sanding it down. Sanding things down is so much easier now that I have a belt sander.


This is the most smooth blaster that I have ever used. The combination of the rainbow catch and the smooth and clear plastic tubes just makes it very fun to use. I can empty an 8 dart hopper in record time with this thing. I used a K25 in this one just like in the most recent +bow because I am having problems with K26s scratching the plunger rod. I don't see any changes in range using a K25 so that is good and the ranges are standard primary ranges. The seal is also very good due to the skirt seal. This rainbowpump looks just as good as +bows in my opinion. The clear PVC and polyester look super awesome with the wood and two pieces of opaque PVC. The only bad part about this blaster is that the trigger has an extra hole in it. That was my mistake and it doesn't bother me. I really like this rainbowpump and it is my new go to pump-action primary.

Update

$
0
0
I know updates are really boring and no one reads them, but I think they are better than not posting at all. I am extremely busy right now and I have had no time for anything. I've been at school for 13 hours a day due to sports and other things and I have been overloaded with work. However, in a few weeks I will be on break and I will be able to work on some things that I have been wanting to work on. The first thing is an expanded hornet tank and the second is a UMB tank thing. I can't decide what I am going to do with these yet, but they are going well. I'm even considering putting them in the same blaster. Expect to see those finished in a few weeks.

I am also selling my Double Rainbow and Snapbow. The Double Rainbow is being sold for $80 (feel free to make offers though) and my Snapbow for $35-$40. They both work great and the Snapbow only needs the seal to be tightened. The Snapbow will not include the hopper or barrel. Let me know if you want a barrel or hopper with either of them. Just email me at Drev453@gmail.com, comment below, or pm "Drev" on NerfHaven if you are interested in either of these.


What should I make?

$
0
0
It has come to that time when I can start working on a project. I have a lot of things that I want to do, but  only have time for one.
Options
- Improved bullpup with a writeup
- Expanded hornet tank with homemade shell (mostly pvc and some polycarb)
- UMB tank in a Longstrike or Firefly
- UMB tank and expanded hornet tank in a Longstrike or Firefly
- Crossbow overhaul

Which one should I do? Please let me know in the comments because I can't decide. 

A sneak peek.

$
0
0
It turned out that I didn't have the materials for the crossbow and since I had a limited amount of time, I built this.


I'm not going to give any more details because there is going to be a video and a writeup for it. It is a new version of my bullpup though. Stay tuned!

3d Printer and Kronos Wye

$
0
0
I have a 3d Printer! This means that I can print parts that I need instead of making them all myself. Not only that, but I can print very complex things and things that don't even have to do with Nerf.


This printer is called the Da Vinci 1.0 and it is made by XYZ Printing. I chose this printer for a few reasons:
- Sub $1000 ($500)
- Heated build platform
- 7.8"x7.8"x7.8" build area
- Built in SD card
- LCD Display
- Works out of the box


That's right, this is a $500 3d printer that can do all of those things. This is the best deal for a 3d printer that I have ever seen. Let me tell you, this printer is worth that deal too. So far I have done about 7 prints and only 1 print has failed because it messed up slicing. The printer has great quality prints and it just works well in general.

Printing with support material
You might expect that there has to be something wrong with the printer for it to be so cheap. That would be the proprietary filament cartridges. With these cartridges, you are currently forced to print only in ABS and you end up paying an extra $10 for the filament. I honestly don't mind this because people have already found ways around this that are very easy to do. I actually plan on doing a slight modification to the printer in the future so that I can use any filament. As for only printing in ABS, XYZ is coming out with PLA in Q4 so there is nothing to worry about there.
Here are some things I have printed:
Lego 100 microns


Key Chain 200 microns


Phone Case 200 microns


Kronos Wye 200 microns


Sights 300 microns


As you can see, the printer printed very well for each of the resolutions. I expected I would have to do some calibrating, but it worked right out of the box. Overall, it is a great printer especially for the price. I'm excited to see what else I will be printing in the future.


Now on to the wye review. As many of you know, Kronos Nerf Mods from Nerfhaven and Youtube designed a 3d printable wye. He went through many iterations and this is his newest version. I decided to print it with a 200 micron resolution to see how that went and it worked perfectly. The design is very strong and PVC fits in it perfectly. I had to do some minimal sanding to make the inside smooth, but other than that it required no work. The advantages of using this wye over normal ones are:
- Shallower angle
- Less dead space
- Dart ramp
- I can make it at home!
- Can be printed in color!
I can confirm that these wyes are worth it. Slugs feed very smoothly and the best part is that IT HOPPERS DOMES! All of the domes that I have fired out of it fire flawlessly. This wye is an amazing design and if you ever have the chance to print one, I highly recommend it.

Sorry about the writeup taking so long. I have been very busy as usual. It should be up in the next week or so.

Bullpup V2 Writeup

$
0
0
This writeup isn't finished, but I wanted to post it because it has taken me forever to make it. The only things missing are really the pipe measurements. Please let me know if I am missing anything else or if I need to make any corrections.

Before I start this writeup I need to ask you for some help. This is just the "test writeup" that I'm posting before it goes on NerfHaven. If you can think of a name that is not already used for a bullpup, that would be great. Also, let me know if there are any problems or if I go into too much detail or not enough. Thanks.

Here is the writeup for the bullpup. This blaster does take time to make, but if you have used a scroll saw and a dremel before, you will be fine. Since this blaster involves using those tools, it will be in the +bow category.


Credit:
- The rainbow clan for inventing the rainbow catch
-  Ryan201821 for the Rainbowpump and the handle templates
- Makeitgo for making the Multiple <keeping my blog clean>
- Andtheherois for making the Oltiple Morgasm

Tools:
- Screw Cutter/Mini Bolt Cutter
- Circle templates (little thin plastic thing with shapes to draw)
- A Dremel/Rotary Tool
    - Sanding Drum
    - Cutting disc
- A Scroll Saw
- A Drill
    - 7/64, 5/32, and larger bits
    - A countersink bit
    - 1/2" spade bit
- Tapping wrench
    - 6-32 tapping bit
- A saw that can cut PVC
- Hobby Knife
- A ruler
- A yardstick/long architectural ruler
- Sand paper with sanding block <grit>
- Sanding Sponge <grit>
- Sharpie

Before I start the parts list, I highly recommend buying the 1" and 1.25" PVC from your local hardware store to cut down on shipping costs. However, you can find most of the parts you need at http://www.mcmaster.com/ . I will include the part numbers so you can easily find everything. For screws and other hardware, I am overestimating the amounts so you have extras. In order to find the screws and hardware on McMaster, just type in the info for the screw into the search bar.

- 8538K18: 1/2" nylon rod
- 9637k26: K26 spring
- 4880k44: 1.25” PVC tee
- 4880K21: 1/2" PVC 90º elbow (2x)
- 48925K91: 1/2" PVC Pipe
- 48925K93: 1" PVC Pipe
- 48925K94: 1.25" PVC Pipe
- 4880k314: 1” to ½” PVC reducing bushing
- 9245k51: PETG tube 2” OD 1.75” ID buy 1'.
- 2044T43: 1/2" ID PETG tube. This is the kind used for barrels.
- 8574k281: ¼” polycarbonate sheet 6”x6”
- 9691K56: U-Cup seal 7/8" ID 1-3/8" OD
- 91735A146: 6-32 3/8" panhead machine screws--You need about 20 if you don't buy 50
- 91735A151: 6-32 3/4" panhead machine screws--You need about 8
- 90126A007: #6 Zinc-plated washers


You will also need to purchase from a hardware store:
(Buy more than two of each screw)
-  ¼ 20 machine screw 1” length (2x)
- 10-32 machine screw 1” length (2x)
- 6-32 1.25” machine screw (2x)
- 6-32 1" machine screw (2x)
- 6-32 3/4" flathead machine screw (2x)
- 6-32 locknut (1X)
- Silicone/White Lithium Grease
- Plumber's Goop
- 3/4" thick wood. It doesn't matter what kind, but make sure it isn't too soft. Poplar is great for this.

Not from hardware store of McMaster:
- Maverick/Nitefinder catch spring or any catch spring with a diameter similar to those. You can probably fin a small spring similar to these in a hardware store though.

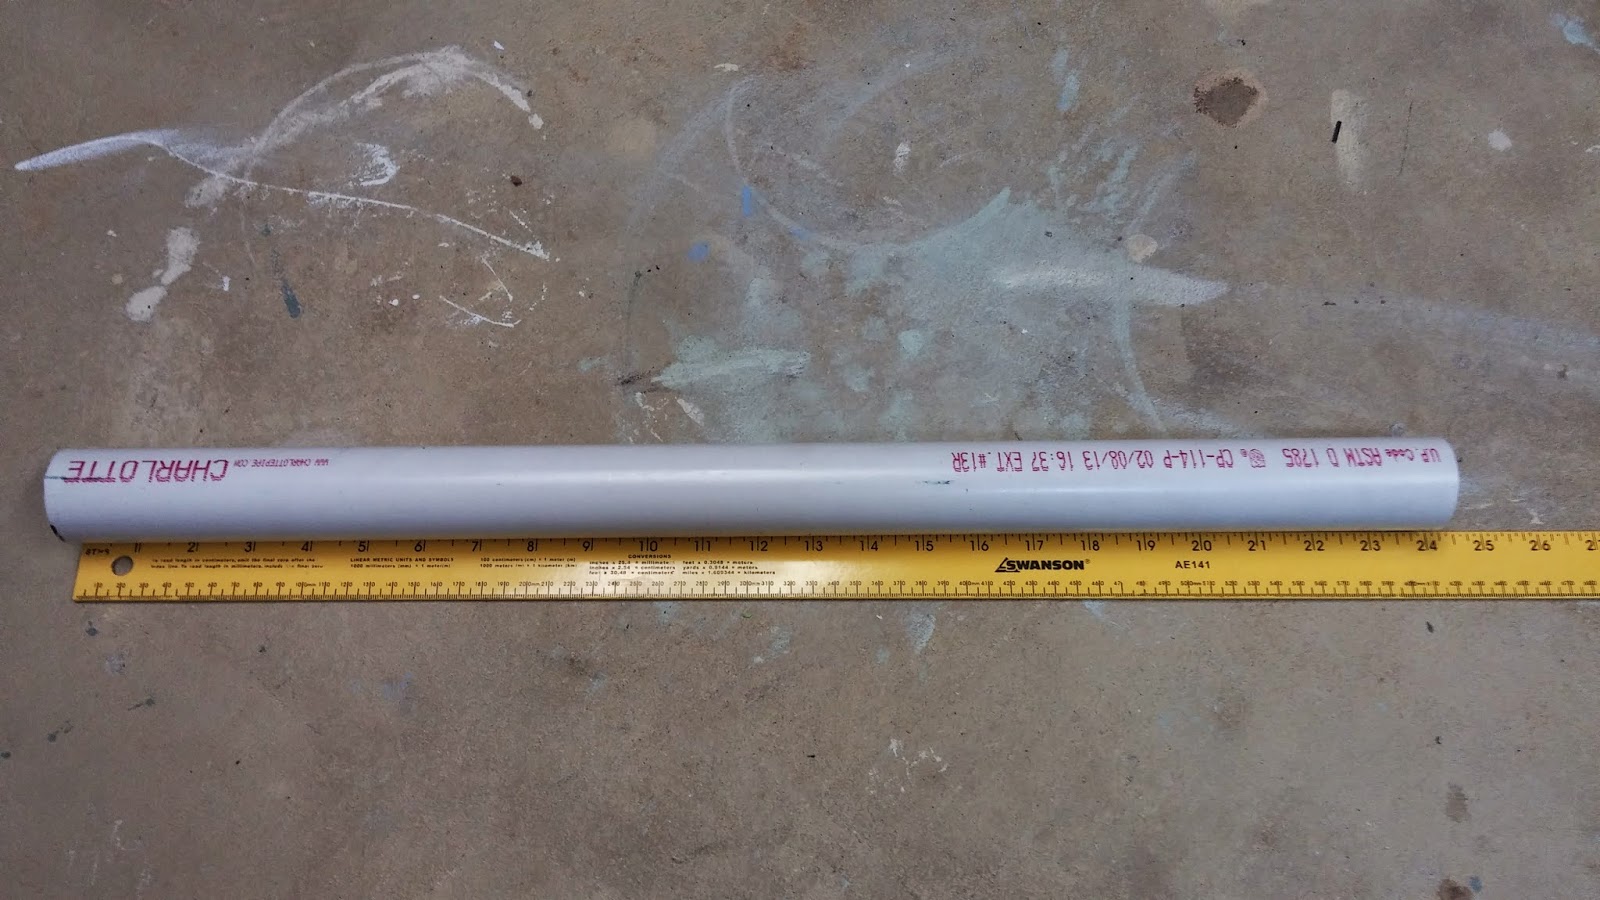
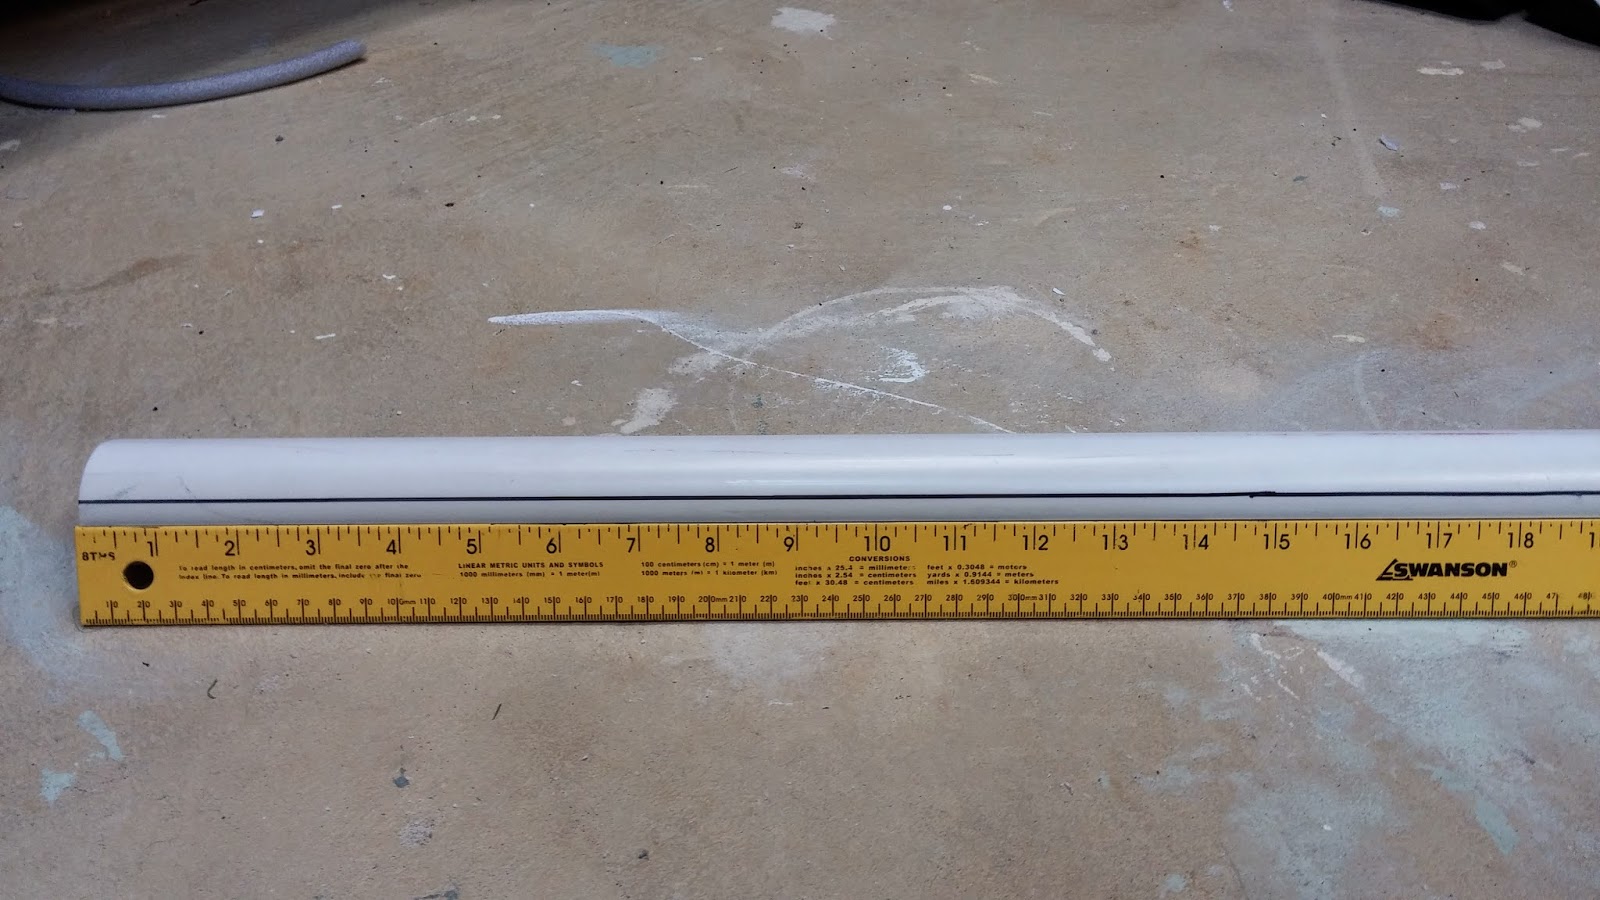
You're going to want to start off by cutting out a 24" length of 1.25" PVC. Use a hacksaw, dremel, or scroll saw to cut it nice and square.


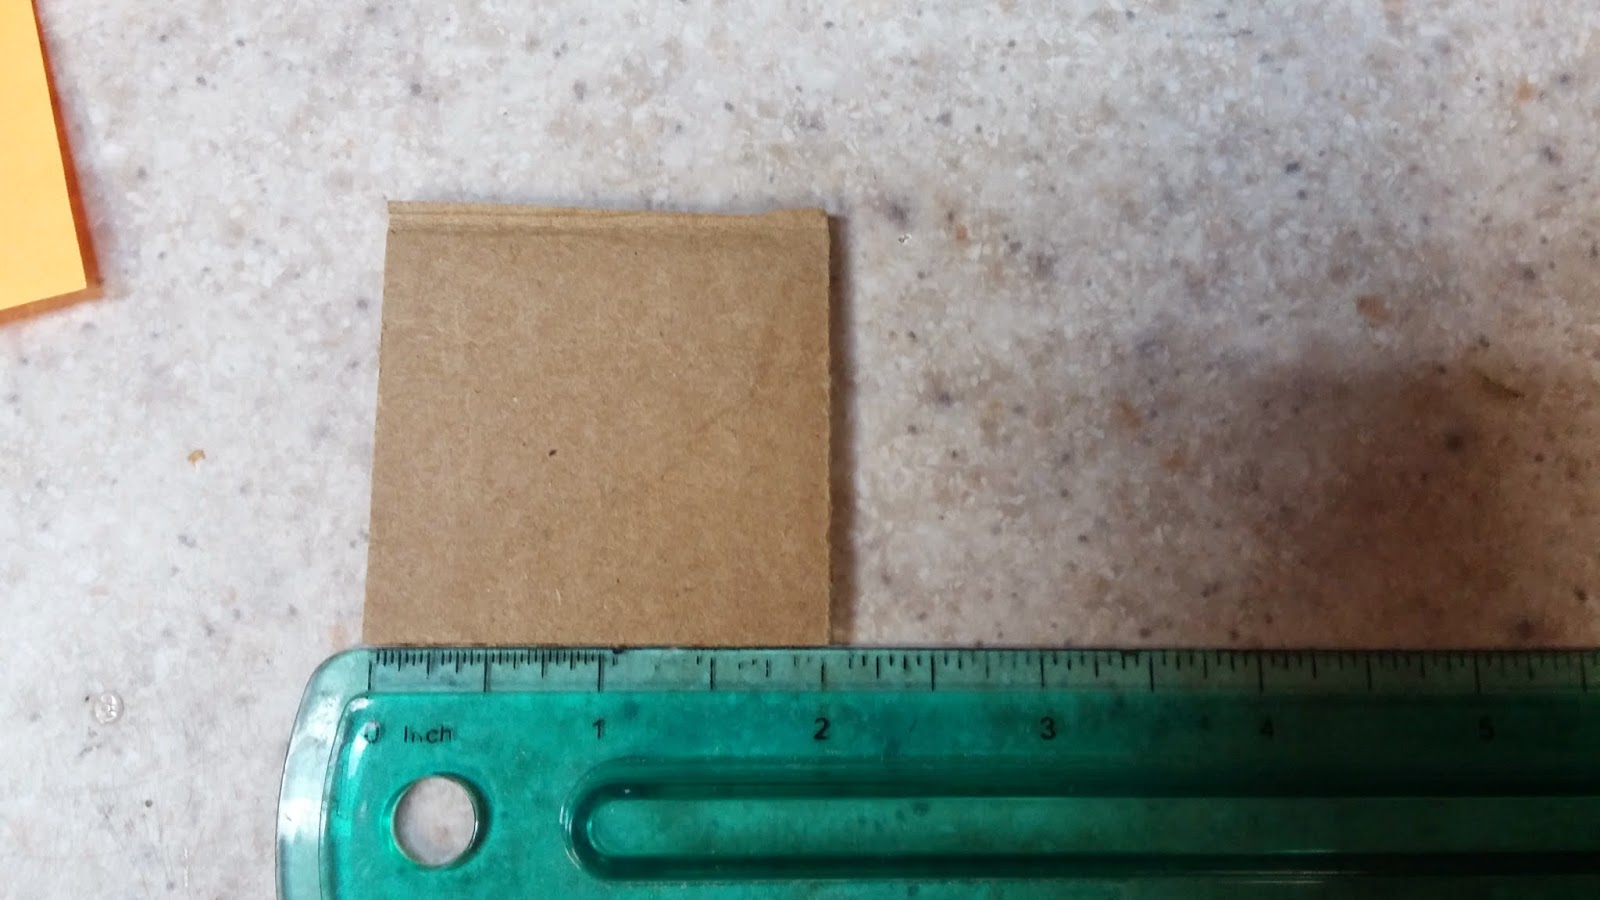
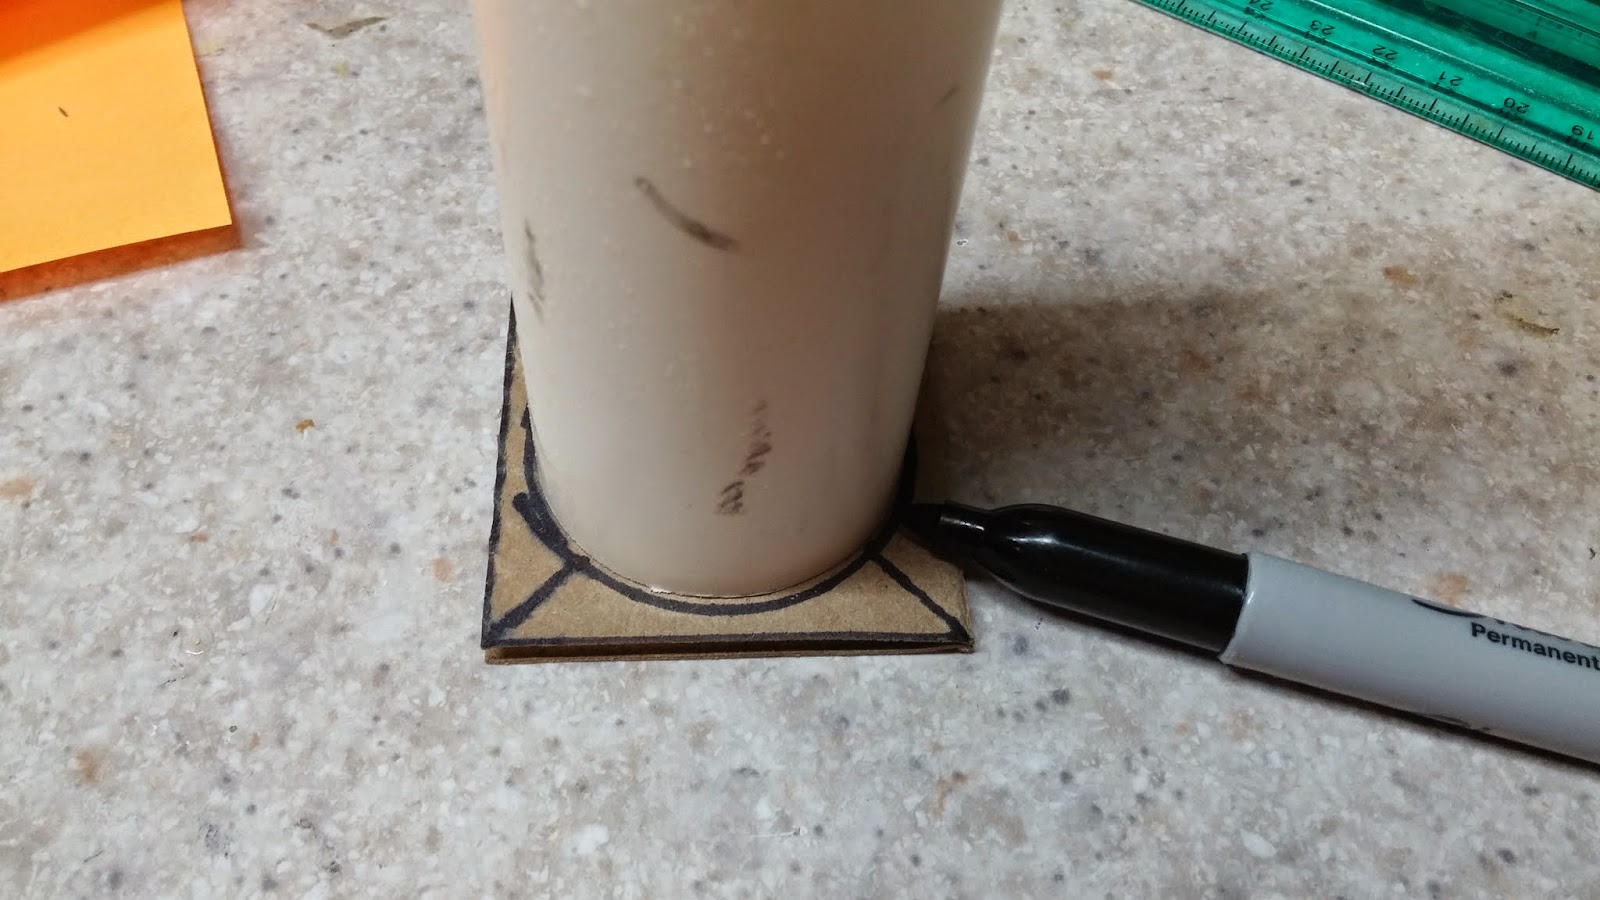
Next, make a simple quartering jig. This one is the most simple one out there. Cut out a 2" by 2" cardboard square.


Try to place your PVC in the center and trace around it with your sharpie.


Line up the corners of the cardboard with the ruler and draw lines like this. Use the lines to make marks on your PVC.


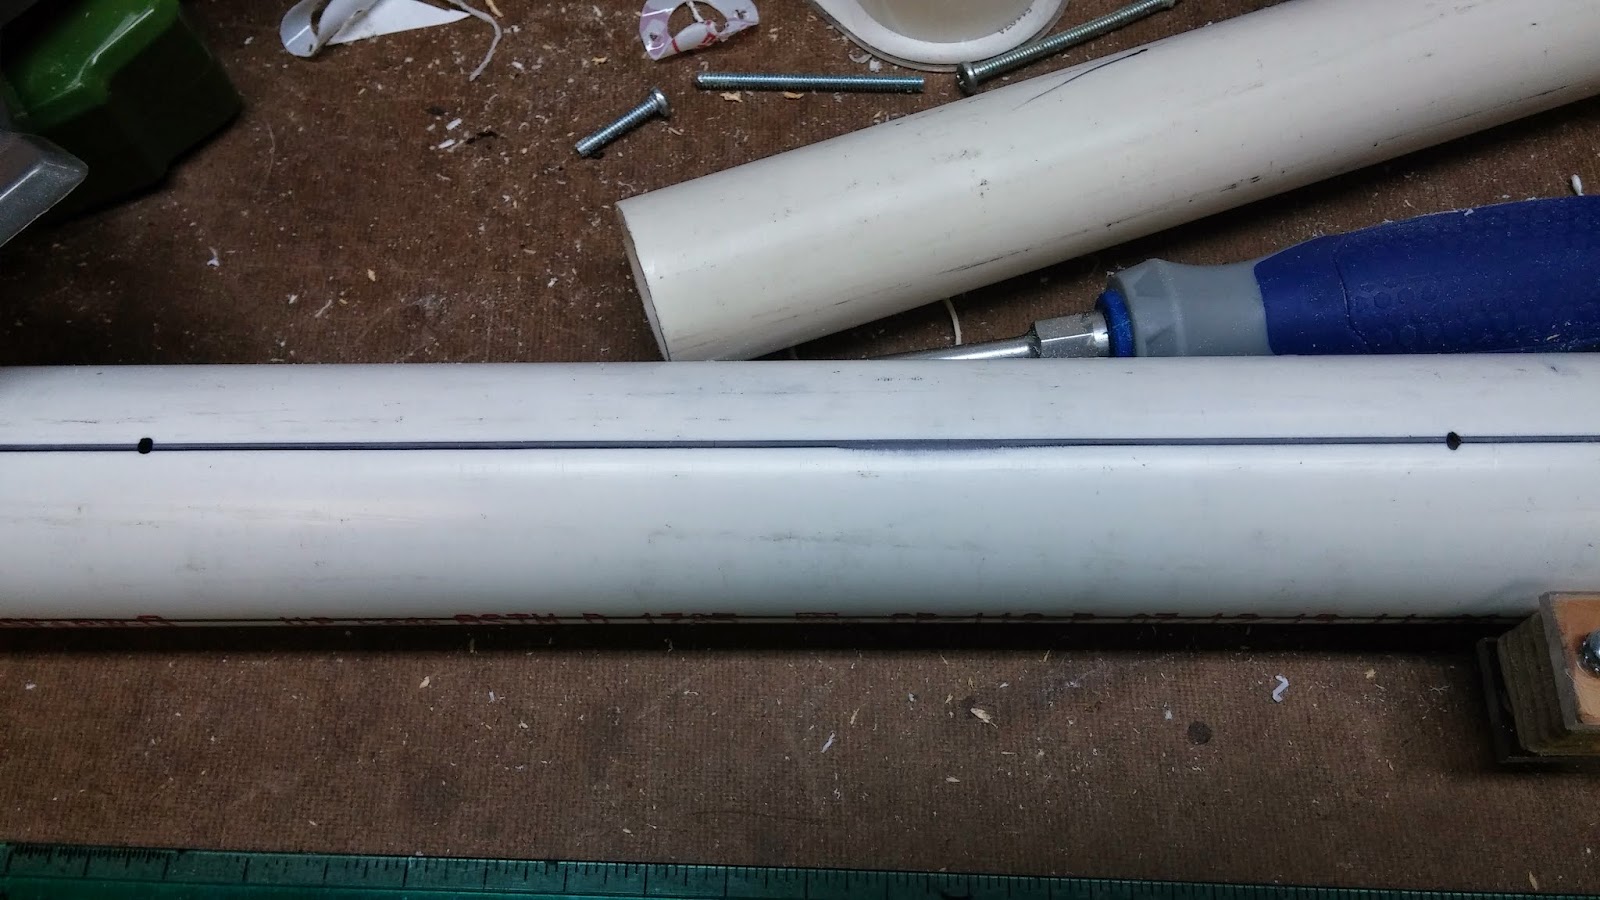
Use your ruler to draw four straight lines starting from the marks on the PVC to the other end.


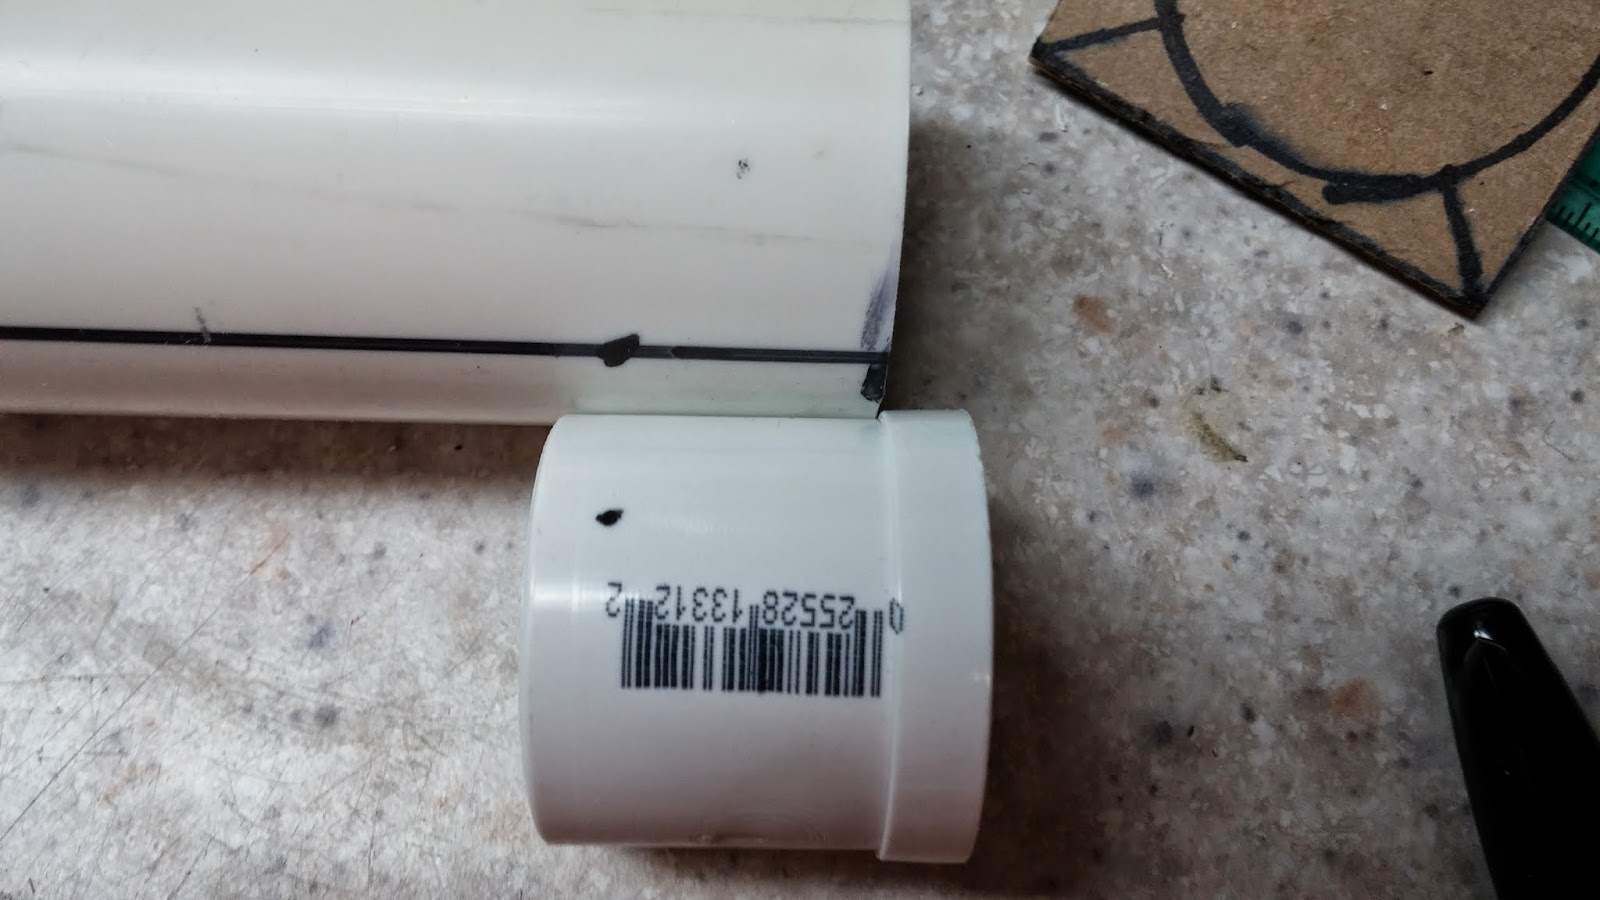
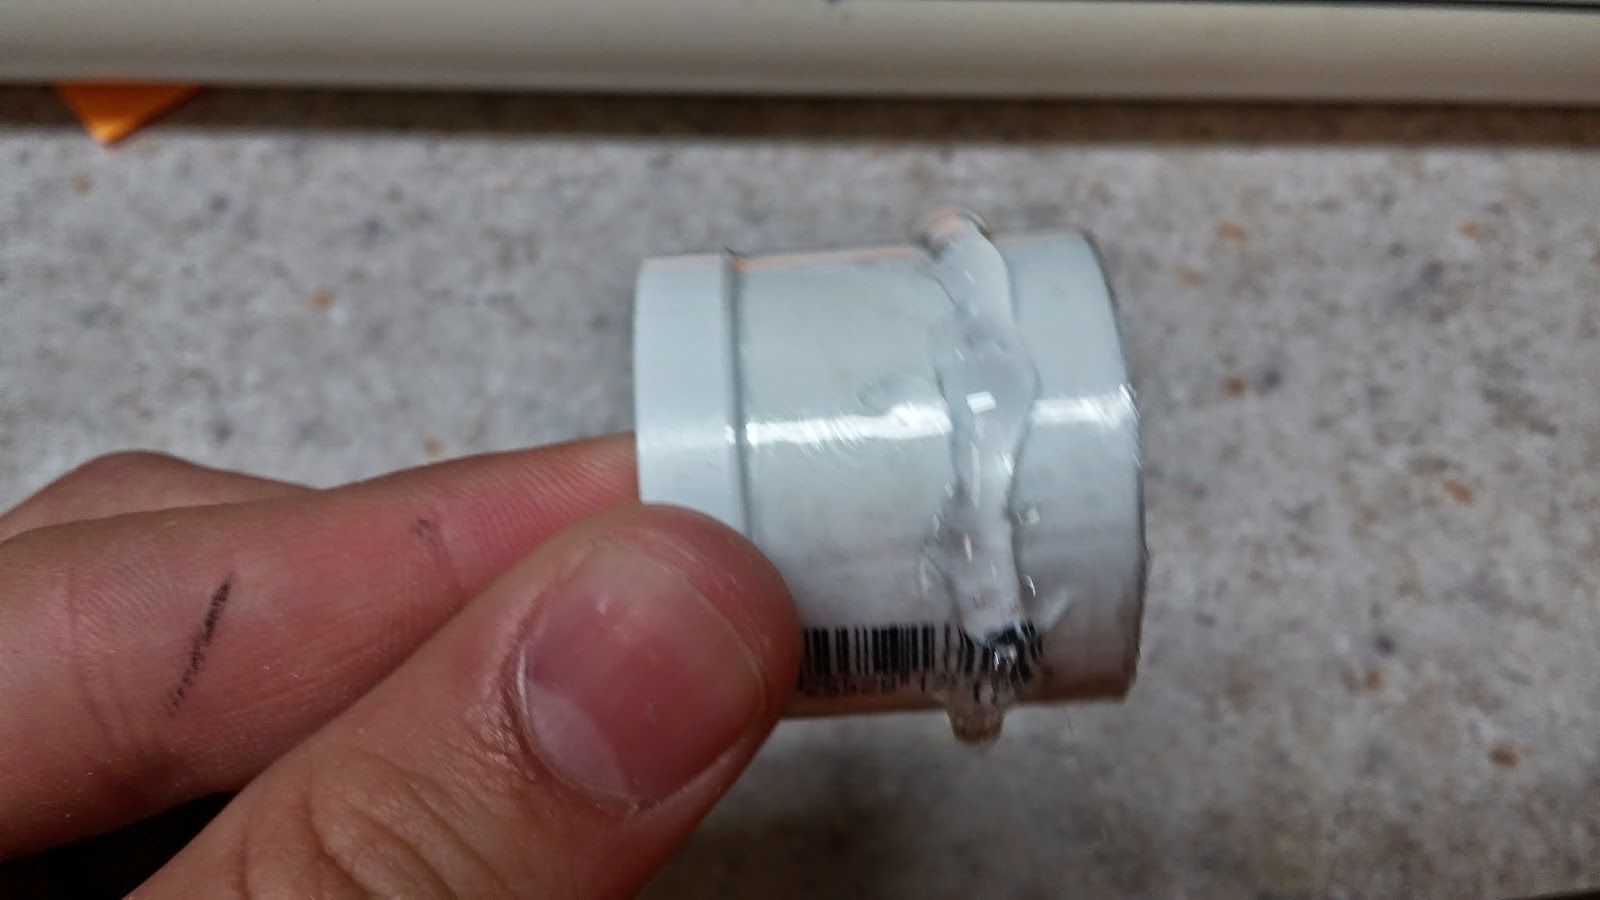
Now onto the bushing. You will notice that there is a part of the bushing that isn't the part that couples to the 1/2" PVC. Make a sharpie mark on this part of the bushing. Line up the bushing with the PVC like you are putting it in the pipe. Use the sharpie mark to make marks on each of the four lines of where you will be drilling the holes.

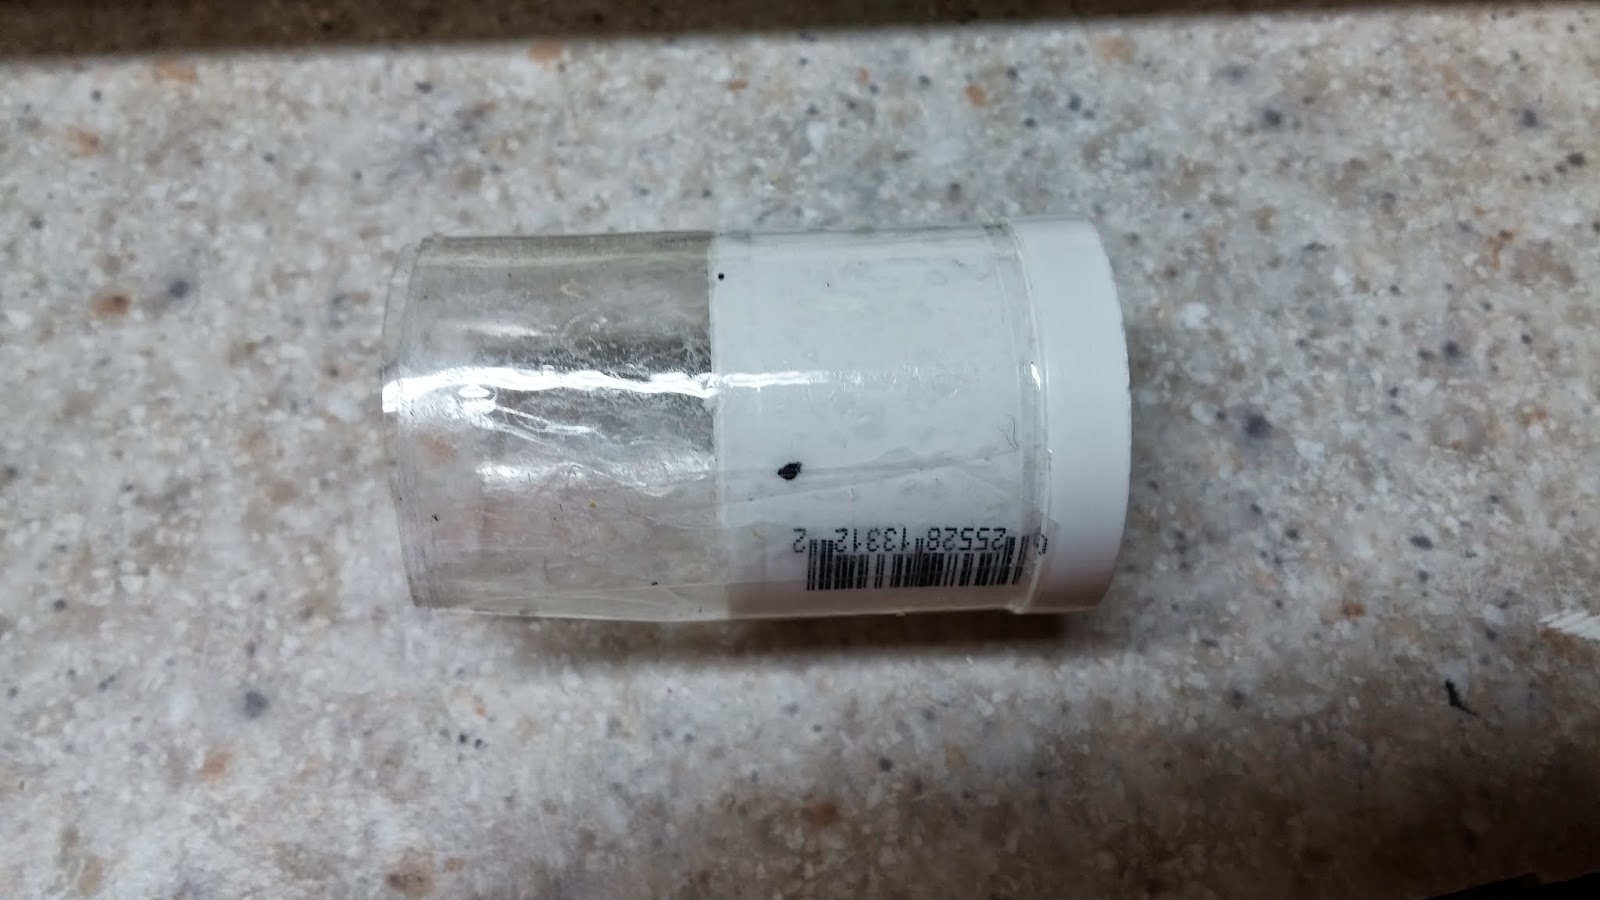
Wrap packing tape around the bushing until it fits snugly into the PVC. You want an air-tight seal, but you also want to make sure you can still fit the bushing in. Once you have used the desired amount of tape, cut of the excess. 
Put goop around the bushing like so and put it in the PVC.
Drill the holes where you made the marks and tap into the PVC with your 6-32 tapping bit. Use your countersinking bit on the holes and then screw the 6-32 3/8" panhead screws into the holes. If you did the tapping right, you shouldn't need to use more goop here.
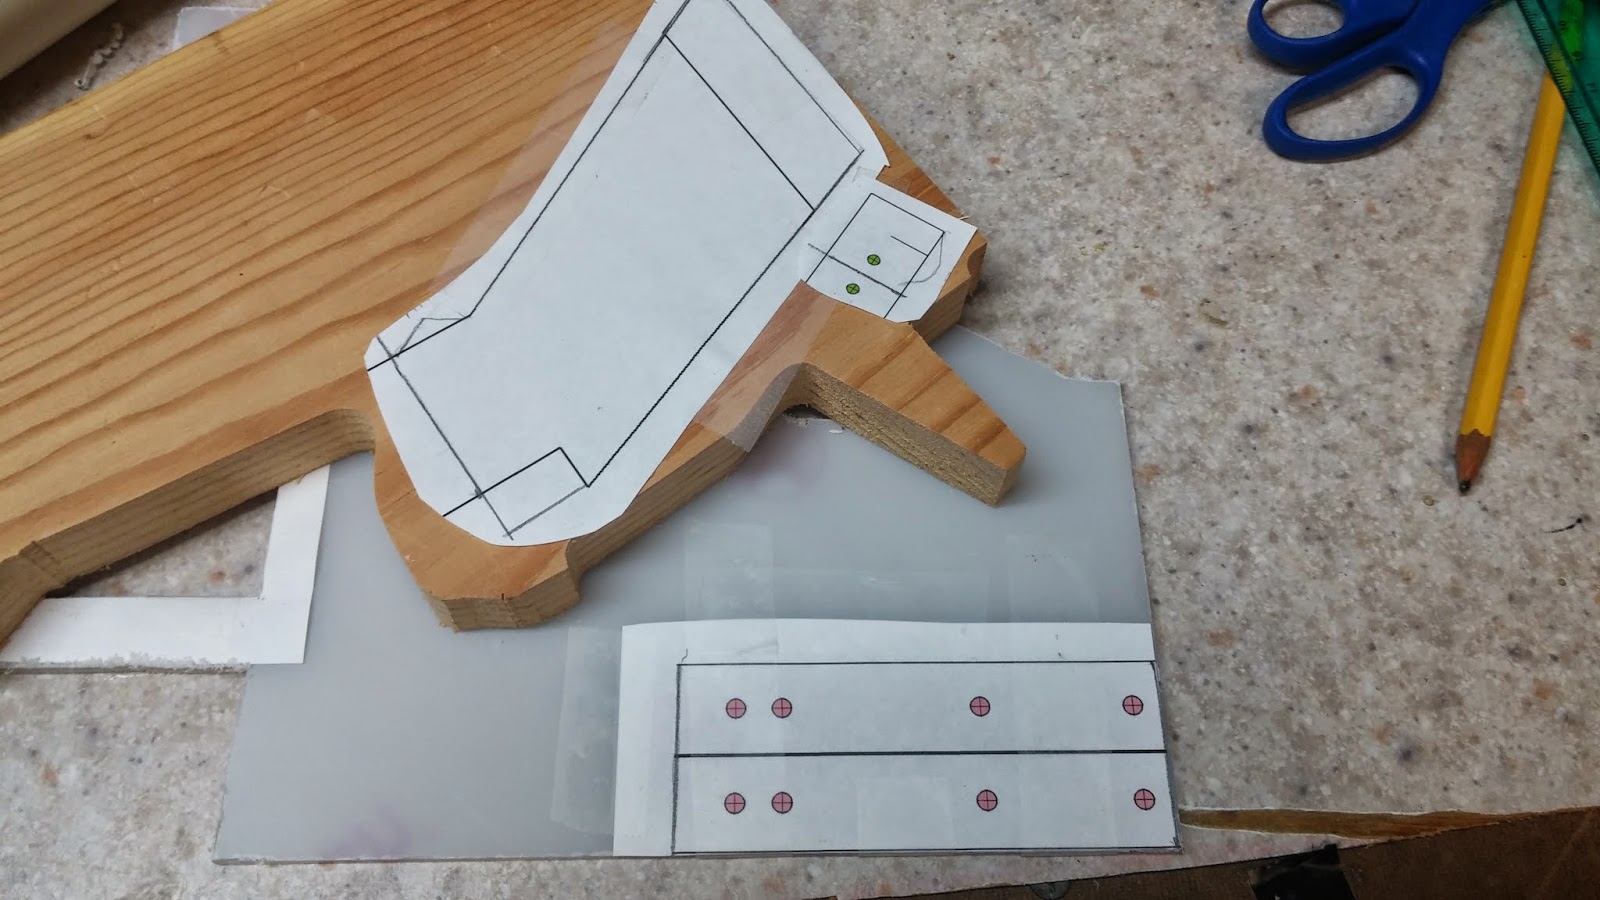
Set the pipe with the bushing away to dry. Meanwhile, you will be making the handle. Print out the templates made by Ryan201821. These templates can be found on his Rainbowpump writeup here. There are, however, many modifications to be made to these templates. I just used a pencil to do this. 

First, extend the handle length by 2cm or 3/4" if you have a ruler without cm. Shorten the top of the handle by drawing a line 3/4" up from the small horizontal section. The picture explains it much better than I can. On the trigger guard (rectangle piece), draw a line to split it in half (2cm). On the trigger sideplates (big rectangle), draw a line 2cm in. 
Cut out the pieces and attach the handle and trigger guard to the 3/4" thick wood. Attach the handle sideplates to your polycarbonate. 
Cut out these pieces on your scroll saw. Once you are done, it should look like this:
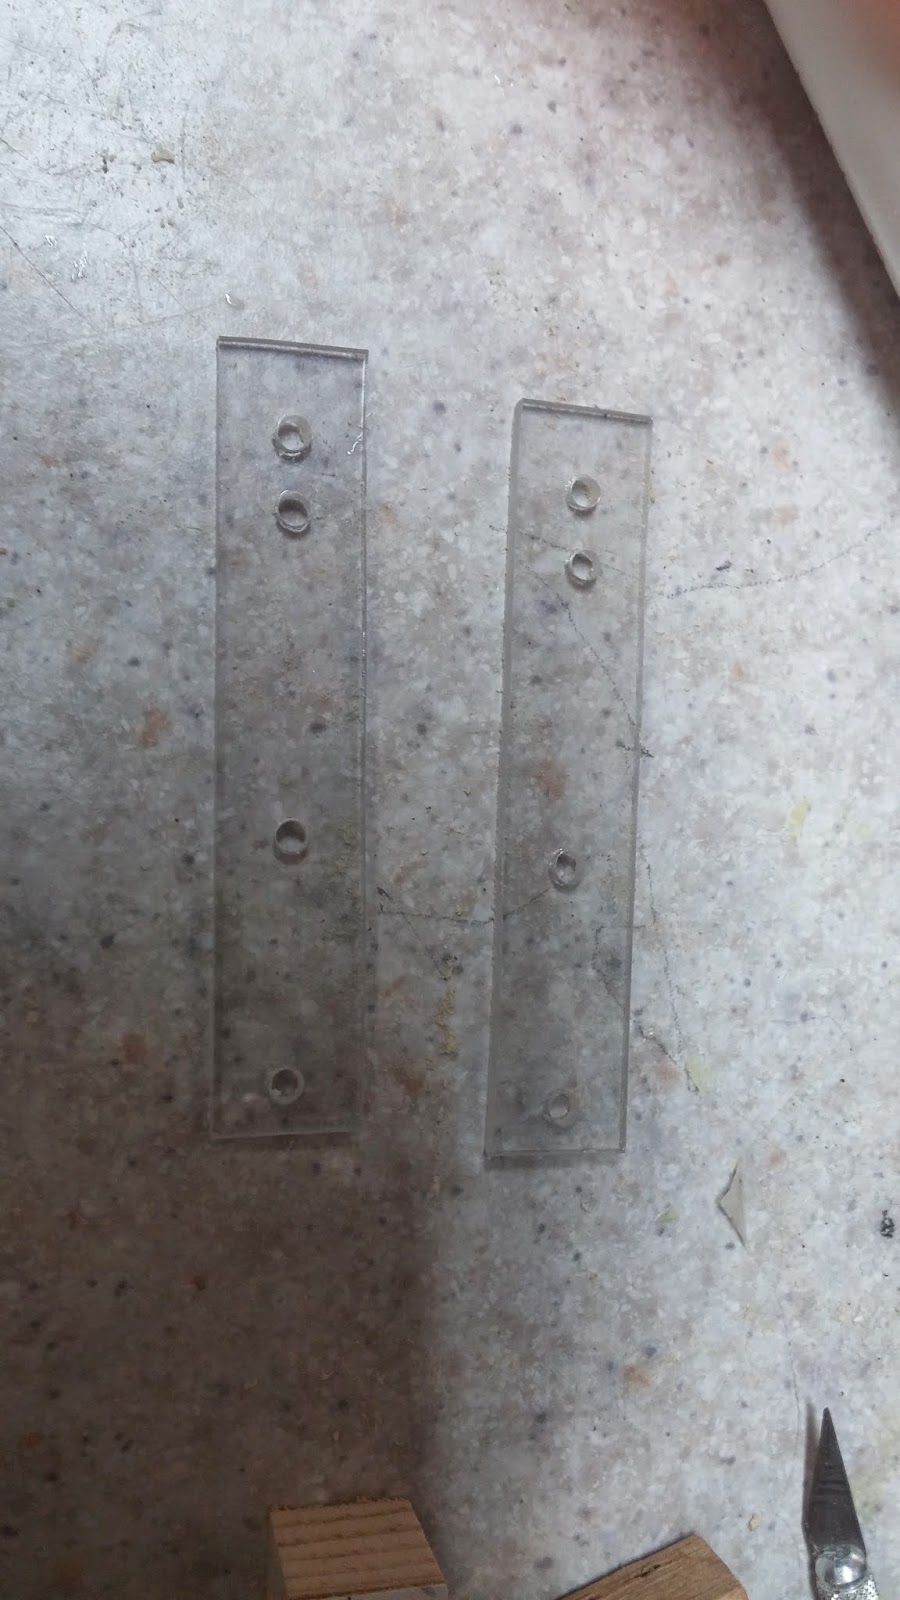
Drill the holes using the key from the template (5/32 for the polycarbonate, 7/64 for the trigger guard). After that, take the paper off.
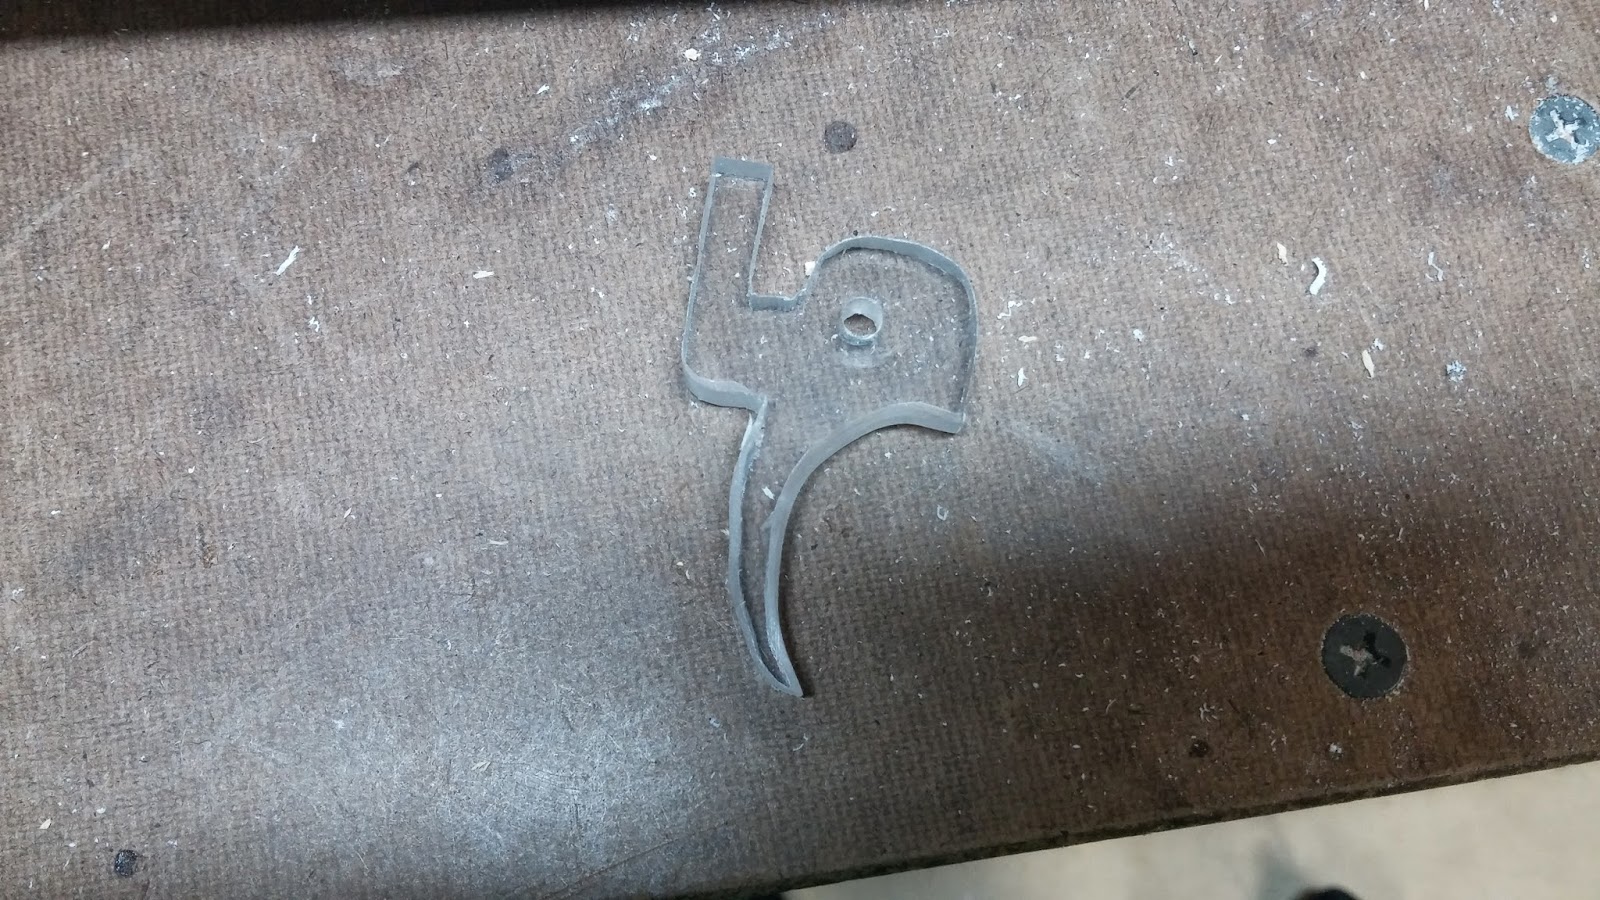
The final part of the templates is the trigger. I attached the trigger template to the polycarbonate and then modified it to look like this. You can make the trigger in any way you want except you have to have the 1.5cm rectangle part at the top. This can be seen in the picture and it is very important.
Next cut out the trigger. You can sand it down to make it more comfortable if you want.
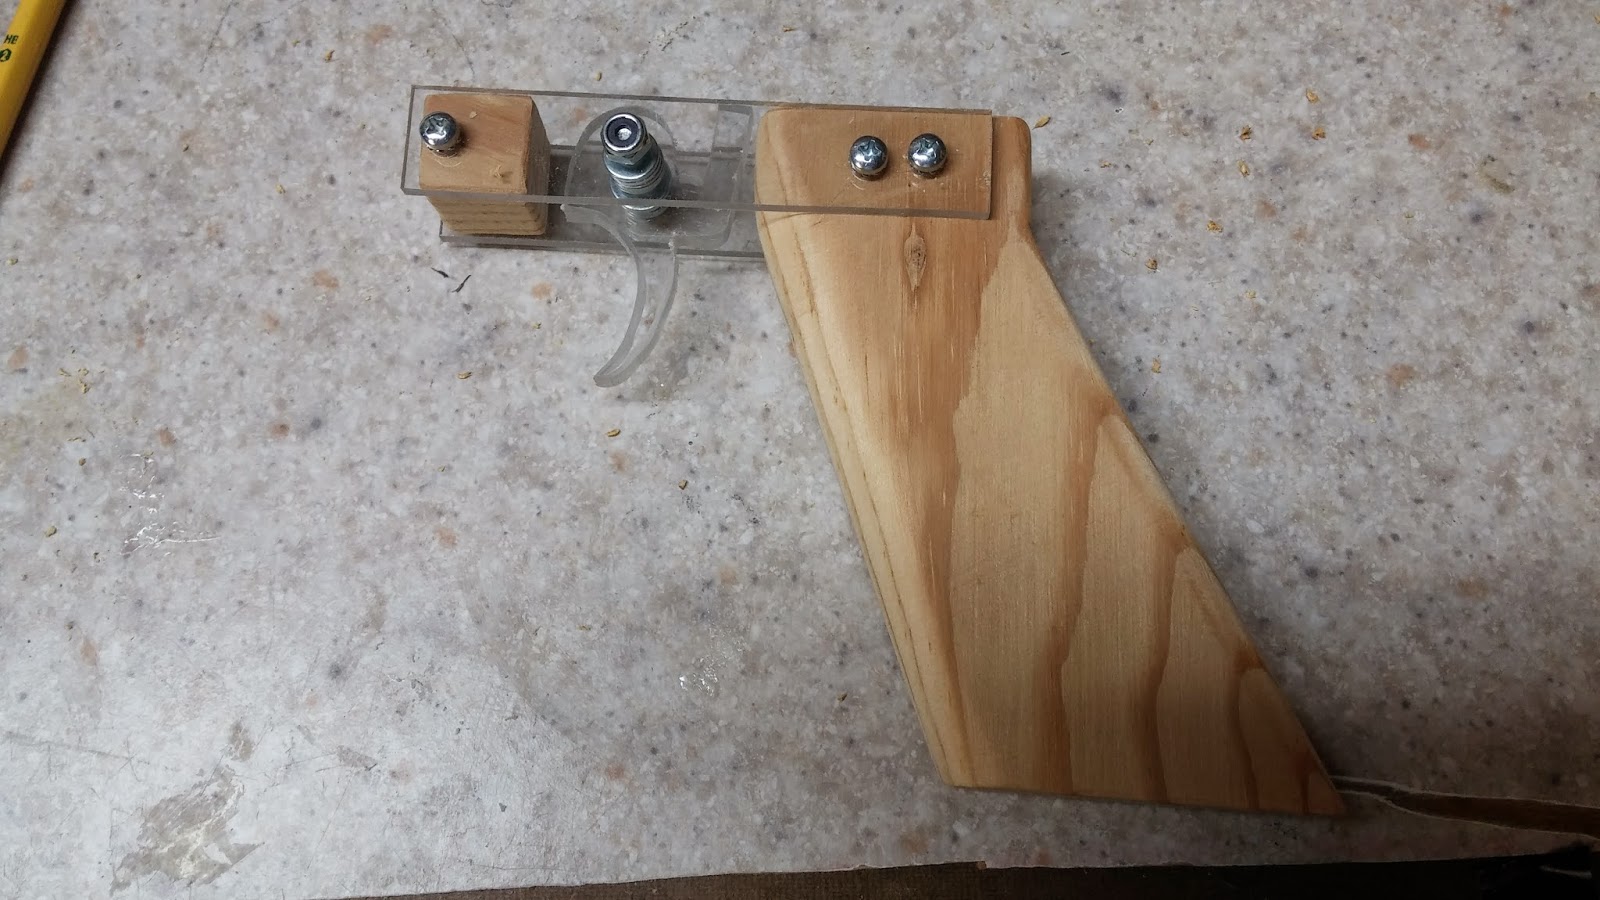
Now you want to put the handle together. The first thing you want to do is to attach the trigger sideplates to the trigger guard with 3/8" 6-32 screws. You can also attach the trigger without the washers to help with alignment. To do this just use a 1 1/2" 6-32 screw and a 6-32 locknut. Line up the trigger sideplates on the handle like so and mark where the holes are with a pencil. Drill the holes on both sides with a 7/64" drill bit.
Screw on the handle with more 3/8" 6-32 screws and put five washers on each side of the trigger (if five washers is too tight, use fewer). Your handle assembly is now finished.
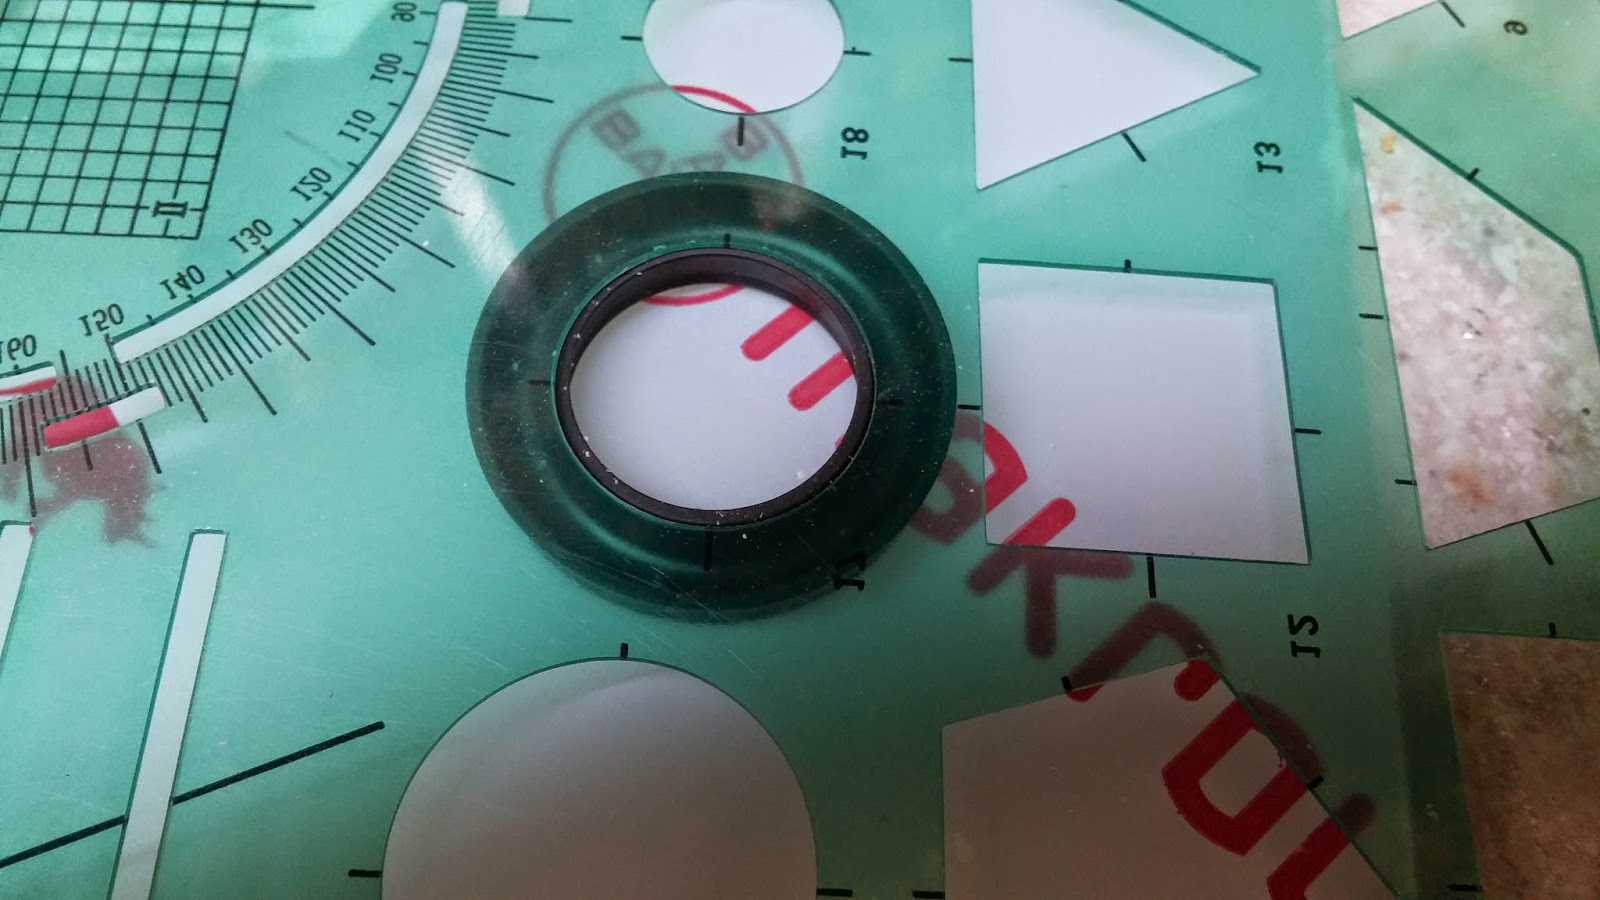
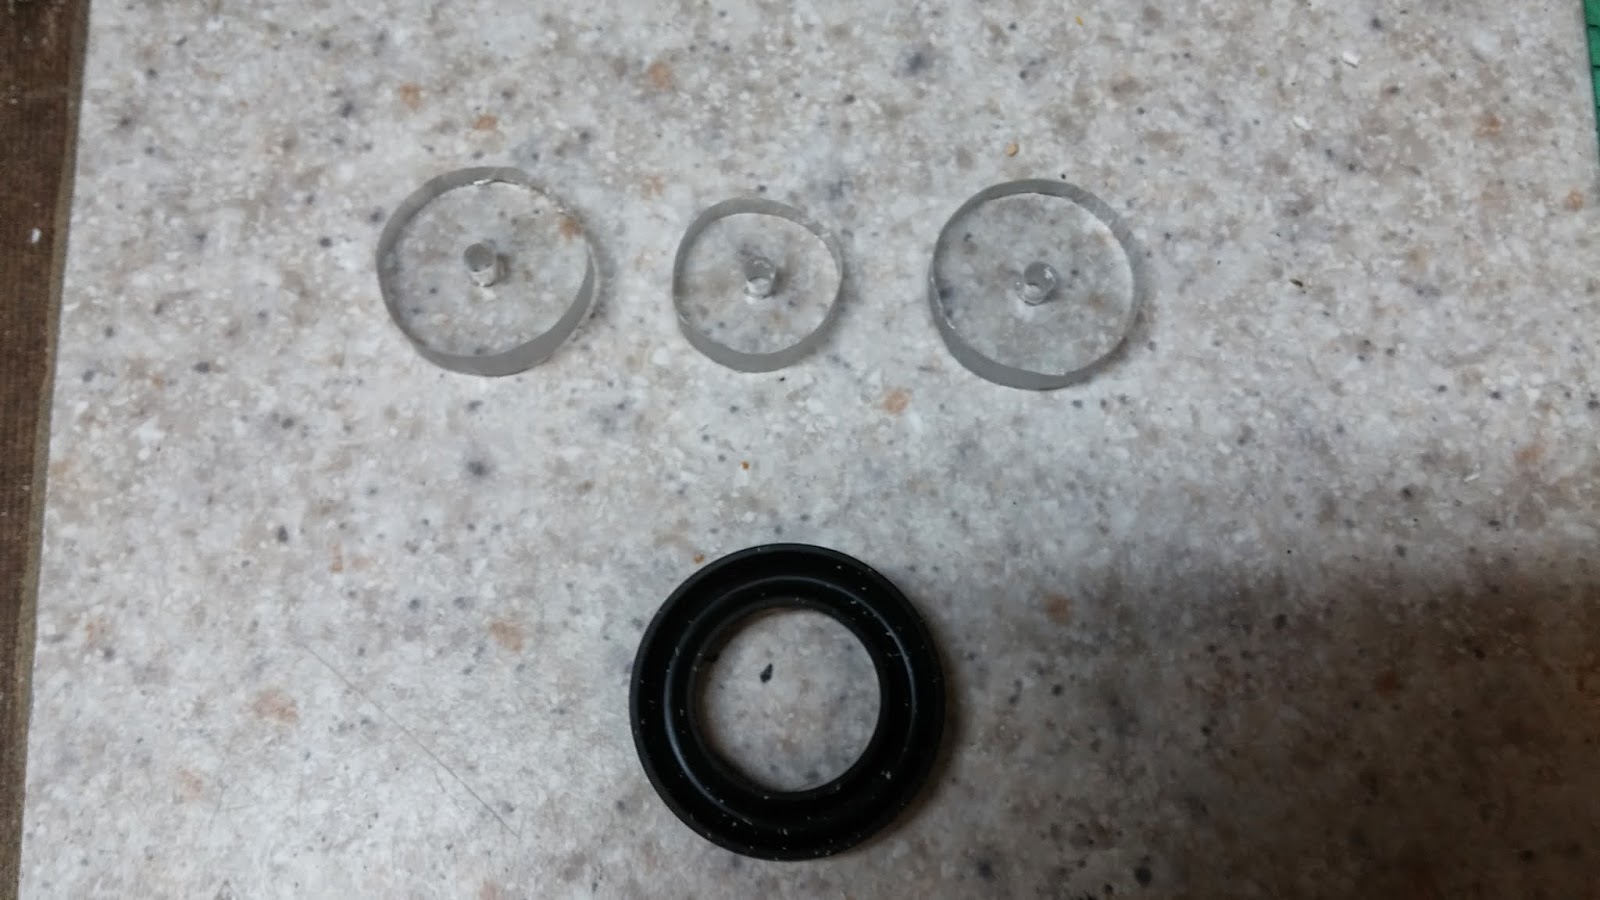
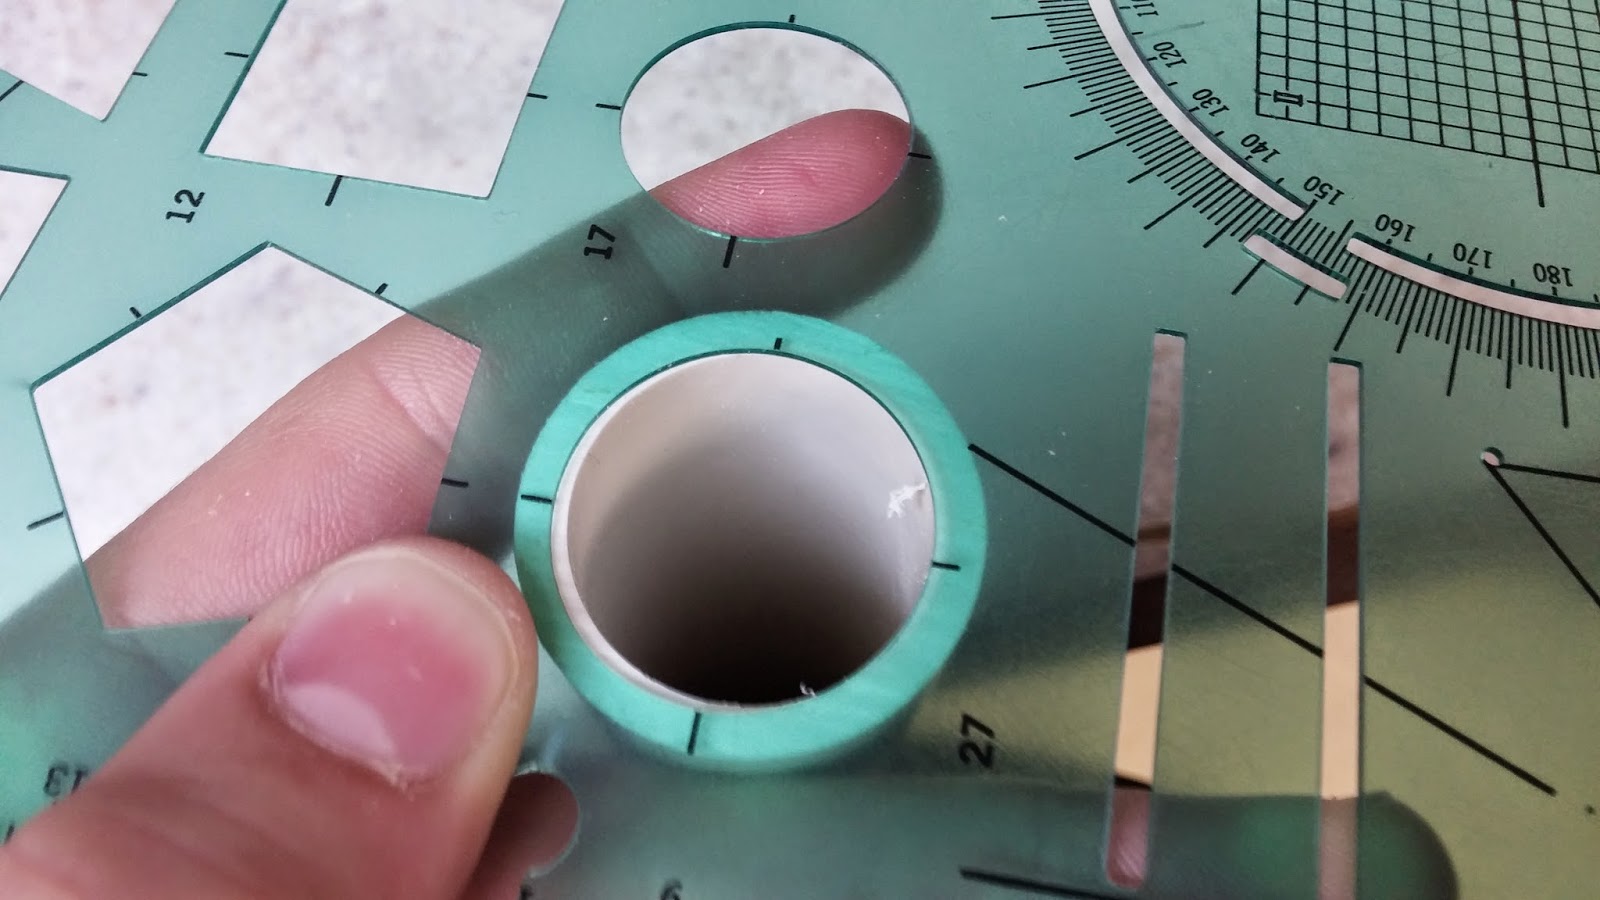
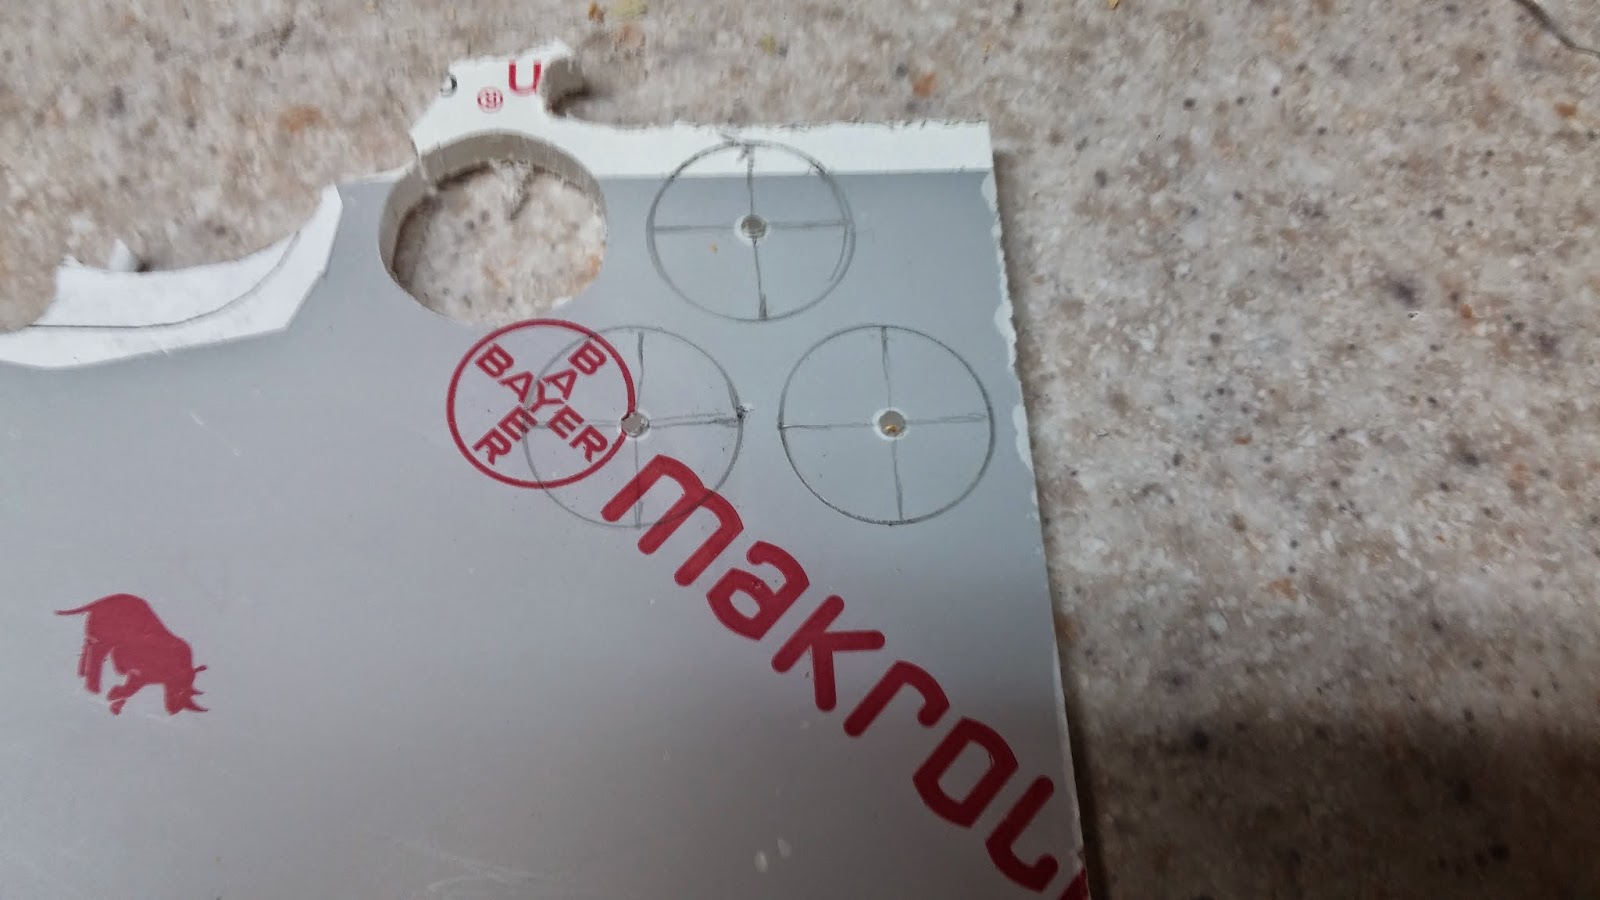
Next is the plunger head and plunger rod. To make the plunger head, you will need polycarbonate and the u-cup. First put the u-cup under the circle template and find a circle that is a little bit bigger than the u-cup. 
Trace two of these circles onto the polycarbonate. You will also want to trace the inside of the u-cup onto the polycarbonate. Do your best to draw a dot in the center of all three circles. A good way of doing this is by making two perpendicular lines through each circle and drawing the dot at the intersection.
Cut out the circles with the scroll saw and drill a 5/32" hole through each center dot. It can be hard to cut circles on a scroll saw, so what I recommend is to cut a crude circle-ish shape bigger than the needed circle and then sand it down with a dremel or even sandpaper until it resembles a circle.
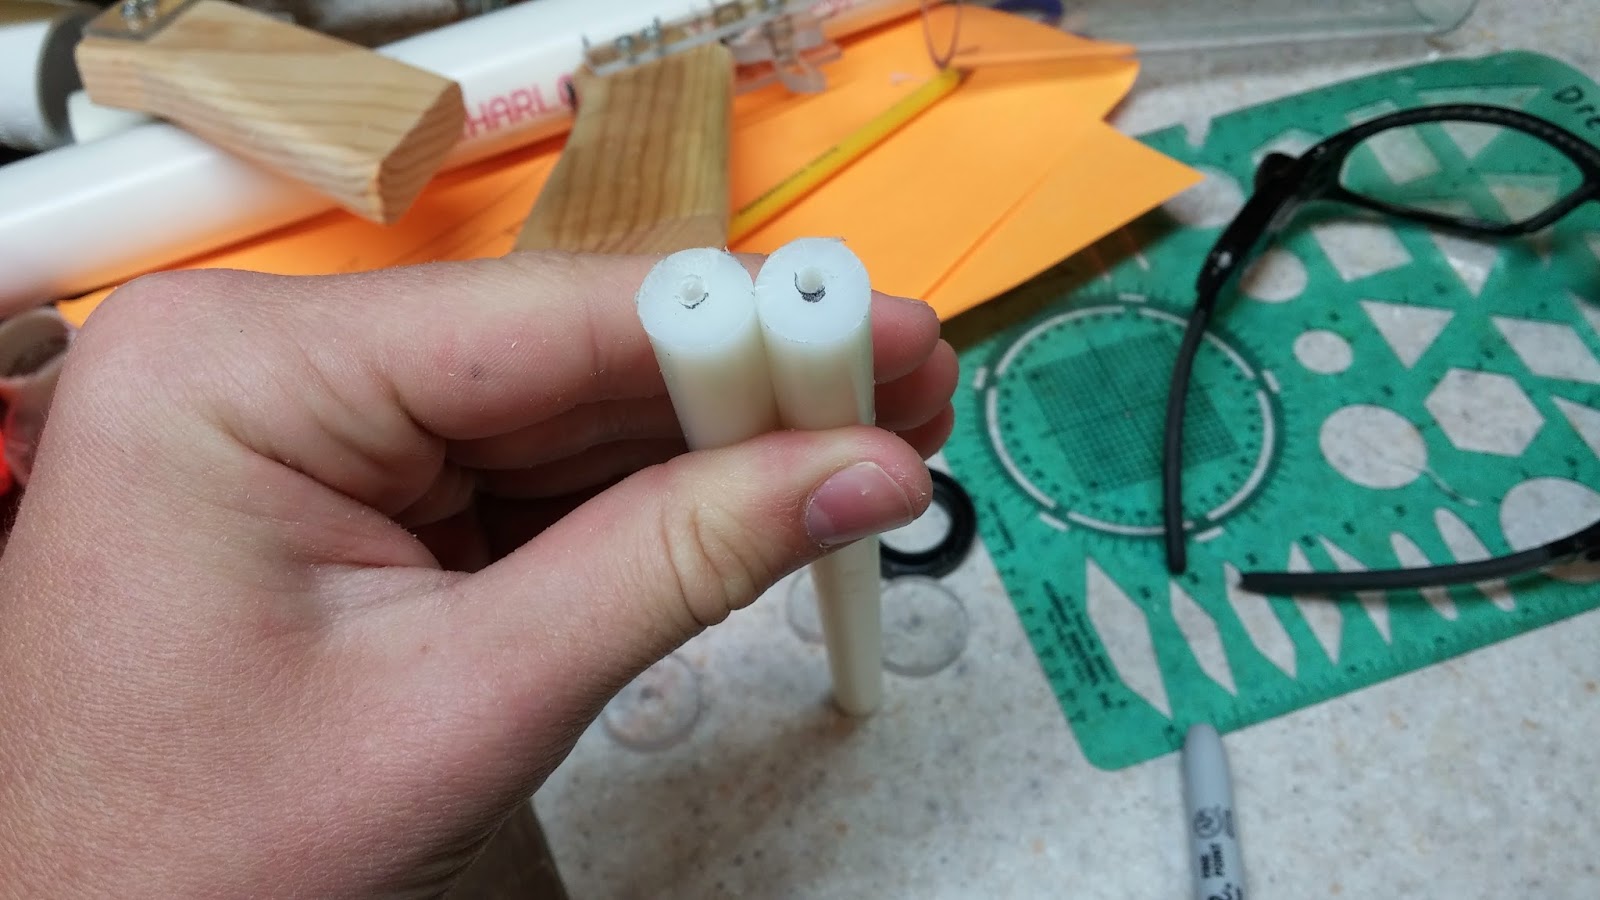
For the plunger rod, you will want 2 <1 1/2"> 6-32 machine screws and the nylon rod. Cut the nylon rod to <?>. Now on the piece of nylon rod, measure 3 1/4" into it and make a cut using any kind of saw that you want.
Make dots in the center of the ends of both rods except for the long one. The long rod only needs one hole. Drill a 7/64" hole into the rod where you made the dots and make sure that the holes are about 3/4" deep. Tap the holes with your 6-32 tapping bit.
Secure the plunger head assembly on to the 3 1/4" piece of nylon rod with a 1 1/2" 6-32 screw. The small polycarb circle should be in the middle of the u-cup and the other two pieces should be on the top and bottom.
Now take another 1 1/2" 6-32 screw and cut the head off of it like the one in the picture below. This can be done with mini bolt cutters or some kind of cutting tool that looks like the one below. You can also cut the head off if you clamp down the screw and use a hacksaw. 
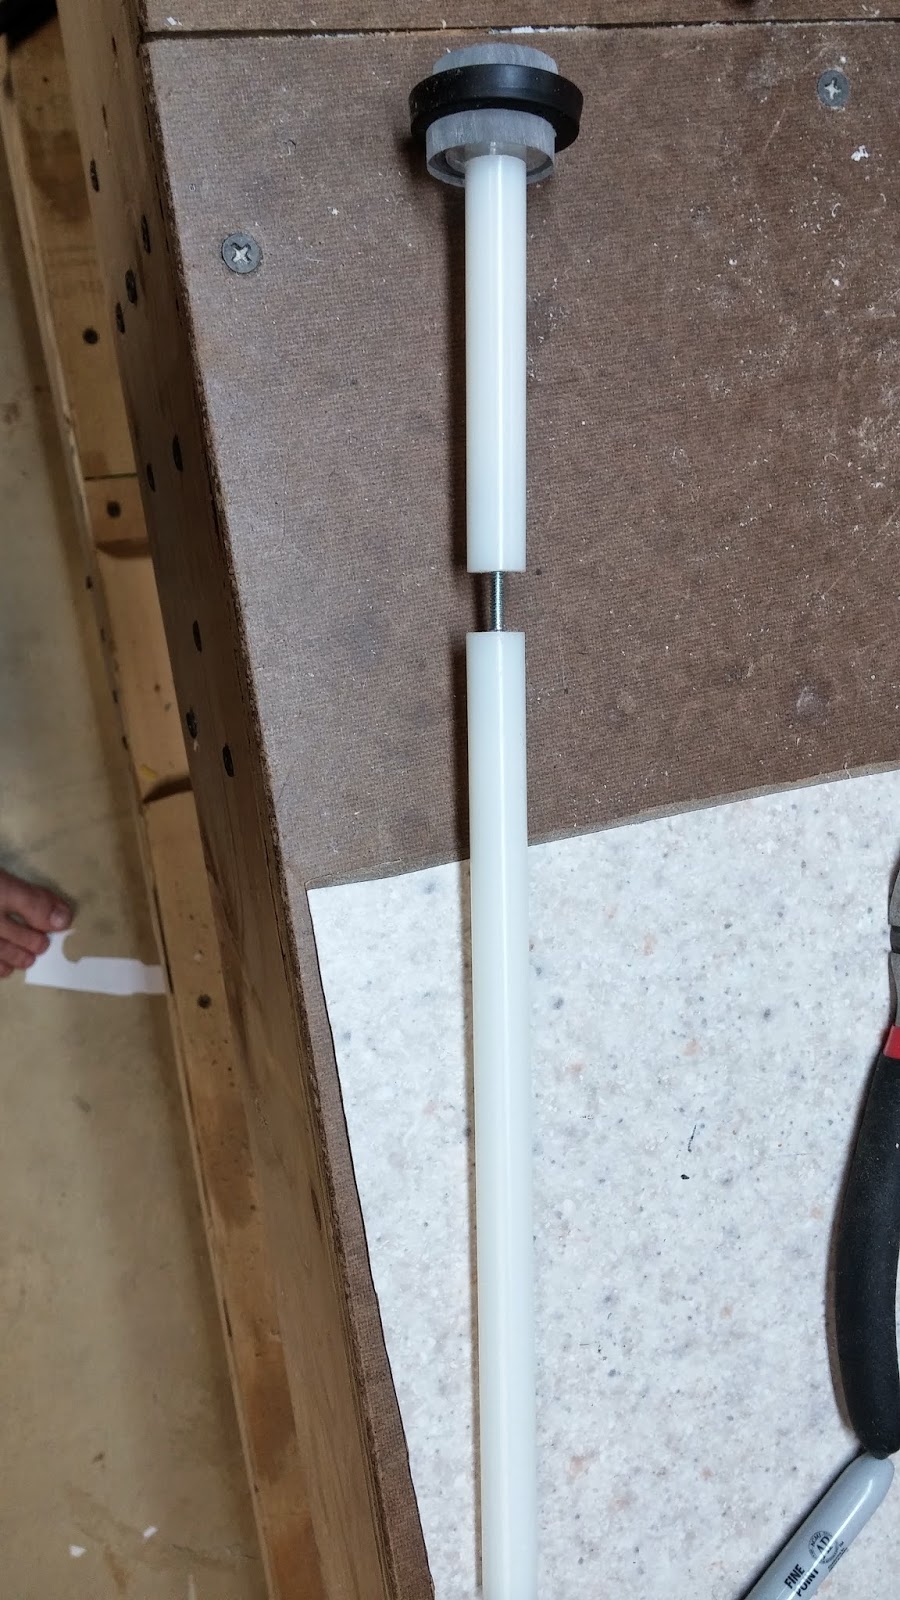
Thread the screw into both pieces of nylon rod. Screw it in evenly and make it so there is about a 1/2" gap between the rods. I recommend gripping the screw with pliers to help get it into the rod. To make sure the whole plunger rod assembly is straight, slide the piece of 1/2" PETG over it. If it isn't straight, make adjustments until it is. 
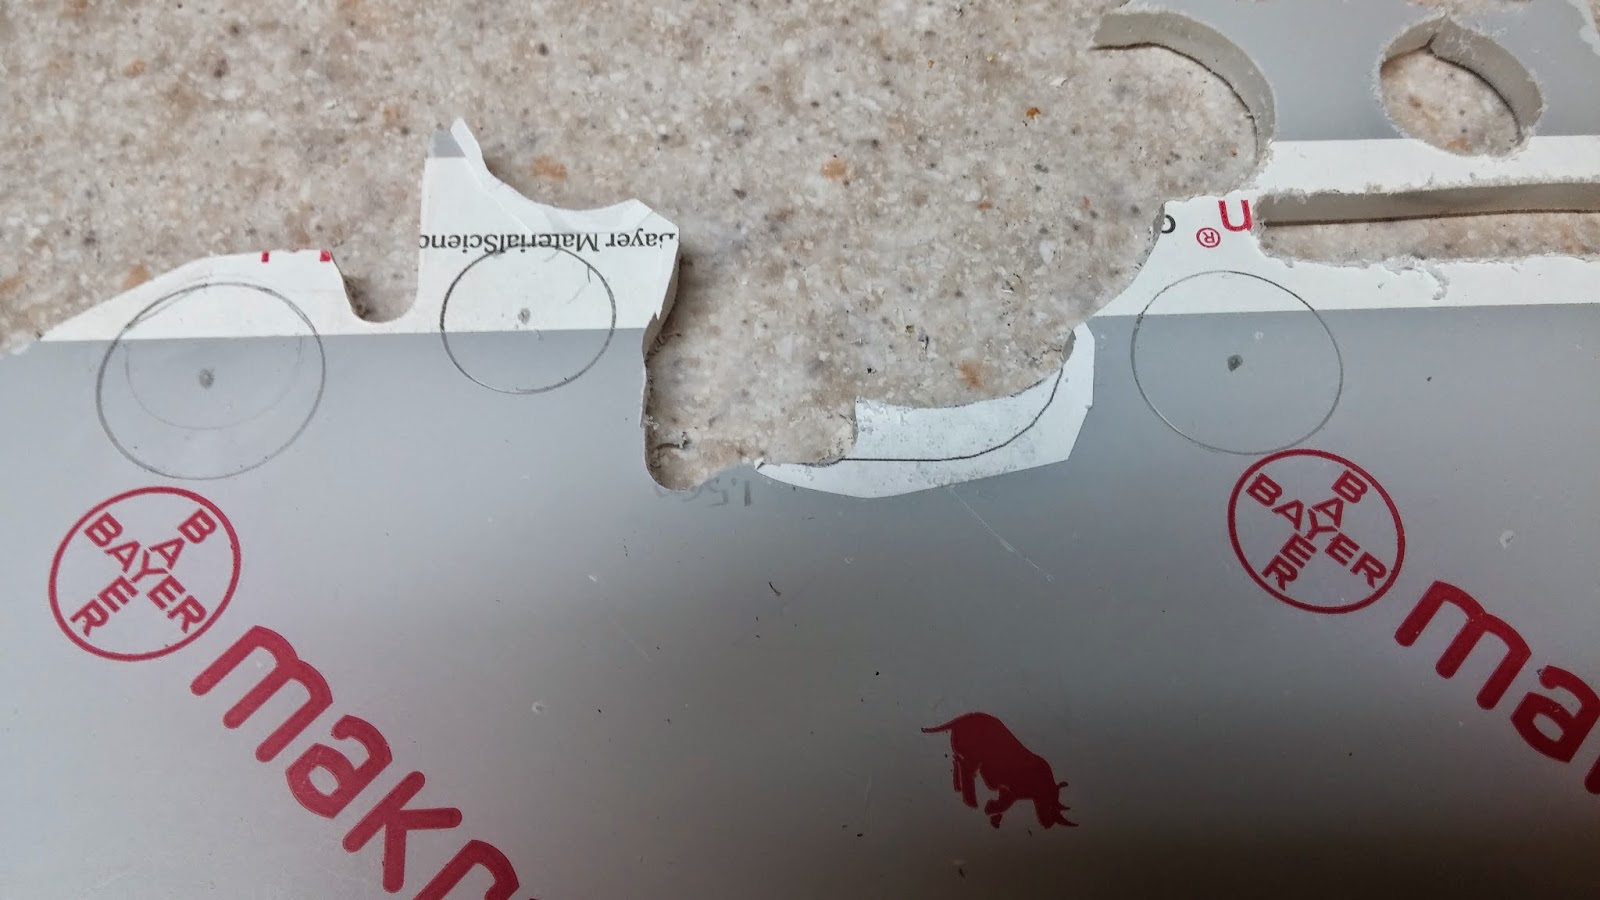
Now that the plunger assembly is finished it is time for the catch! This catch is a modified version of the rainbow catch that is scaled down to fit into 1" PVC. To start off you want to find a circle template that would almost fit in 1" PVC. It's ok if it is a little bit bigger but it can't be smaller. Draw three of these circles onto your polycarbonate, make a mark in the center, and drill a 5/32" hole in them.
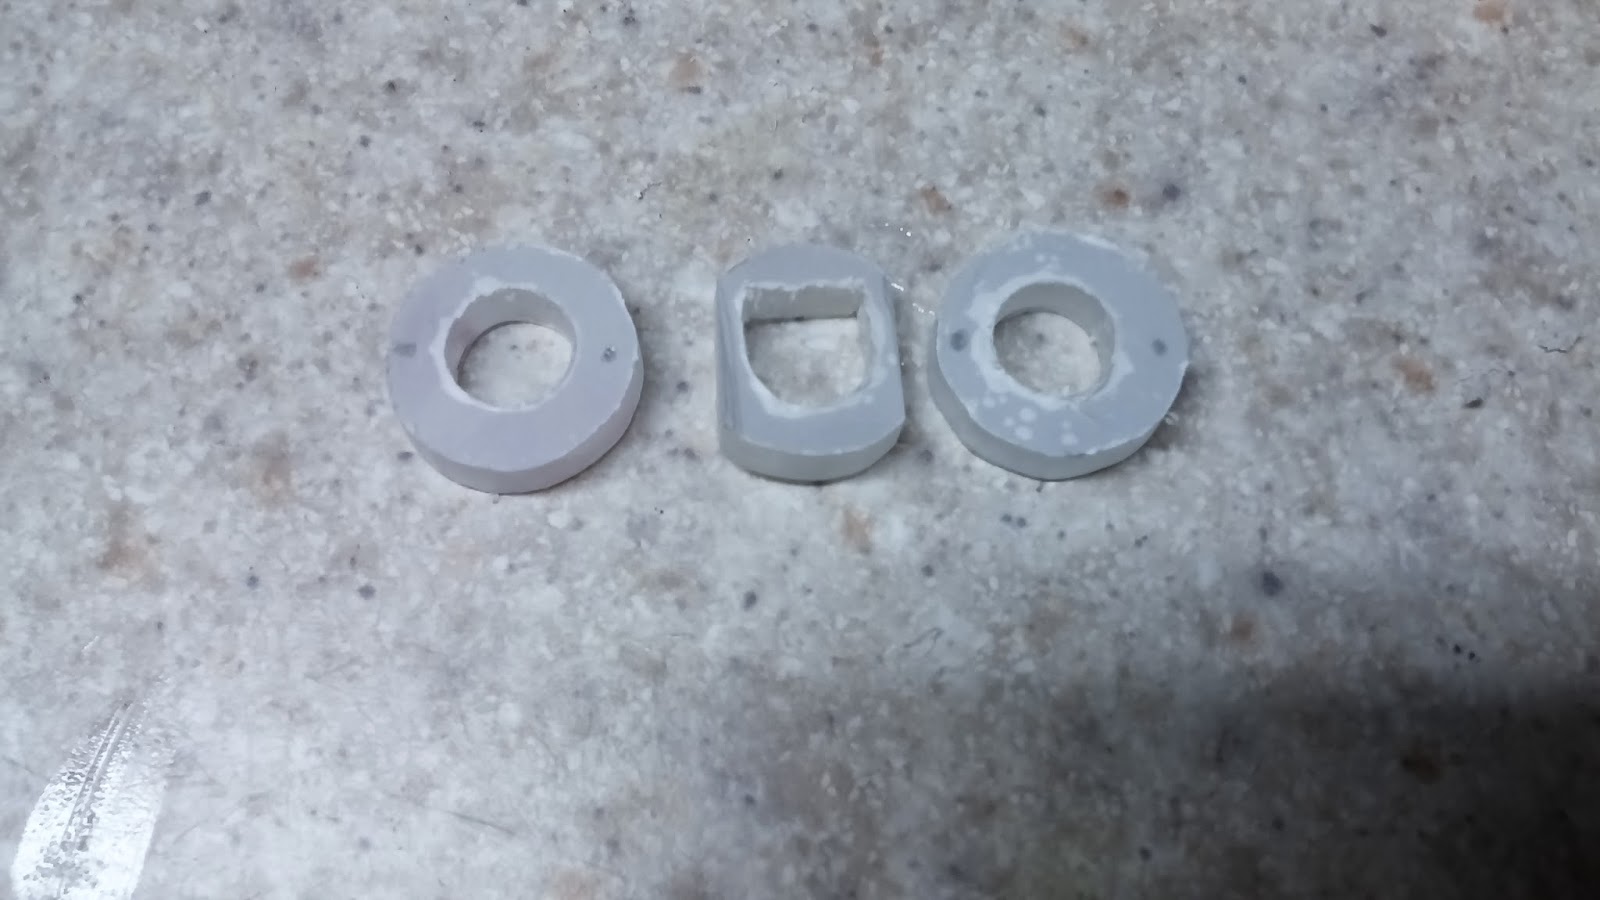
Using the 1/2" spade bit, drill holes into the circles using the previously drilled holes as a guide. You are going to also want to cut catch piece like what is seen in the top circle. There are no specific measurements for this, but just try to replicate it the best you can.


Here are the pieces cut out. Make marks on the circular pieces of where you are going to drill the holes. To help with this, line up the middle (catch) piece with the hole in the circle piece and then make the marks on the outside of the catch piece. The marks should be around the area of where they are in the picture.


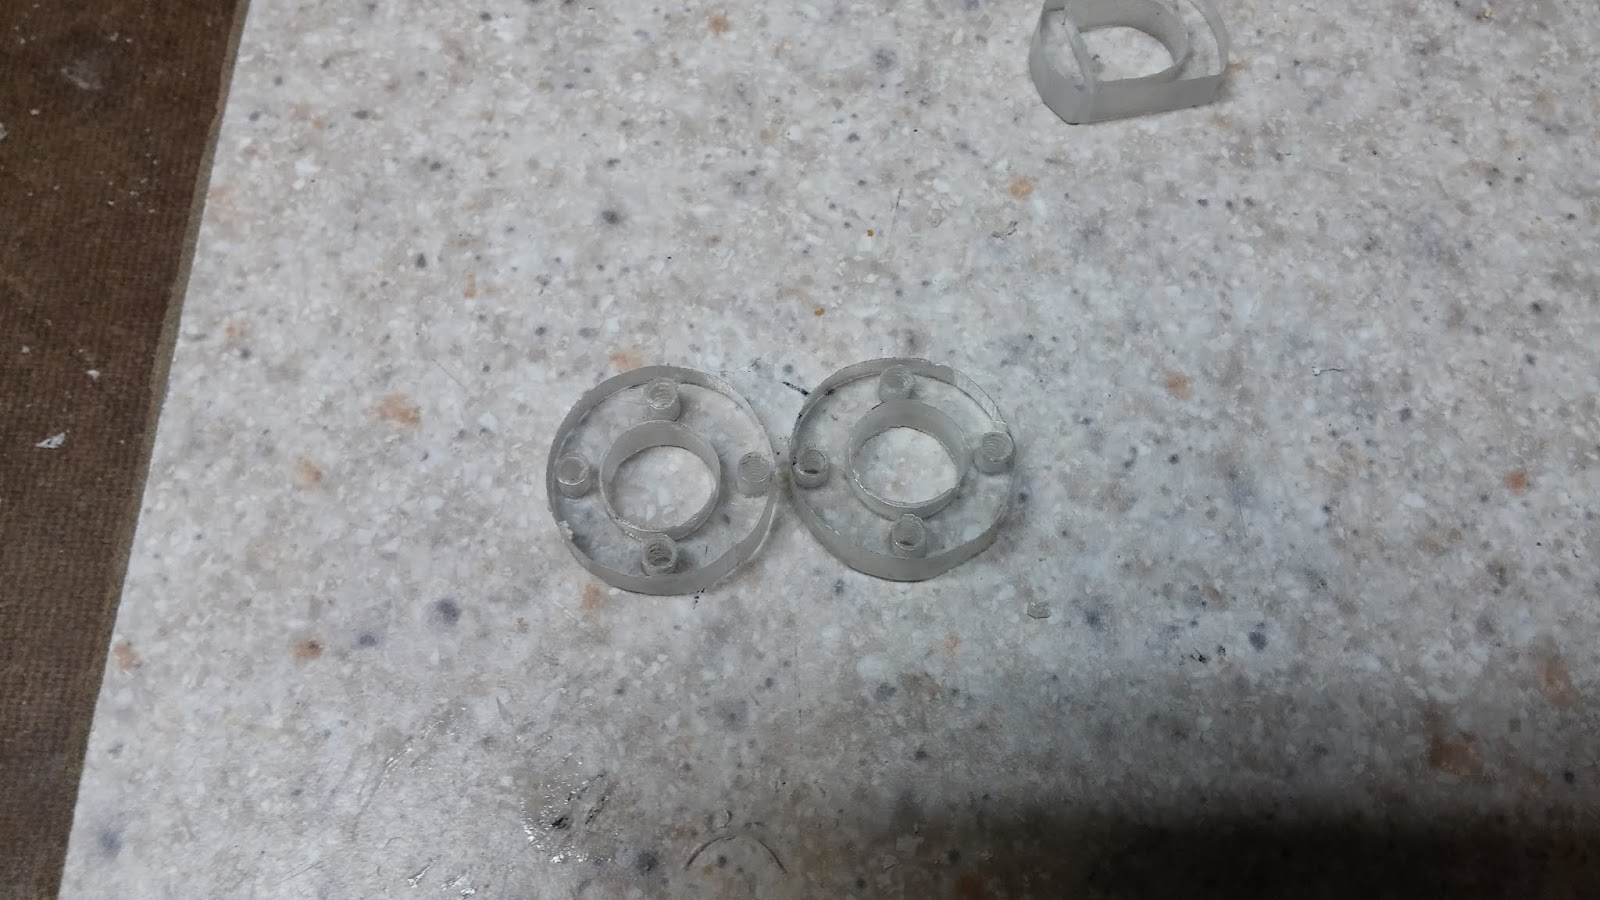
Drill those holes and tap them with the 6-32 tapping bit. There are four holes in the picture because I actually messed up the first time and made the holes too close together. Ignore the holes on the top and bottom of the pieces.


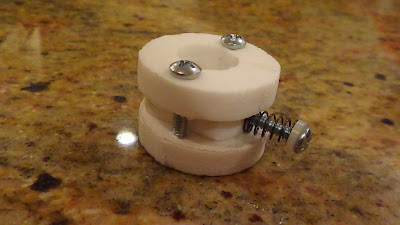
Screw together the catch using 3/4" 6-32 screws. It is good if the screws are hanging off the side a little bit. This picture shows the two circular catch plates and the actual catch piece fitting in between them. If your catch plate does not fit, sand down the edges until it does.


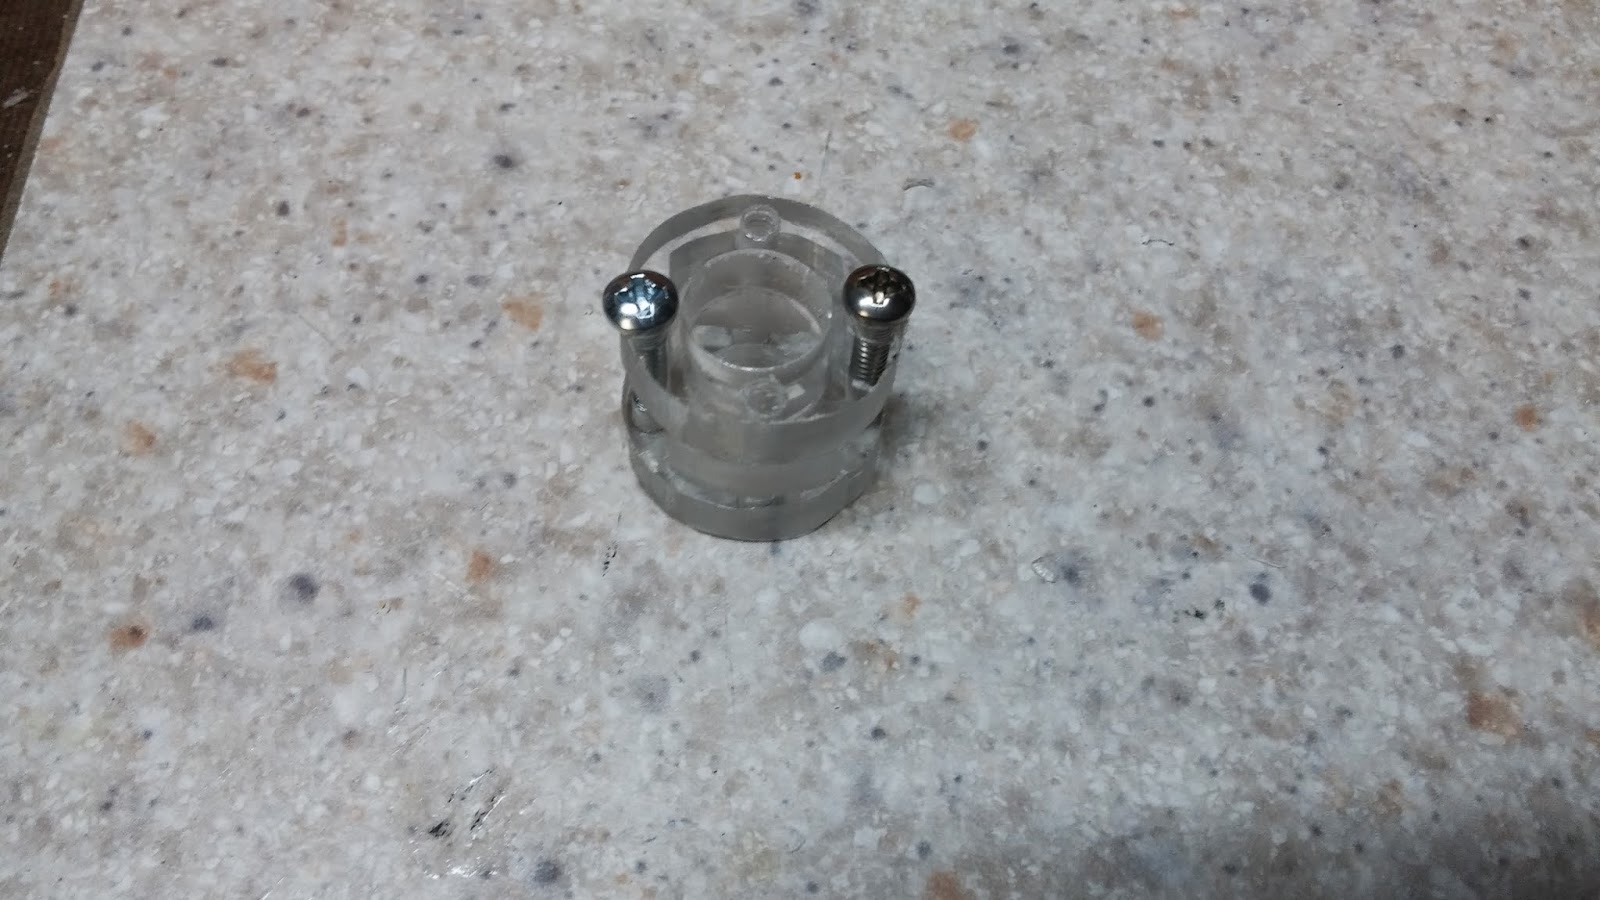
Once you make sure that the catch is put together properly (the catch piece can freely slide through the catch plates and the catch fits in 1" PVC), you can sand the overhanging screws down. Do this with your dremel's sanding bit or it will take forever. Now the catch should be able to fall all the way through 1"PVC. Cut the 1" PVC to <">

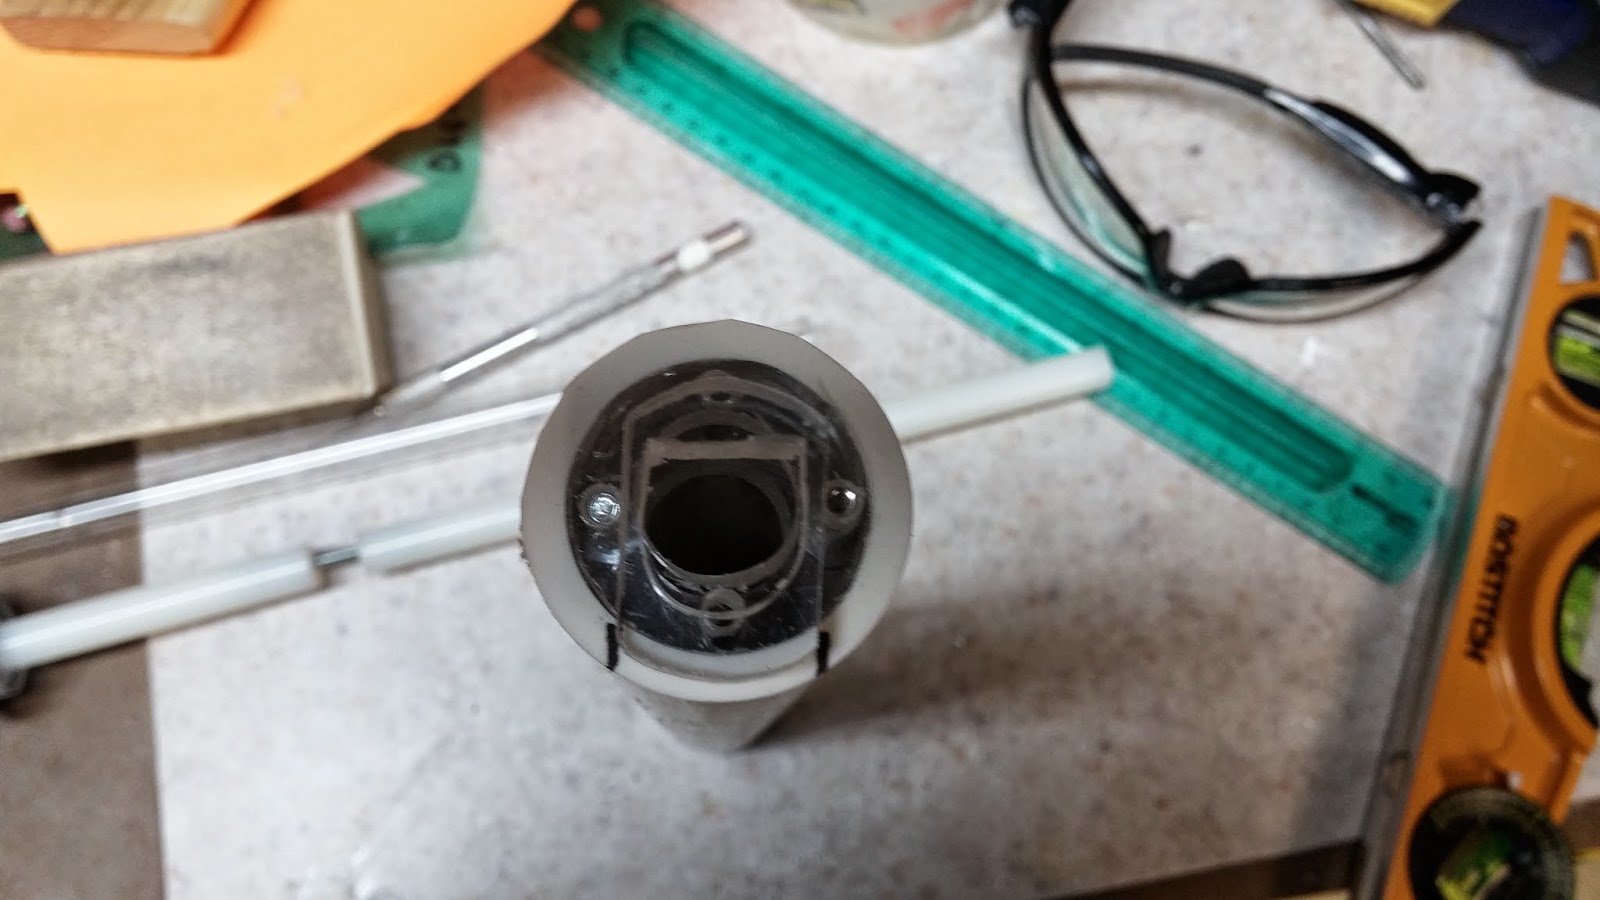
 Line up the actual catch piece with the 1" PVC like this and draw lines on the outside of the catch piece.


To fasten the catch to the 1" PVC, you want to out the catch plates in the PVC so that the screws already in the catch are facing away. Make sure that the catch is flush with the end of the PVC and make 3 marks of where you are going to drill. You will be drilling into the front catch plate without the screw heads. Drill the three holes with a 7/64" bit and tap them with the 6-32 tap. Finally, fasten the catch with three 3/8" 6-32 screws. Everything is better explained in the picture.


Extend the lines you drew earlier to be the length of the catch.


Cut out these lines with a cutting disc on the dremel. The below picture will also help with figuring out how to fasten the catch.


Cut the heads off of the screws that you used to fasten the catch. Use the same tool that you used earlier to cut the long screw. Screw the catch back in. I could screw the screws in all the way without using any tools, but if you are having trouble grip the screws with some pliers and screw them in.


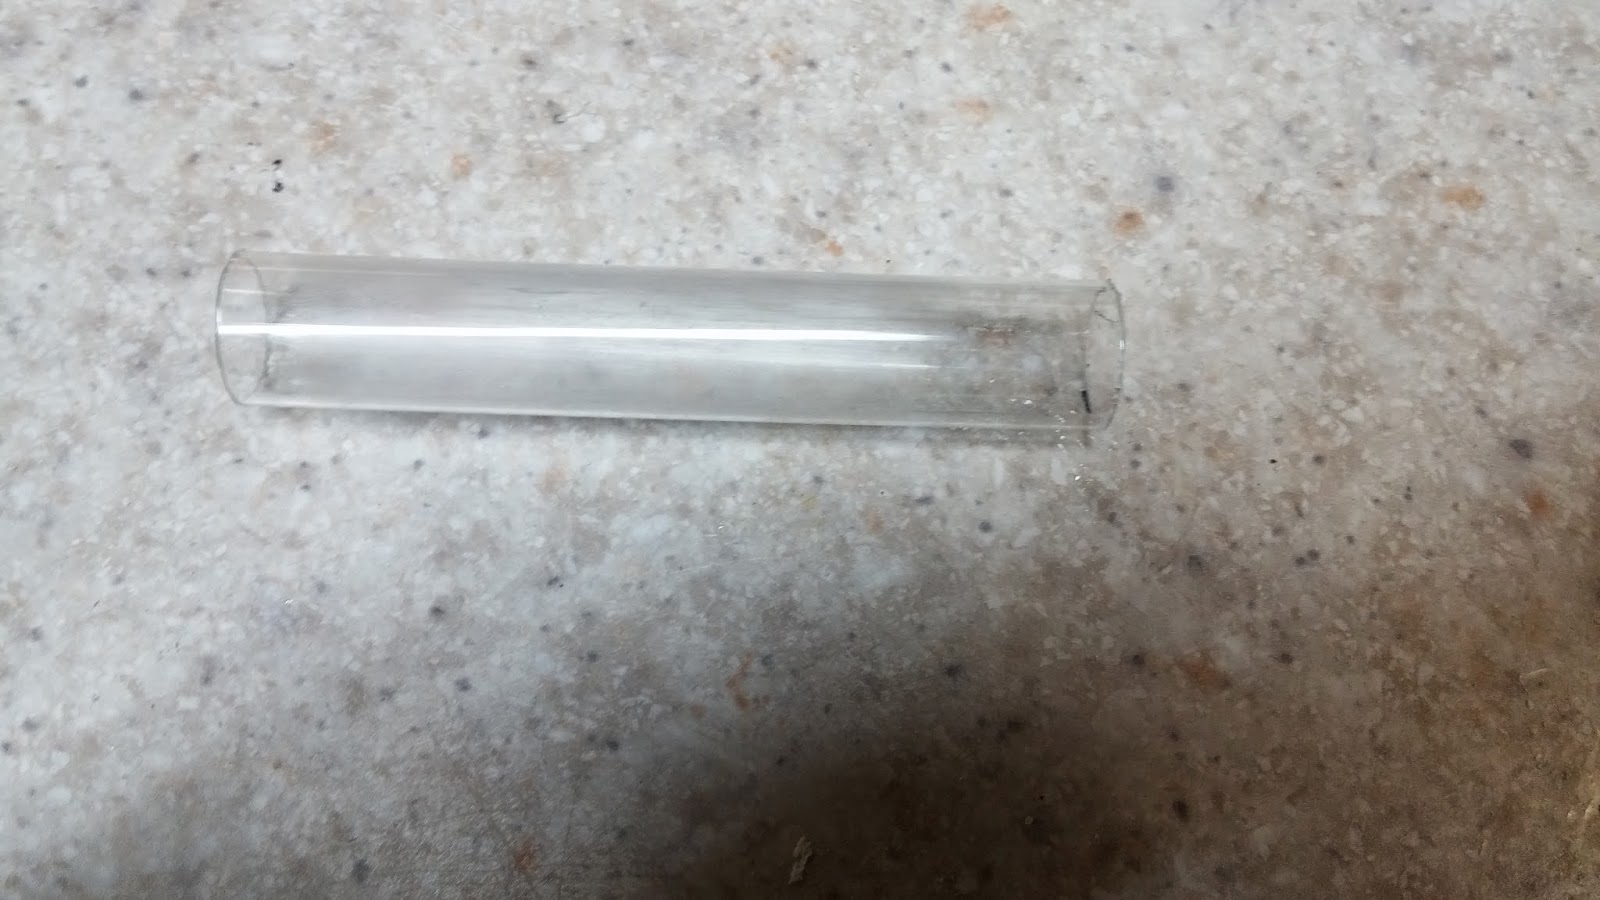
Time to use the PETG! Cut the PETG to <">.


Use your dremel sanding bit to widen the hole on the front catch plate until it snugly fits the PETG in it. Super glue the PETG in and you will be almost done with your catch.


This next part has an easy option and a hard option. The easy option will work, but the hard option is much more reliable.
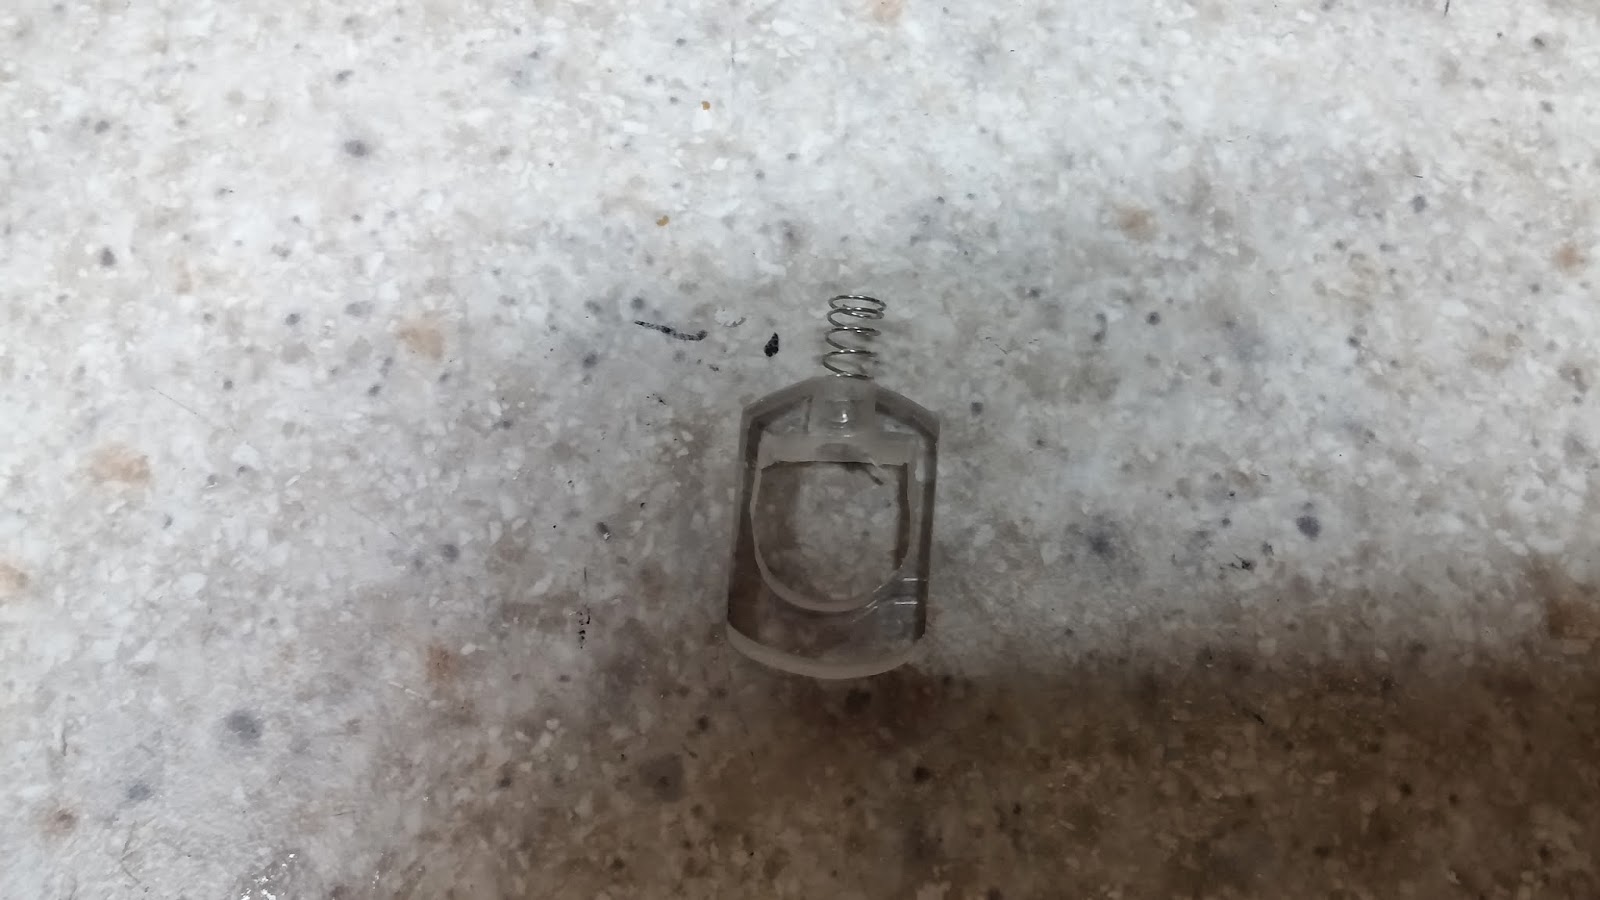
Easy: Take your nitefinder/maverick catch spring, cut it to a length that looks like the length sticking out of the catch piece in the picture below, and hot glue or super glue the spring on.

Hard: You want to drill a hole in the top of the catch piece that will be able to fit the maverick/nitefinder catch spring in it. Don't drill the hole all the way through so that the spring will stay in place. I start with a small drill bit like 7/64" and work my way up to whatever size will fit the spring. If you don't have a lot of drill bits, just use a hobby knife to slowly carve away at the hole.


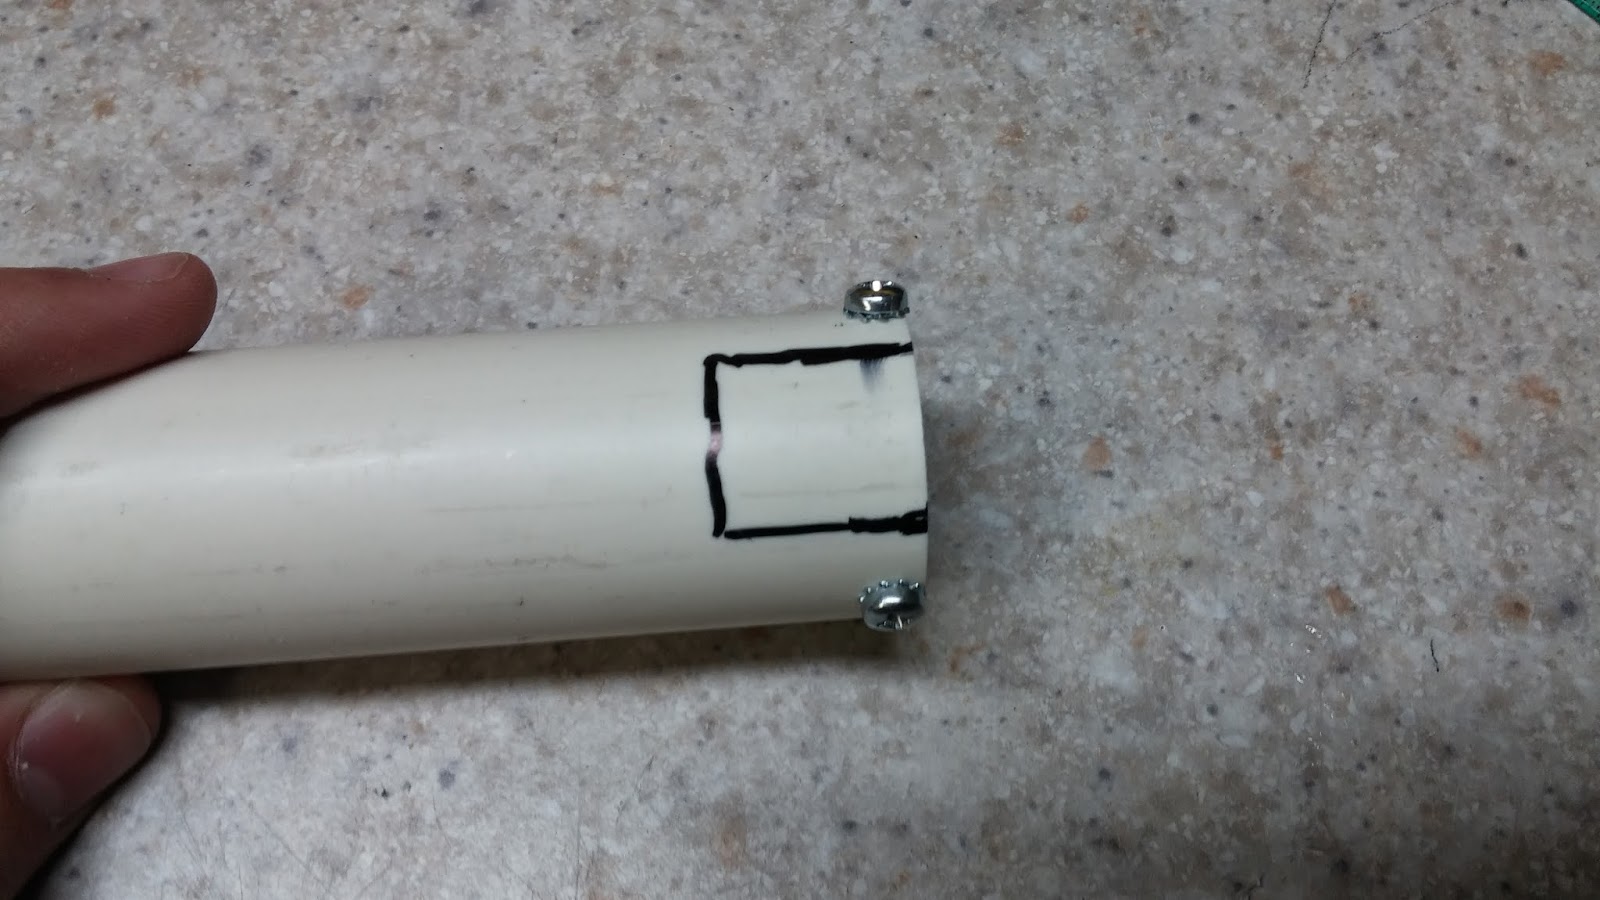
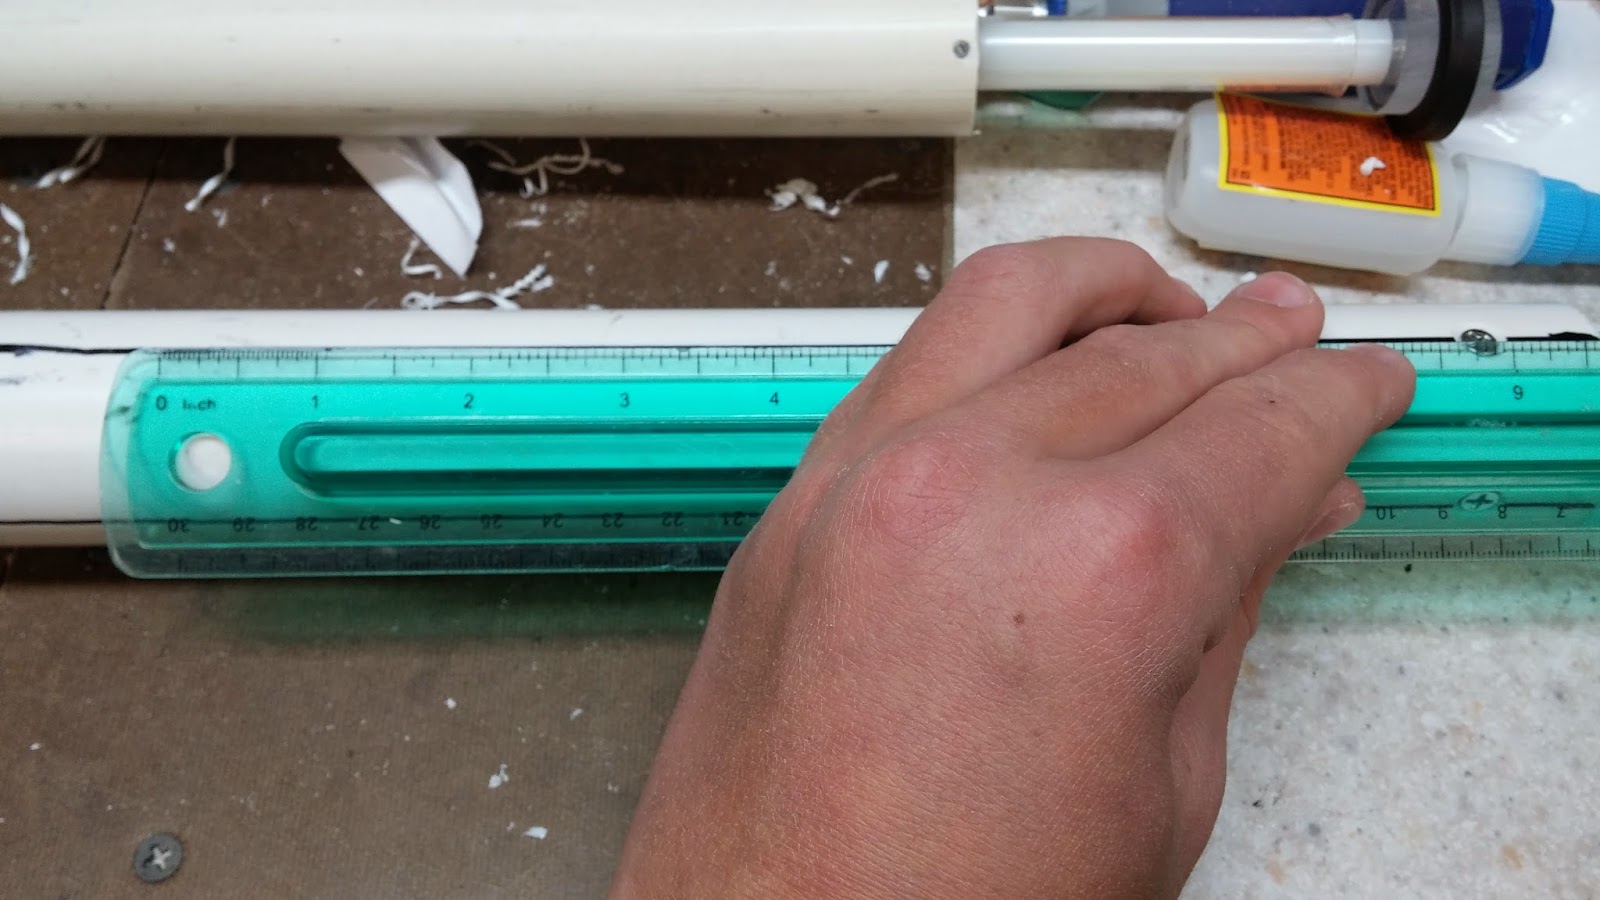
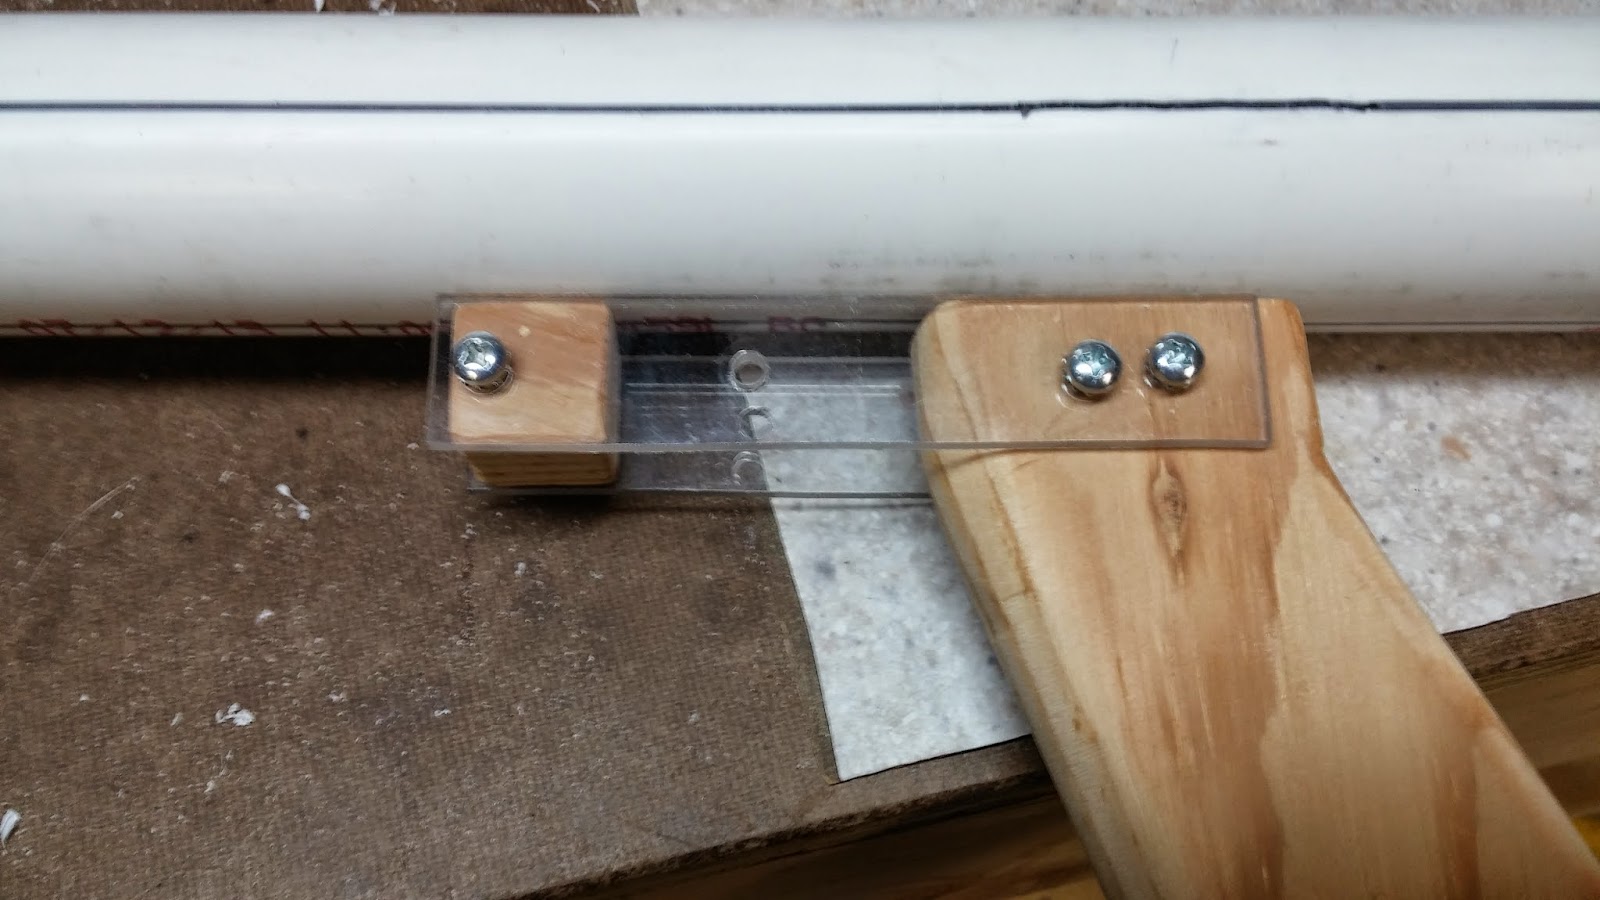
Now that the catch is done it is time to fasten the handle. To do this, measure <"> from the end with the busing and make a mark.


Measure <2.5"> from that mark and make another mark. Connect the marks with lines so it forms a rectangle with rounded edges.


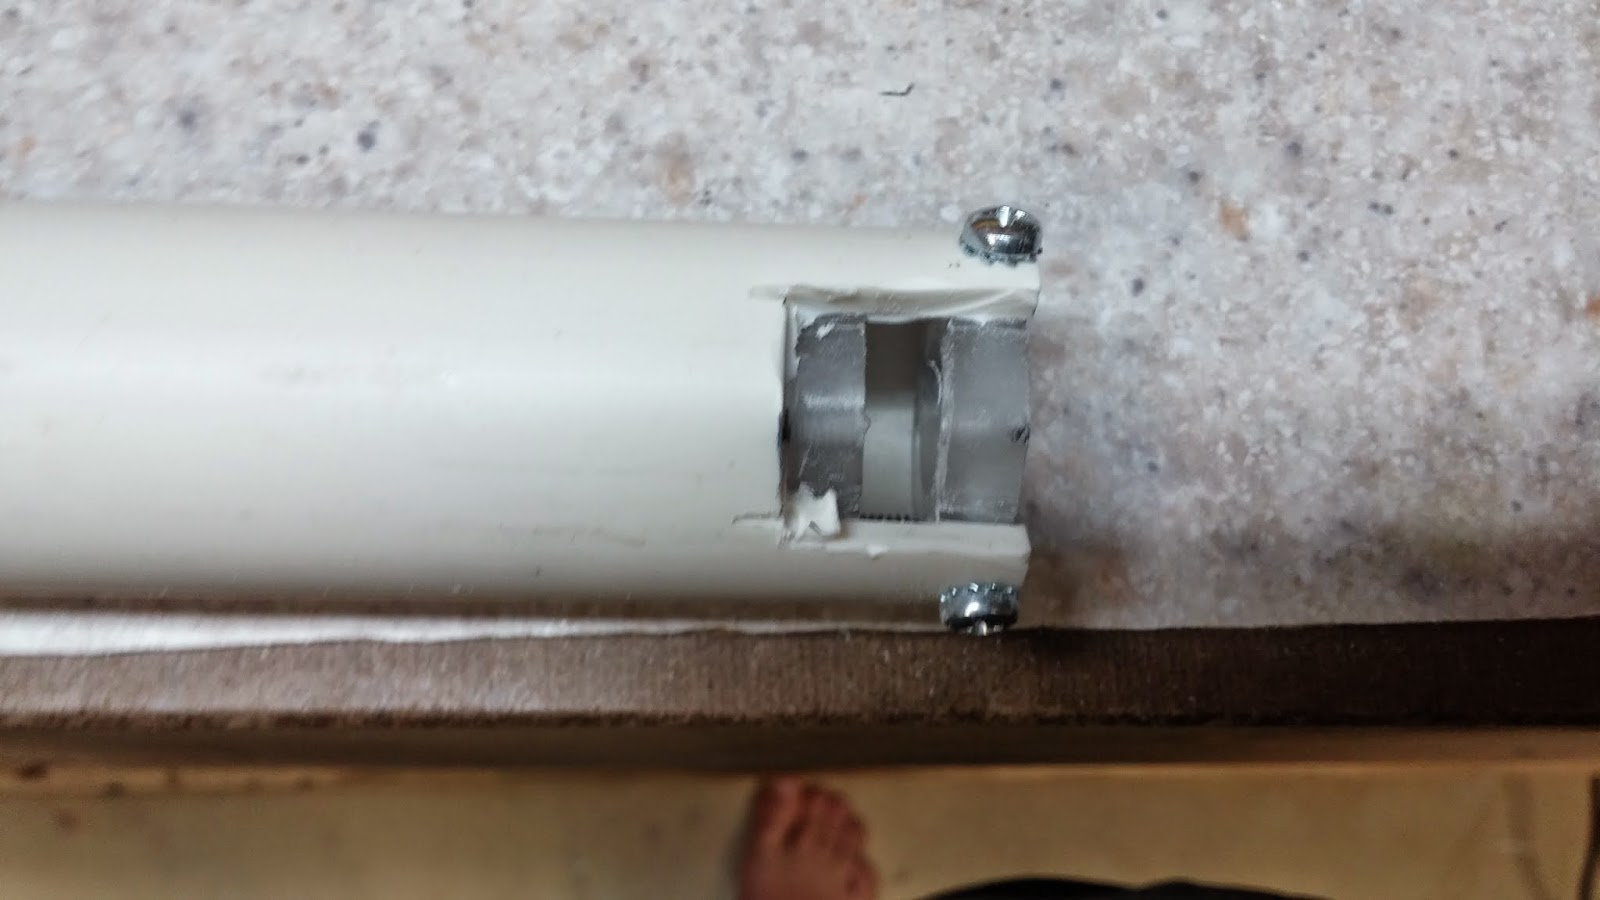
Cut out the shape you just made using the cutting disc on your dremel. Use the sanding bit to sand the edges and make them round.


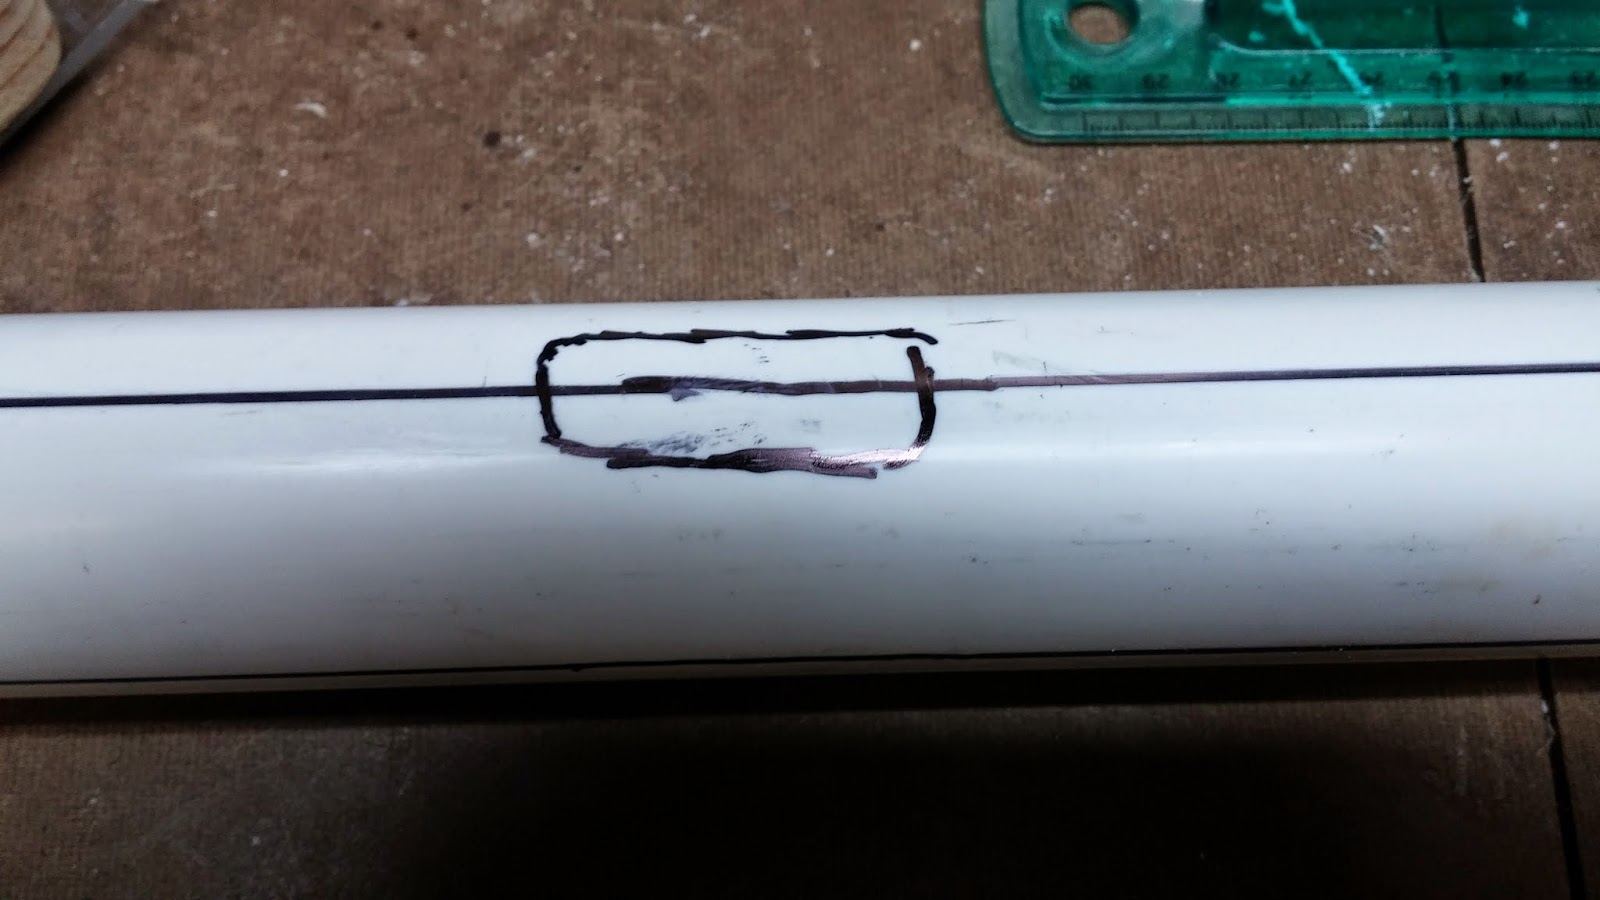
Now on the opposite side of the PVC from where you made the hole, measure <"> and make a mark. Draw two dots on your handle of where you are going to want to screw it in. Line up the back side of the handle with the mark and create two dots on the PVC that are lined up with the dots on the handle. Once you do that, drill holes into the PVC where you made the dots with a 7/64" bit and tap the holes with a 6-32 bit. 
Now tape the handle onto the PVC using duct tape. It helps if you take off the trigger. Try to line up the handle with the holes you just drilled and make sure that the handle is as straight as possible.
There is no picture for this step, but what you want to do is drill through the holes that you just made with a 7/64" bit from the top of the PVC (the big hole). You don't need to be able to drill all the way through, you just need to make marks on the handle.
With your 7/64" bit, make the holes in the handle deeper. 3/4" to 1" deep holes should probably suffice. Now line up your handle again and screw it in using the flathead 3/4" 6-32 screws.
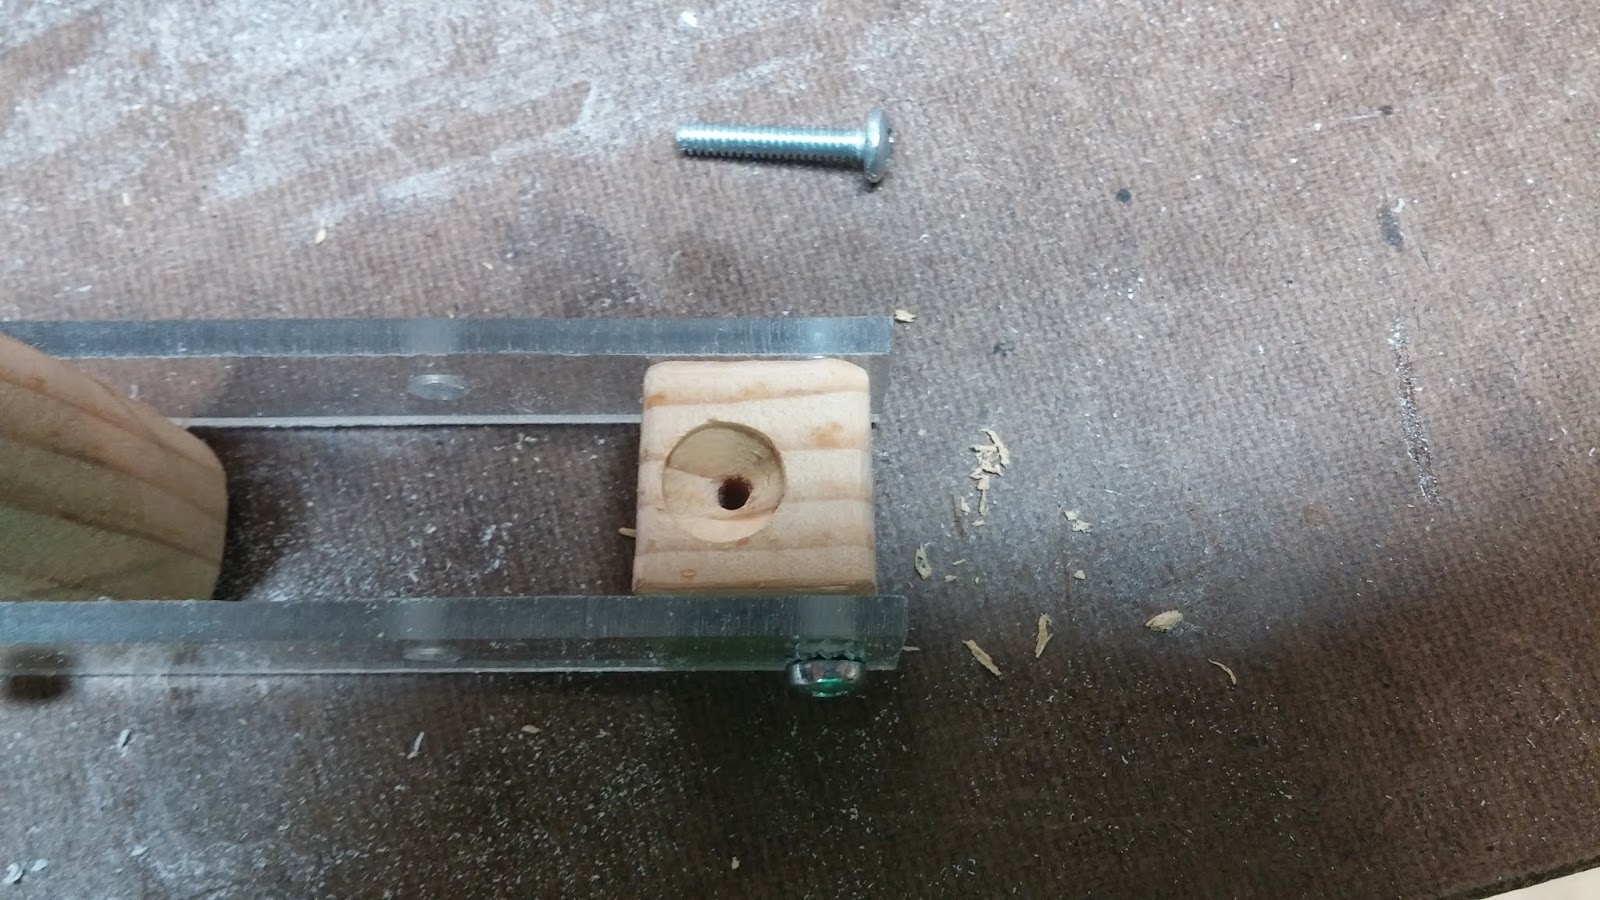
Drill through the from wooden piece on the handle assembly with a 7/64" bit until you drill into the PVC. 
Now remove the handle. Tap the hole in the PVC that you just made in the previous step with a 6-32 bit. Countersink the holes you made to attach the handle with your countersink bit and countersink the front wooden piece on the handle assembly.
Line up the handle assembly with where you would attach it. Also line up the trigger where it would normally go on the handle and make a mark where the back bump part of the trigger touches the PVC. There aren't pictures for this step but you should be able to figure it out. Here's a picture of the trigger again so you can understand what the bump that I'm talking about is:
You have two options now. You can drill a hole big enough for the trigger to fit through at the mark or you can draw a rectangle around the mark and cut it out with your cutting disc. I opted for the second method, but either one will work.
Fasten the handle on again and this time use a 3/4" 6-32 screw to screw in the front wood piece from the bottom. You can also put the trigger on now.
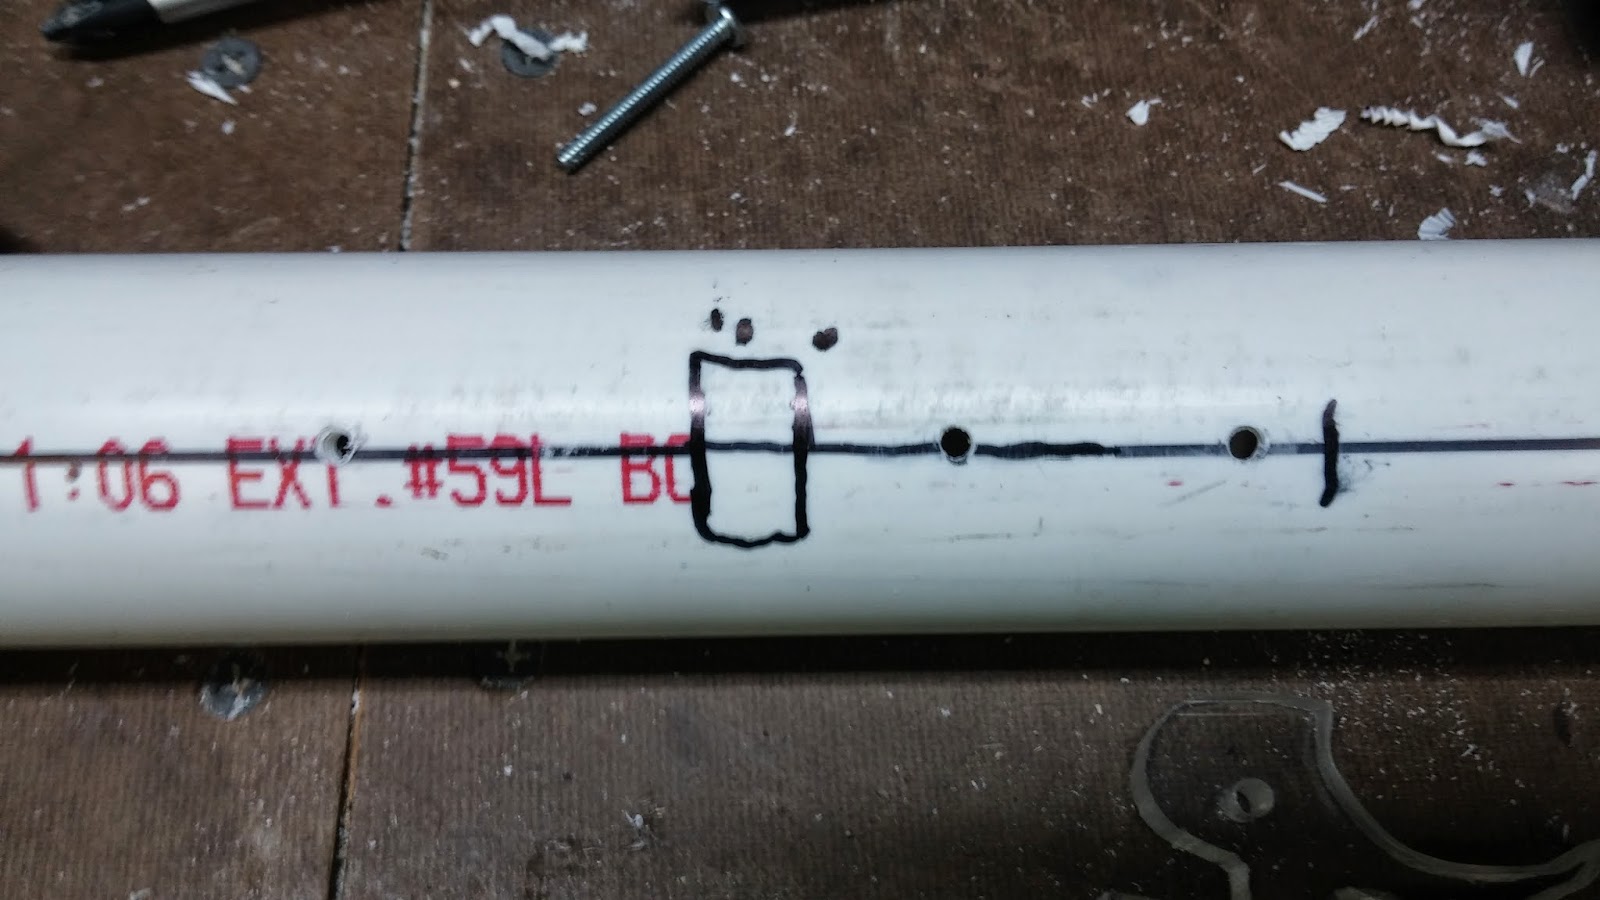
Now onto the slots. To make the slots, measure 1/2" from the front of the handle assembly and make a dot on the line on the side of the PVC. Do this on the other side too. Now measure <"> from the dots and make another dot. Drill into these dots with a <"> drill bit.

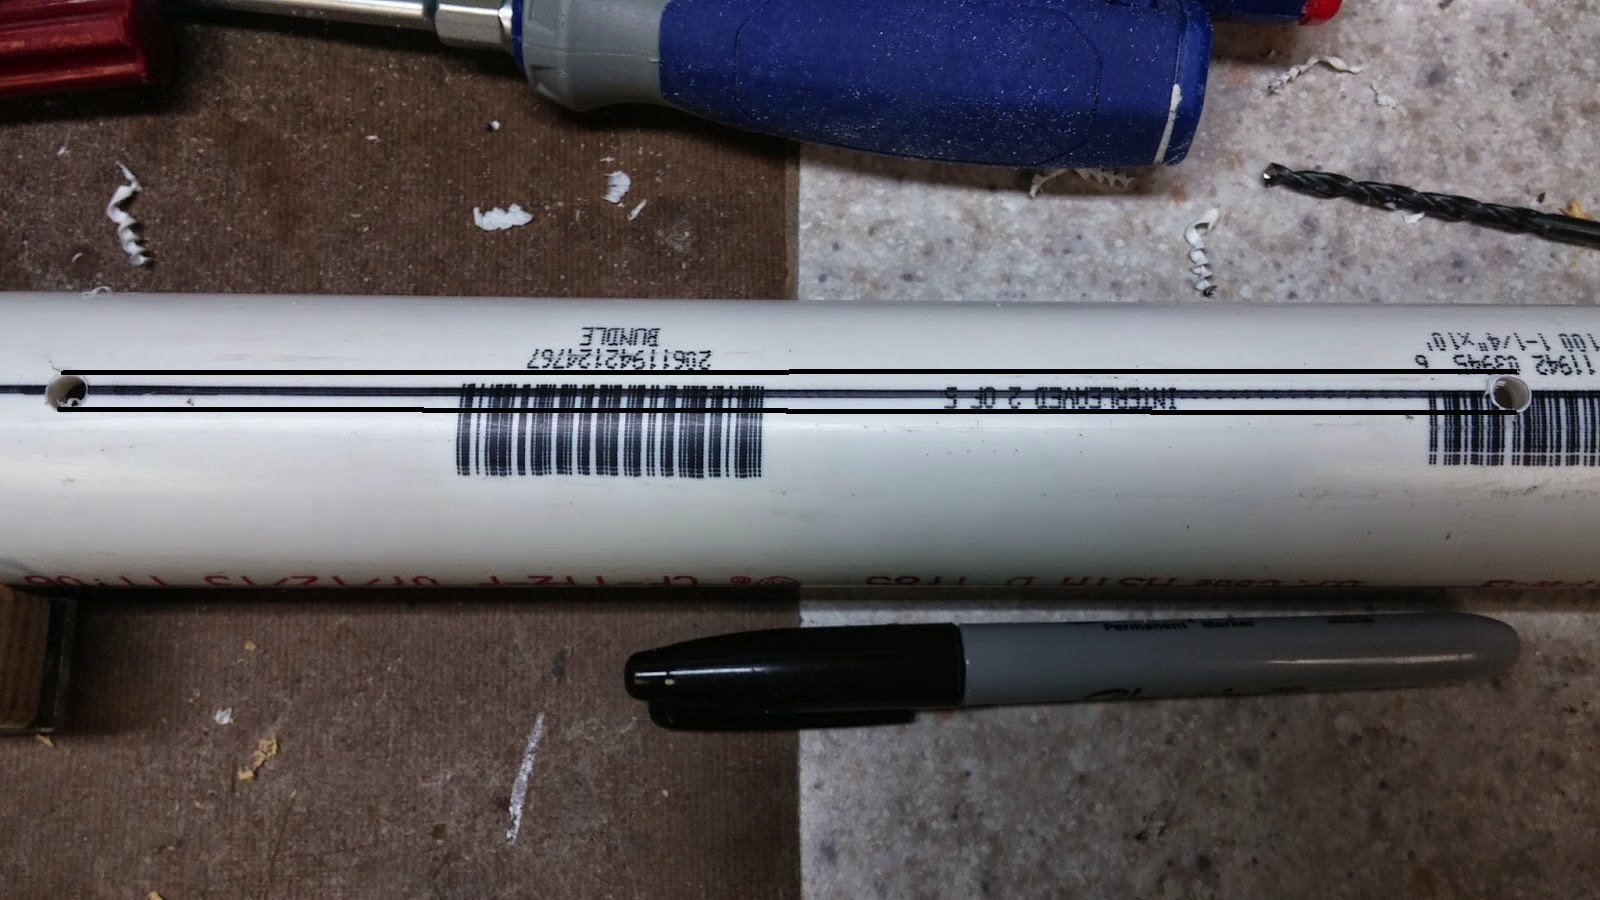
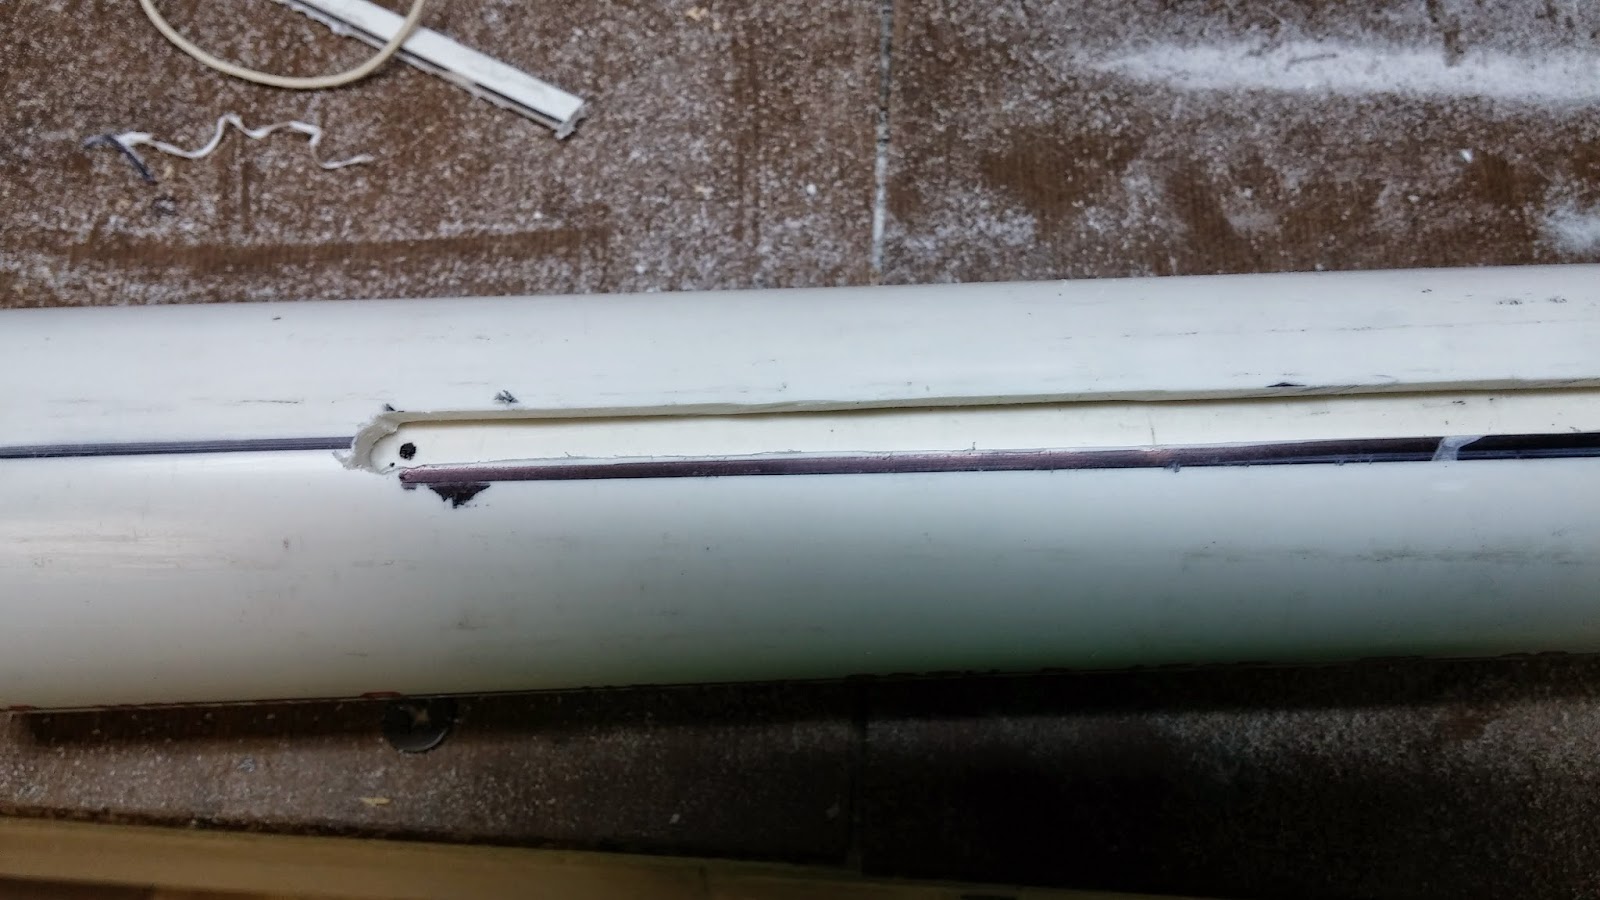
Now it's time to connect the holes. First draw lines using a ruler from the top of one hole to the top of the other and the bottom to the bottom. 
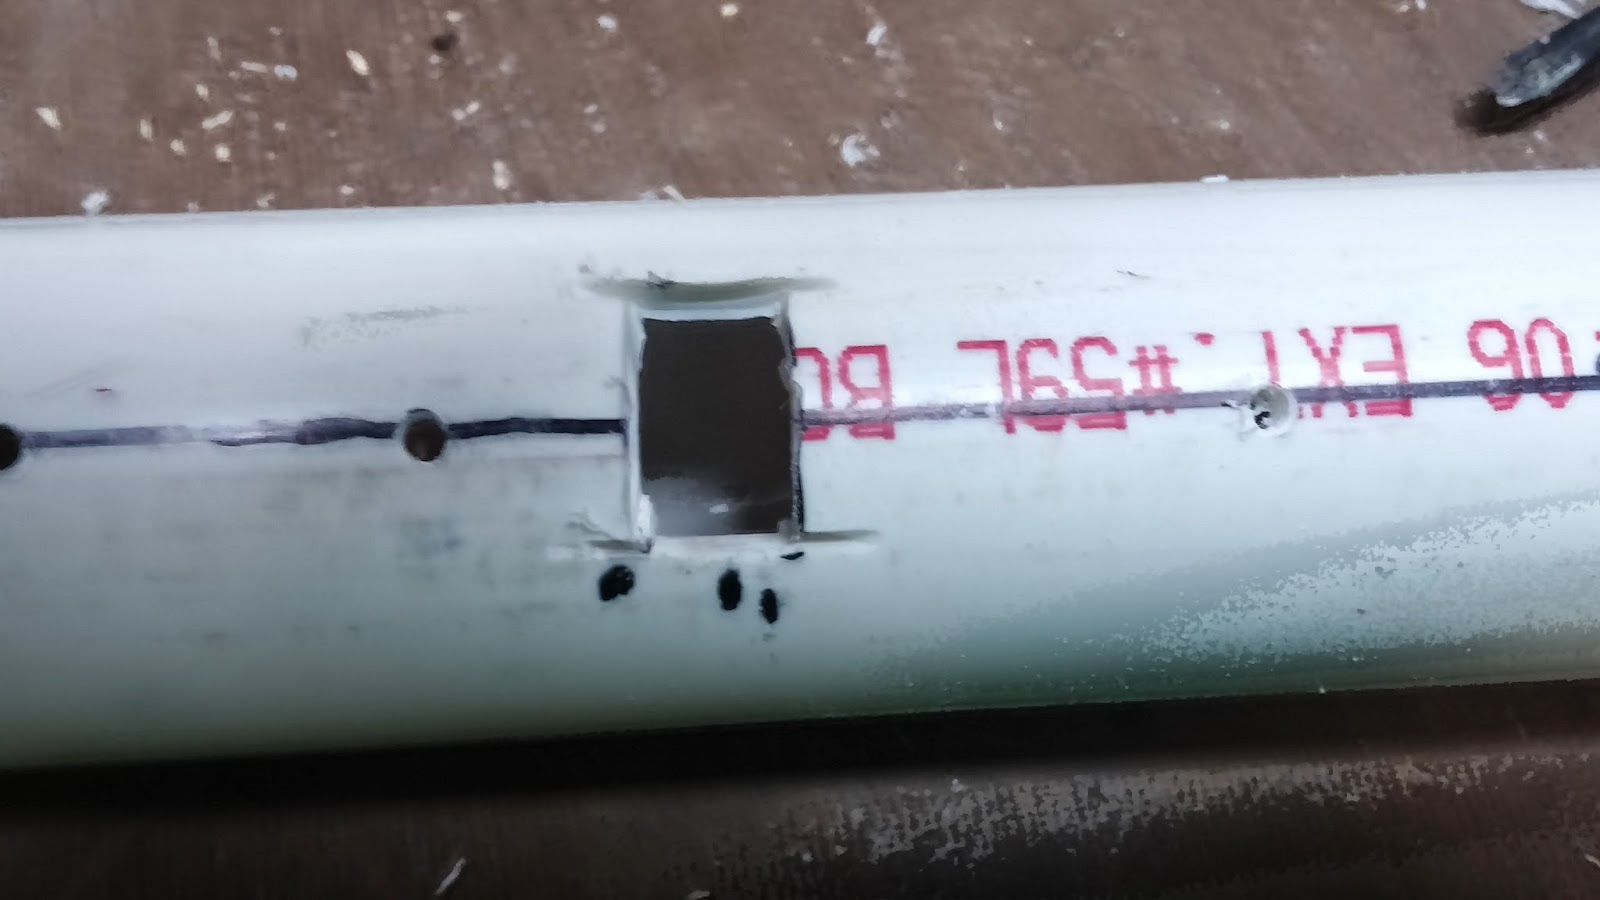
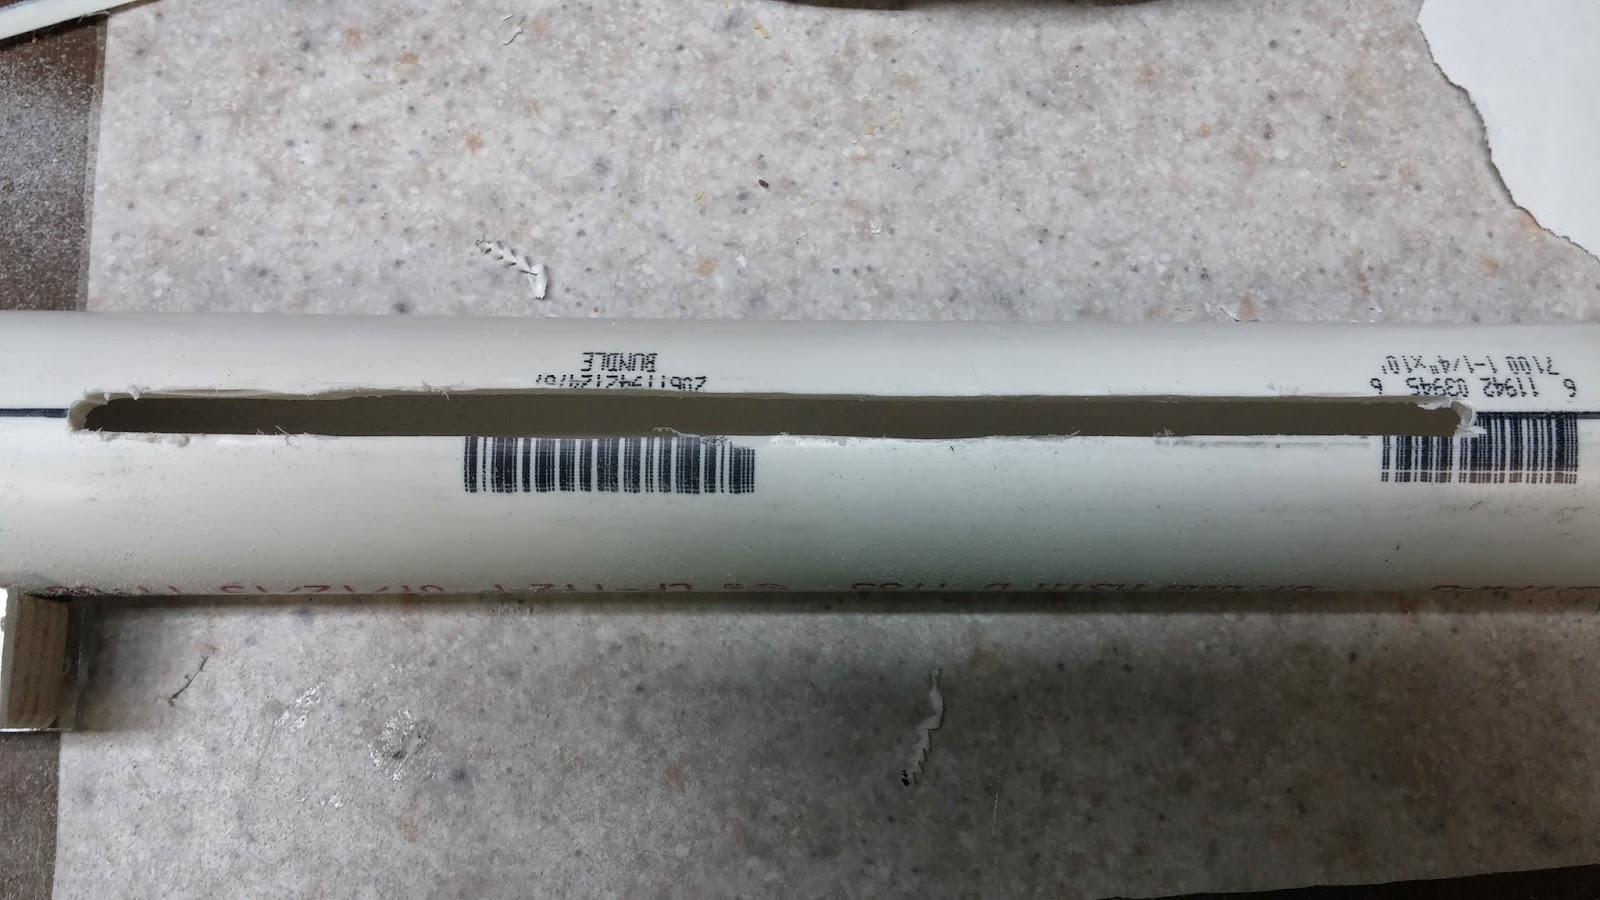
This next step takes patience. You are going to want to cut across the lines that you just drew with your dremel's cutting disc. Don't cut too fast because you really want these lines to be straight. Remember to cut the slots on both sides.
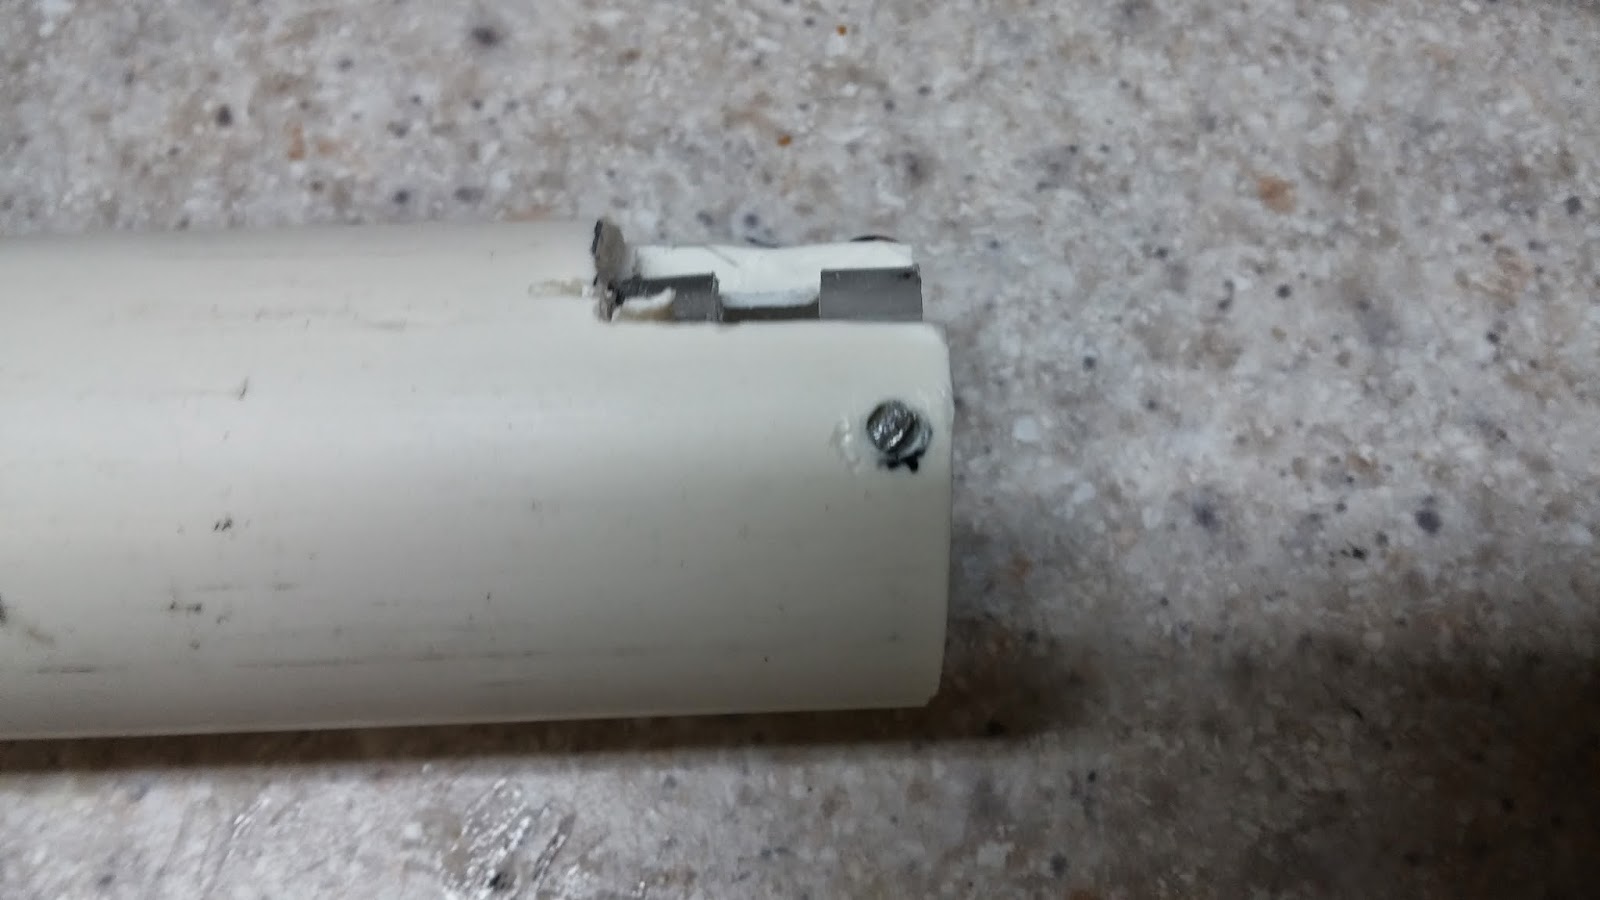
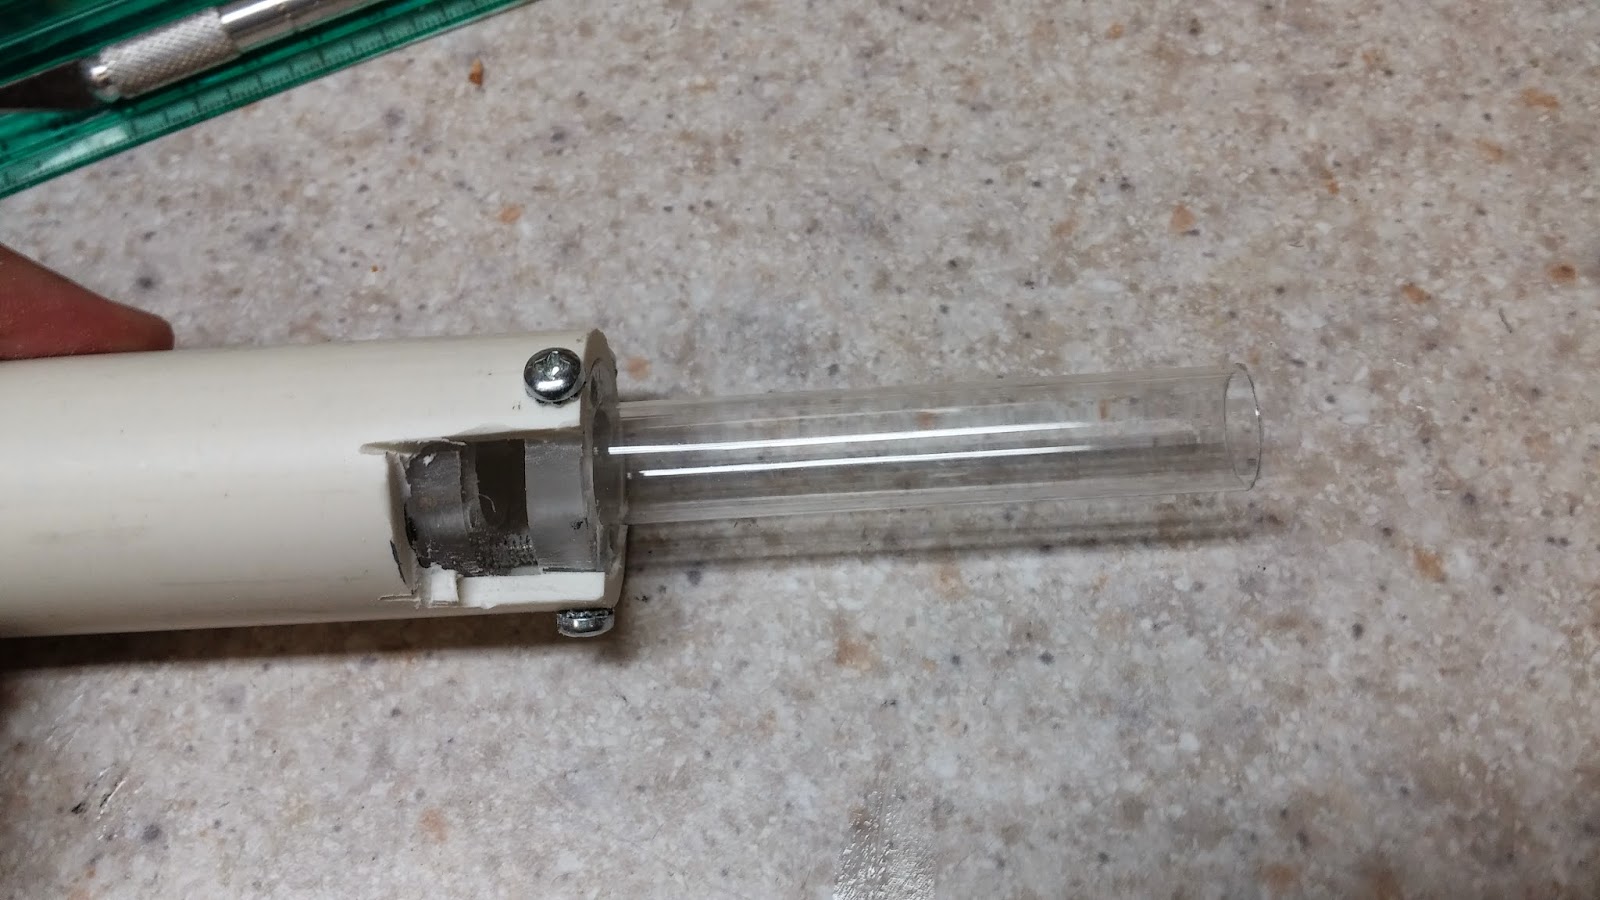
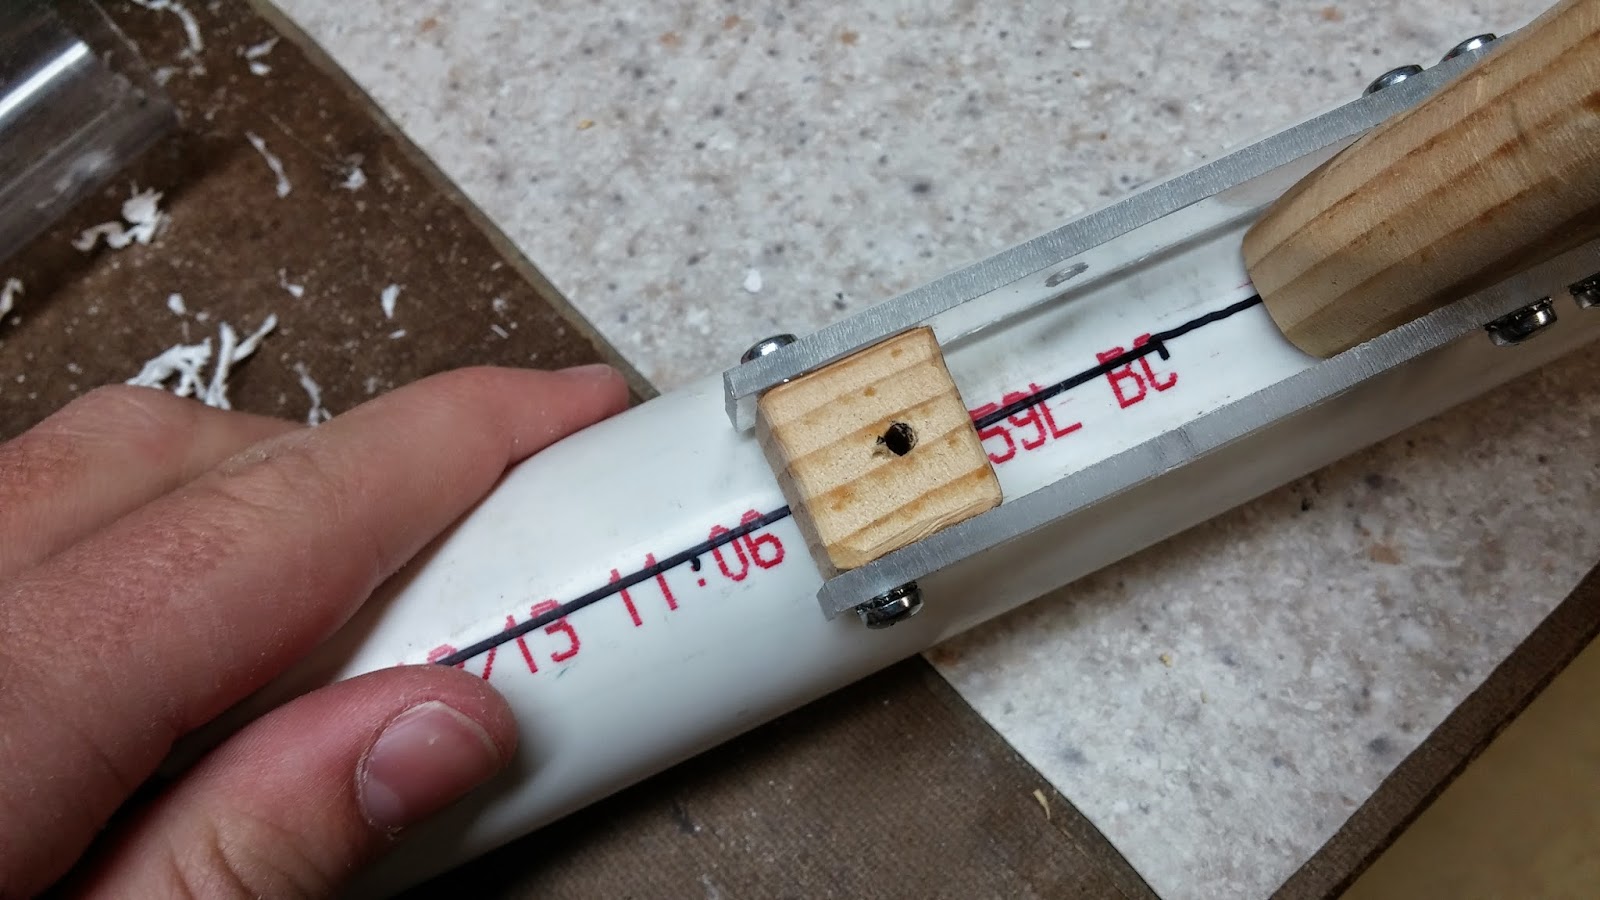
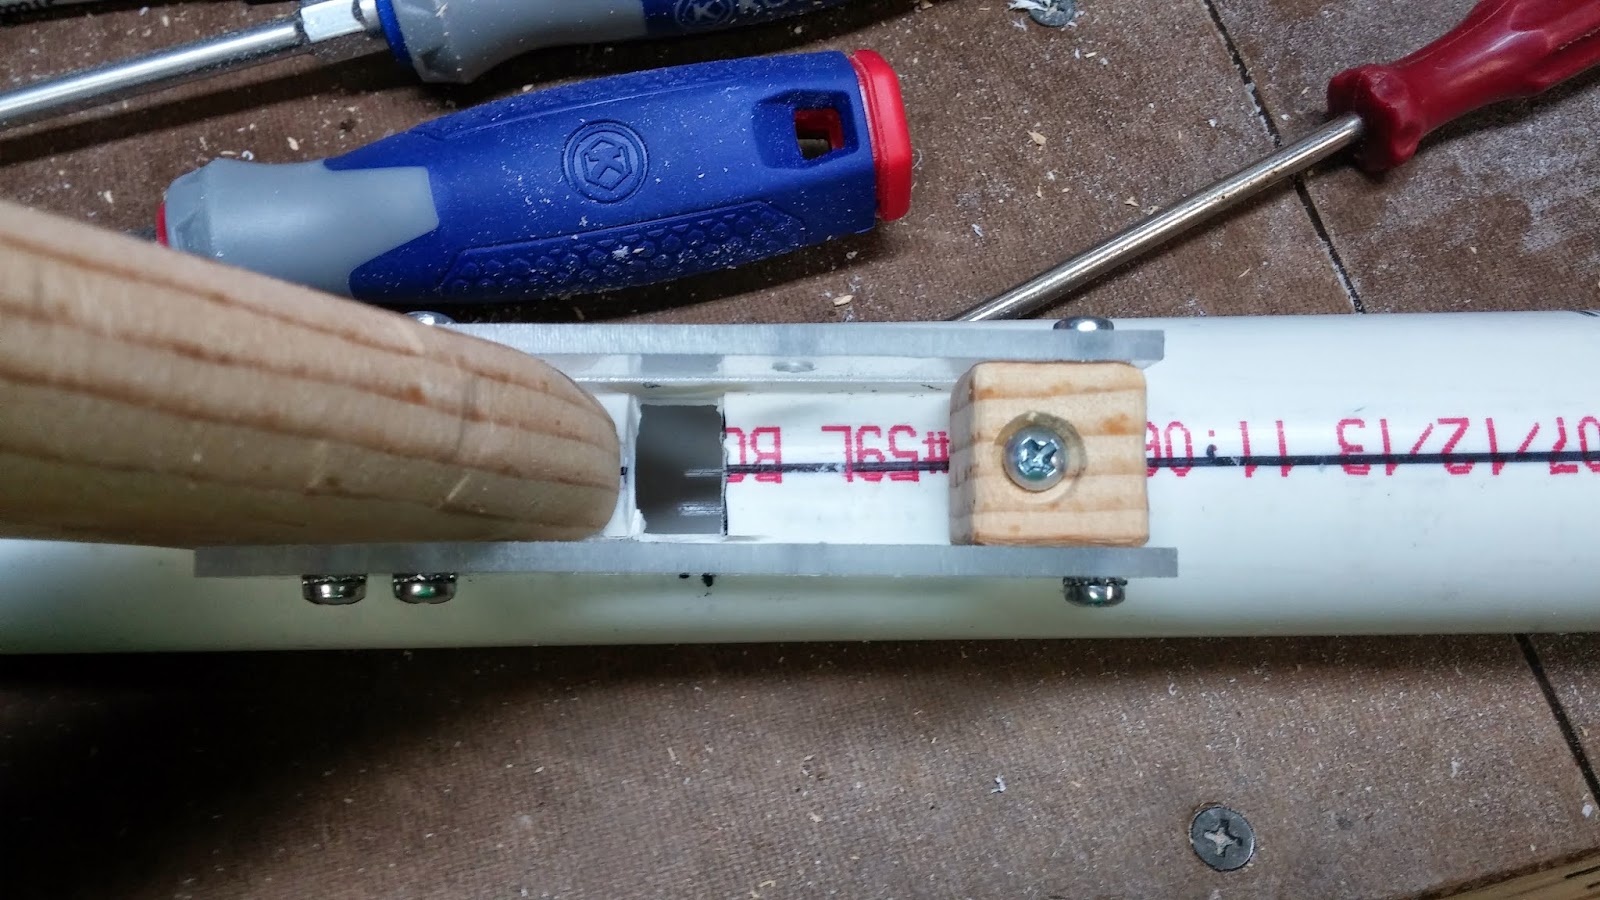
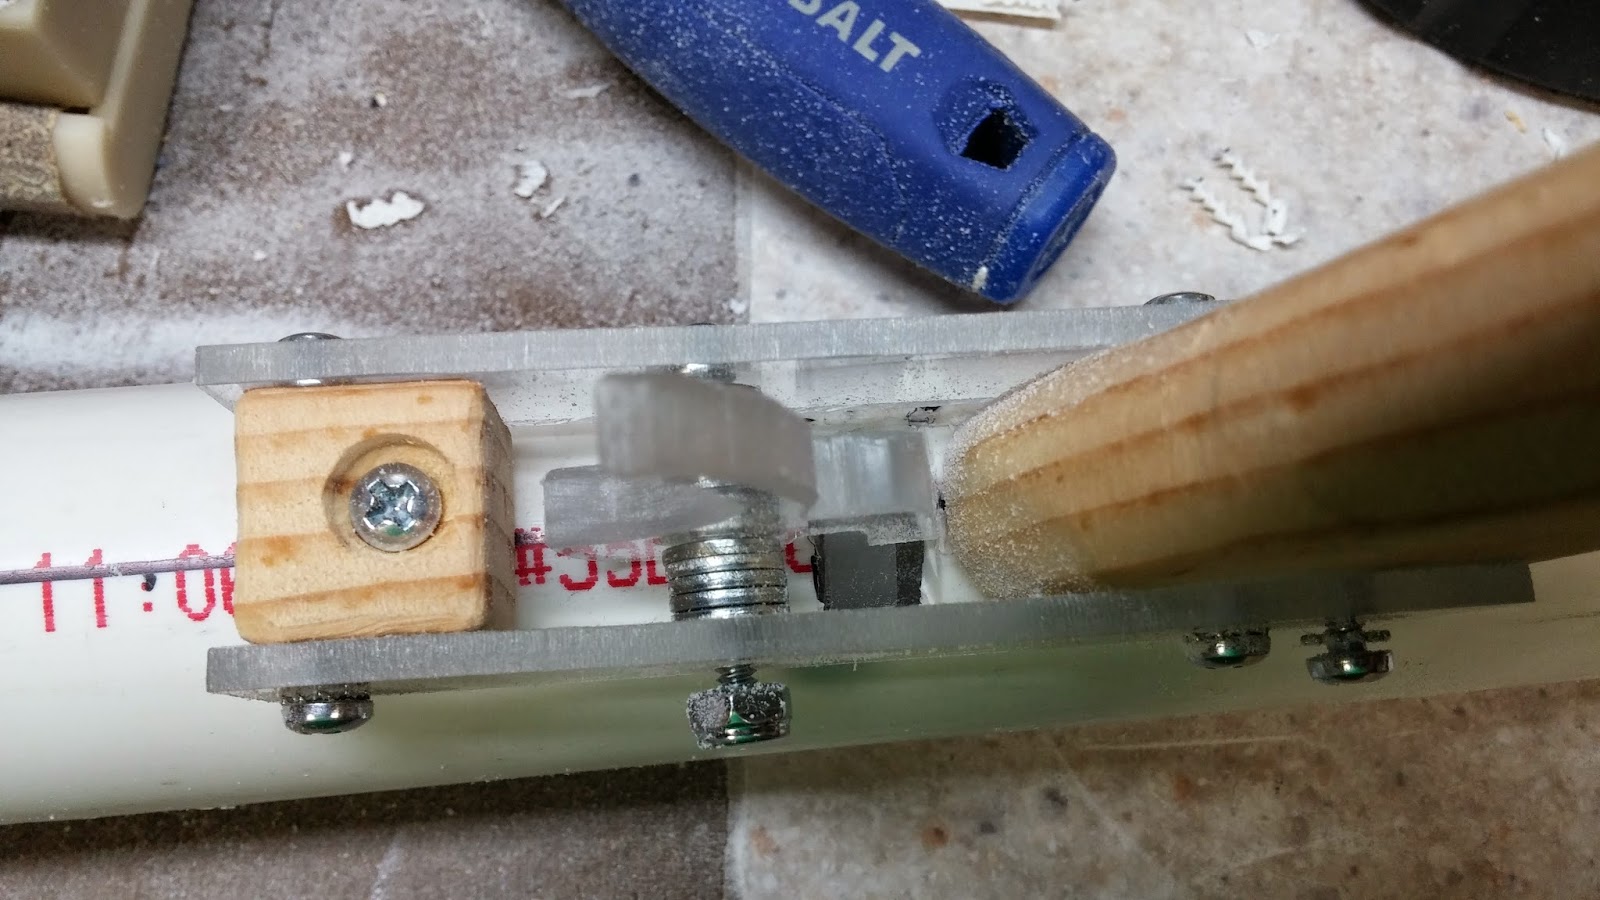
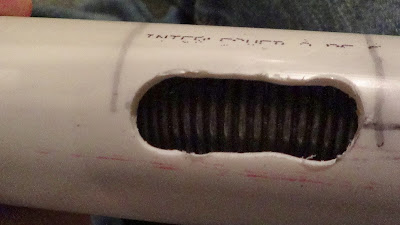
Push the whole catch assembly into 1.25" body. Line it up so you can see the catch through the hole for the trigger.
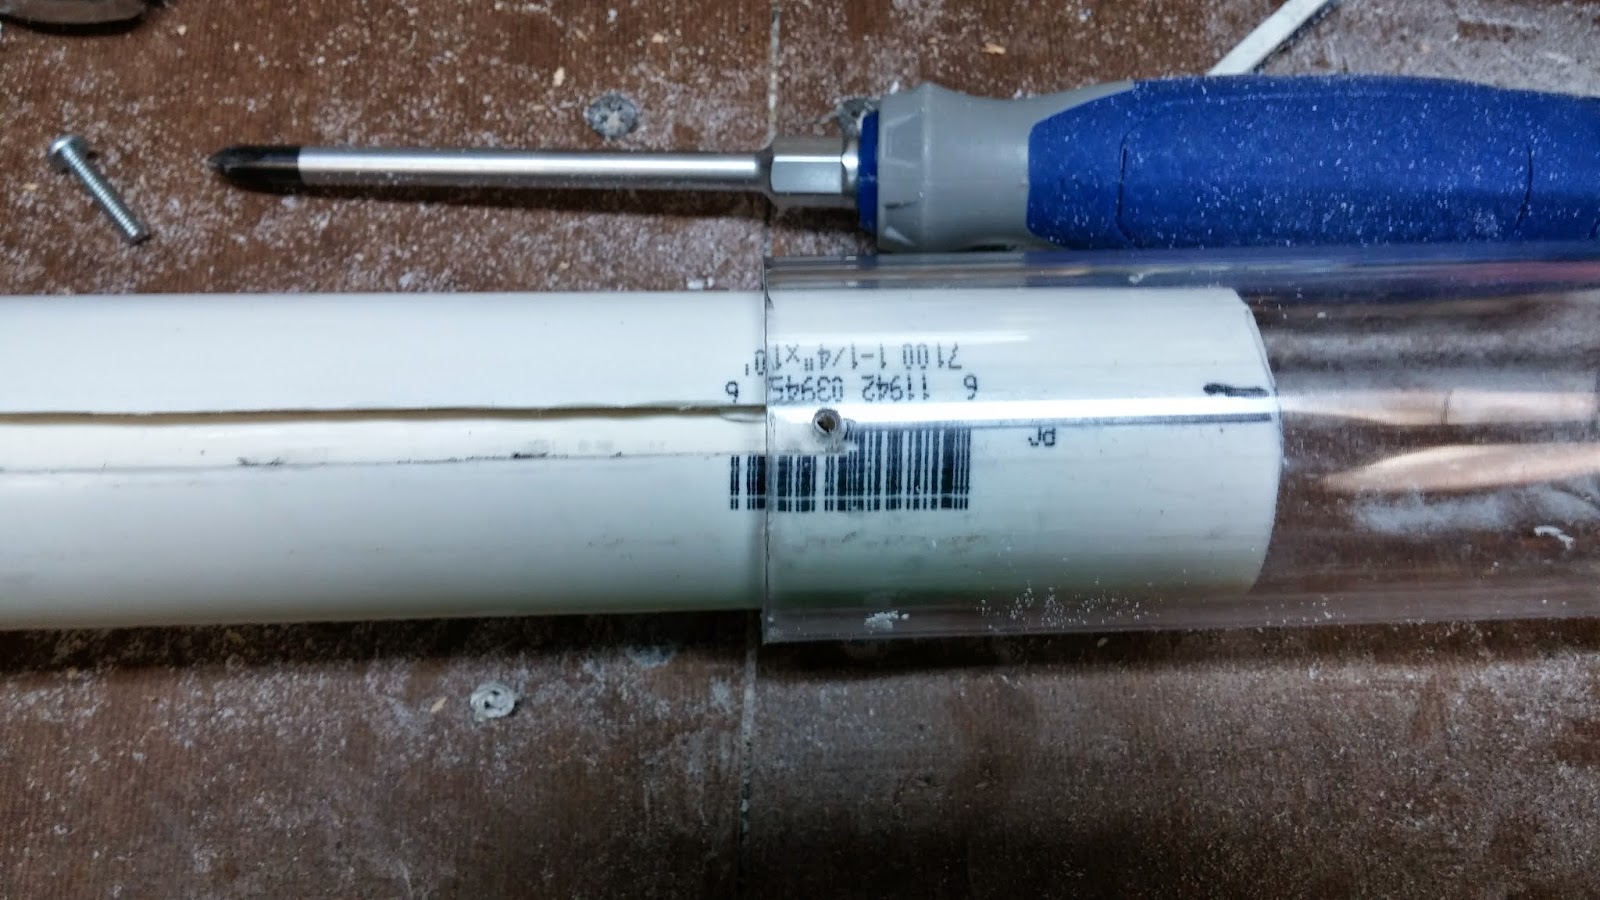
Make a mark on the 1" PVC (catch assembly) where it is lining up with the front of the slot. Do this on both sides like always. Drill into these dots with a 7/64" bit and tap the holes with the 6-32 bit.
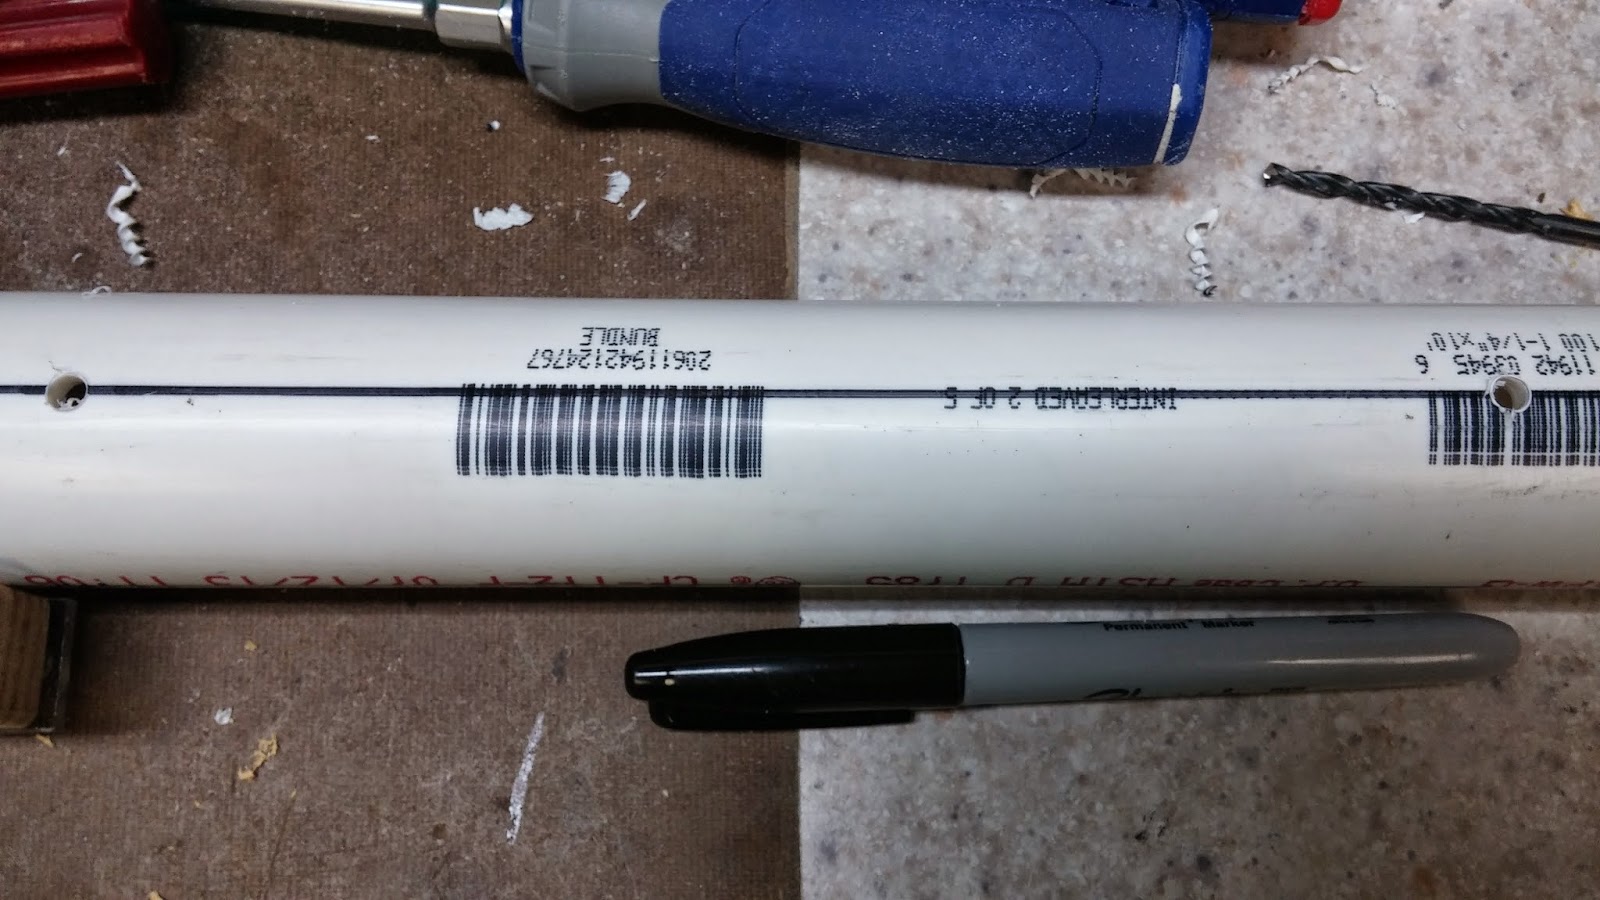
Take the 2" PETG and cut it to 5" long. Put it onto the blaster and line it up with the holes that you just drilled in the 1" PVC. You want to have about 1cm of PETG behind the marks you made. Drill the marks with a 7/64" bit and tap it for 6-32. The picture should explain everything a little bit better.
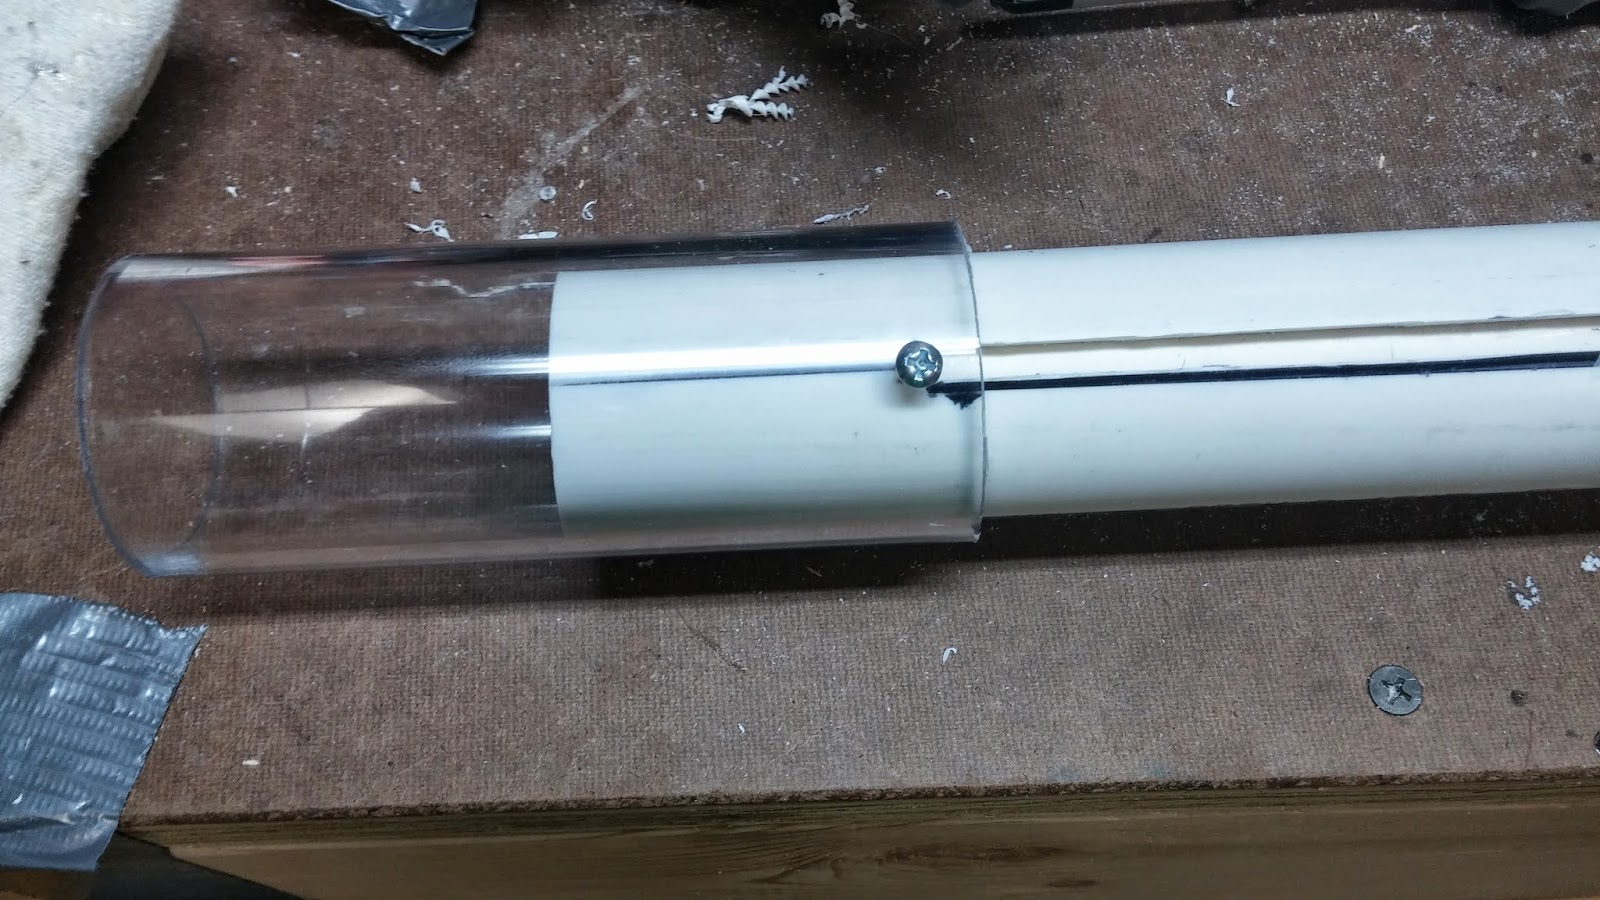
Screw the the PETG onto the 1" PVC with 3/4" 6-32 screws.
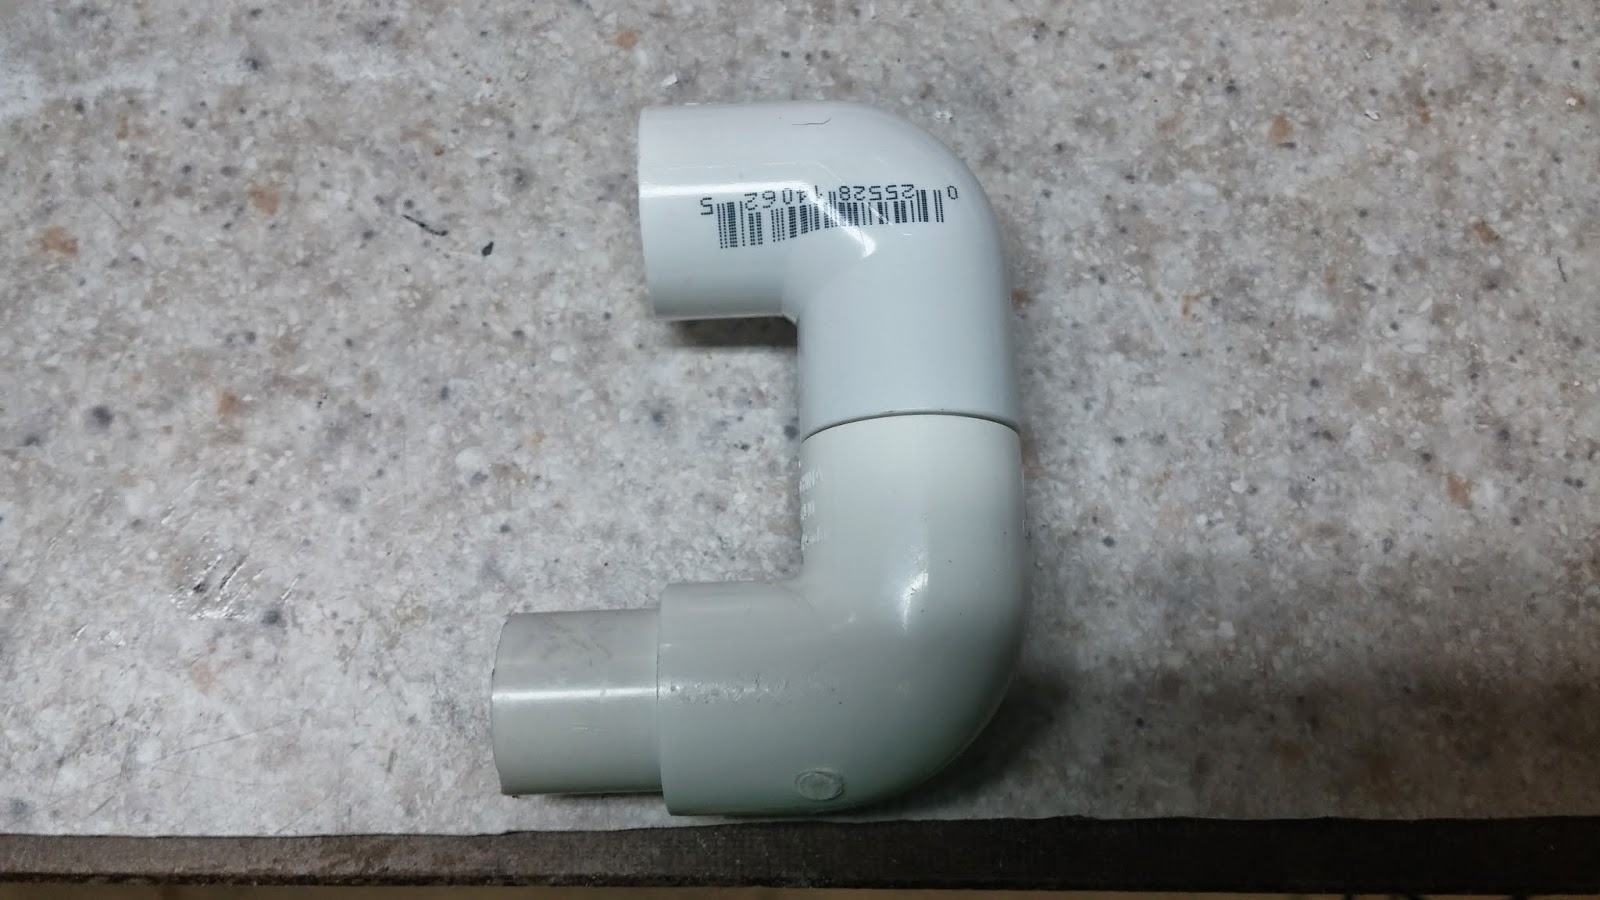
Take your two 1/2" PVC elbows and put them together like in the picture. Use the 1/2" PVC to connect them. It really should be self explanatory. You can glue or screw the pipes together if you want to.
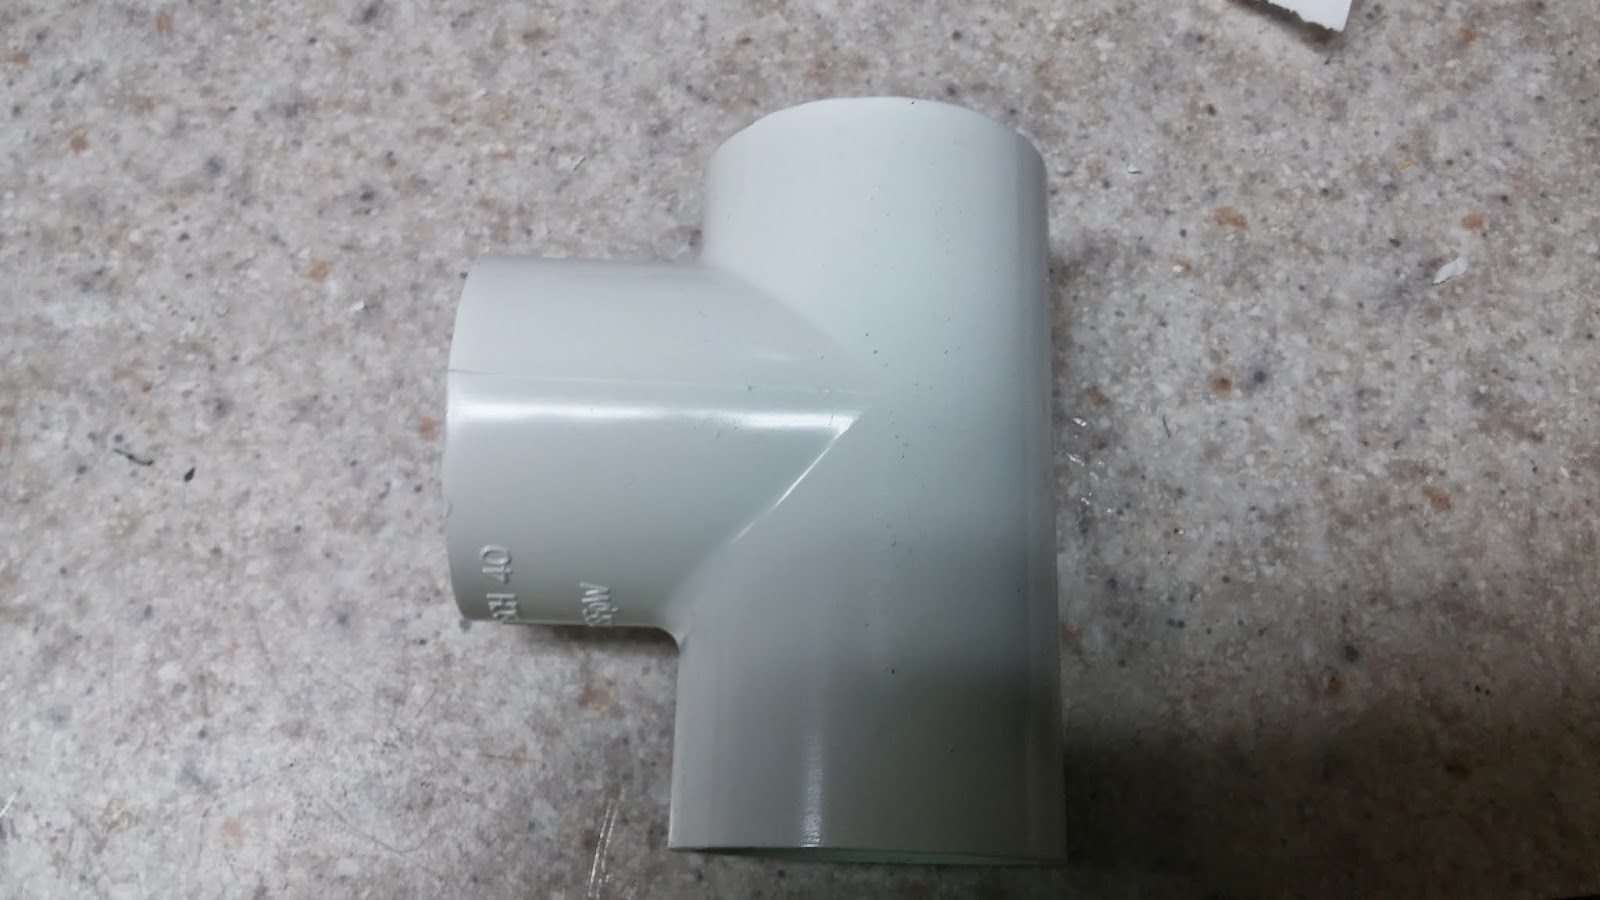
Take the 1.25" Tee and cut down the top a little bit until you can fit the elbows into it.
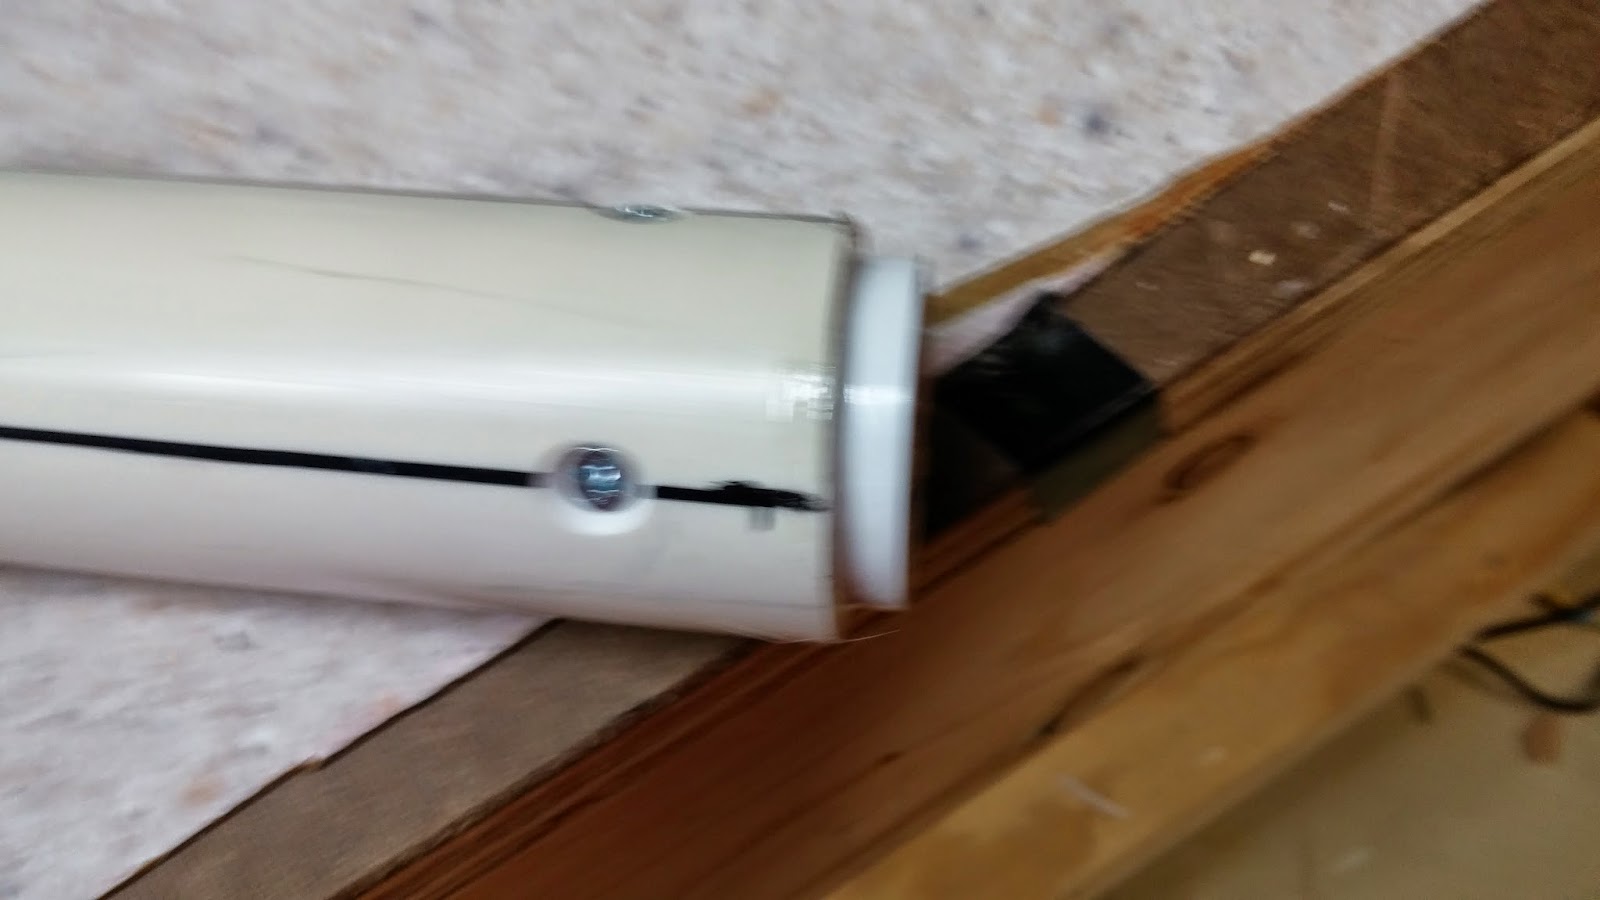
Slide the elbows into the tee with the PVC stub going through the side off the tee. Now put the tee onto the back of the blaster where the bushing is. Make sure the elbows get connected to the bushing.
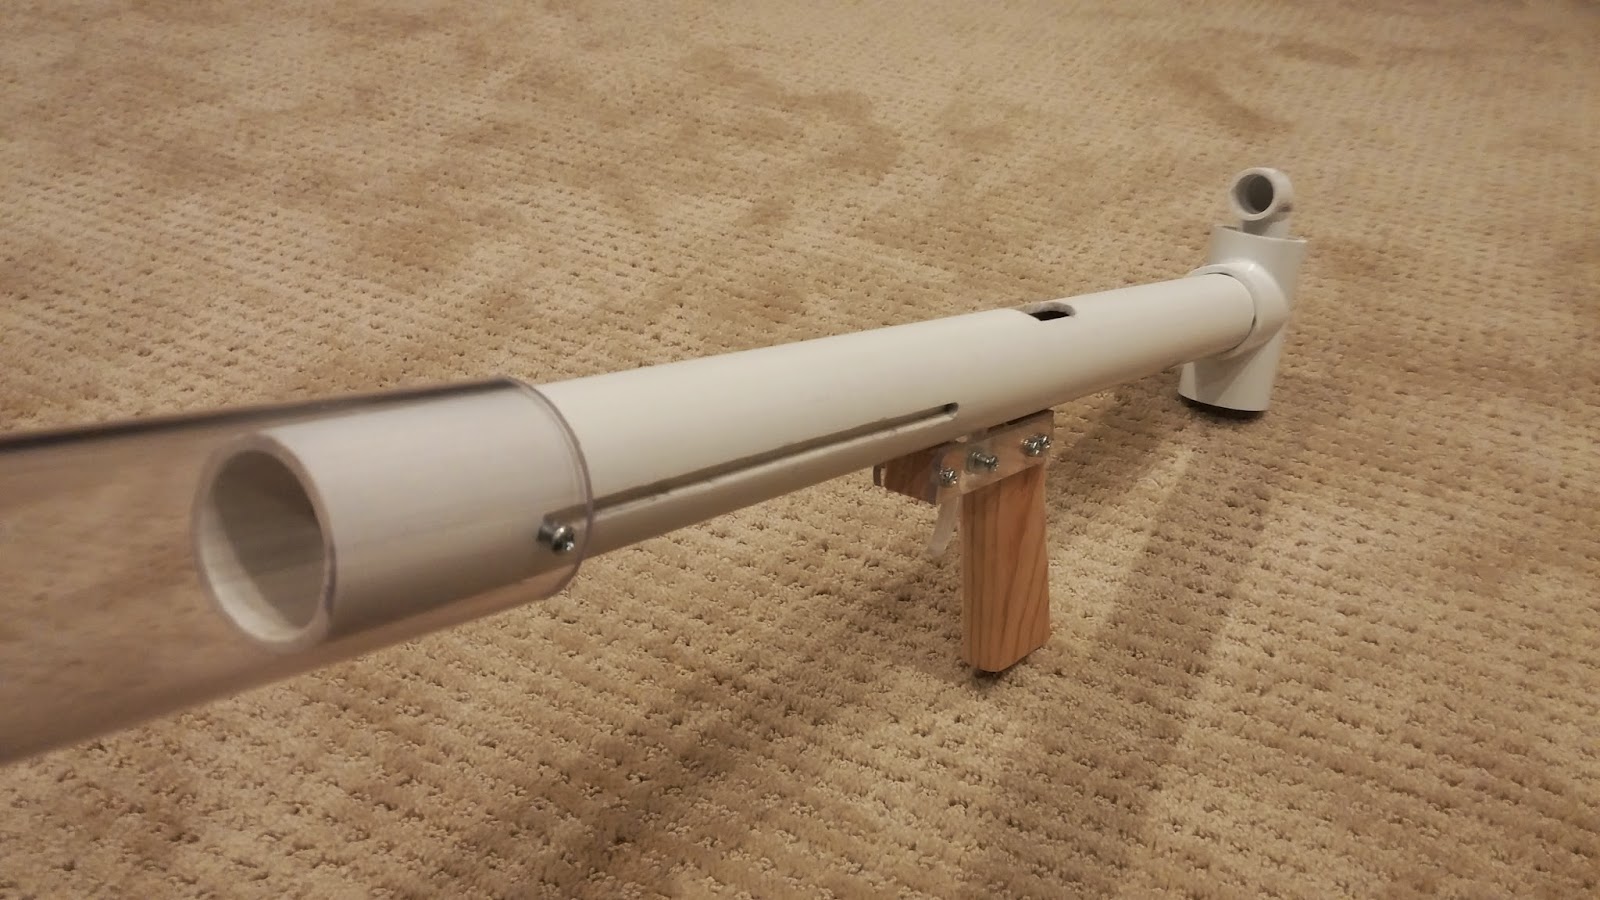
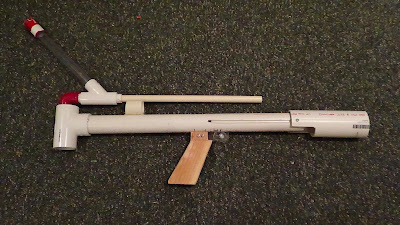
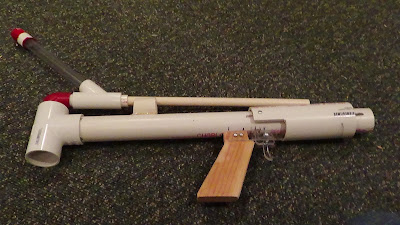
You are now finished with your blaster! As you can see,  I chose to clean it up a bit. To do this, I rubbed rubbing alcohol on all of the PVC to get the sharpie off. I then took a sanding sponge to it and sanded down all of the words and barcodes on the pipe. This can take a little bit, but it makes the blaster look a lot better. If you are having problems with your barrel tilting down, find something that can be a spacer between the main body and the barrel and then glue it to the main body for the barrel to rest on. I have had no problems with my barrel.
This blaster has over 7" of draw and if you do it right, it should have an almost perfect seal. Use your preferred barrel assembly and materials and you will be wreckin' it on the field.
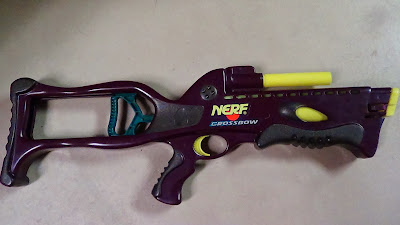
I really like this blaster design because it is very compact and it fires better than any of my other homemades including my rainbowpump.

Writeup posted!

$
0
0
My writeup for my bullpup homemade is posted below my 3d printer post. I kept saving it as a draft and that is why it is behind. Sorry for taking so long with it. I hope to be able to get the writeup on NerfHaven for the contest too.
Viewing all 96 articles
Browse latest View live